项目介绍
面向漏洞分析领域的可私有化部署深度学习模型
项目概述: 本项目提供了一套完整的深度学习模型开发、训练、部署解决方案,专为漏洞分析领域设计,支持私有化部署,有效降低模型训练和使用门槛。
📌 快速访问信息
| 项目 | 信息 |
|---|---|
| 系统访问地址 | http://192.168.10.67:36080 |
| 管理员账户 | admin@163.com |
| 管理员密码 | admin |
| 服务器位置 | /home/kdgc/ |
📂 系统文件结构
/home/kdgc/
├── llm-dataset/                # 本地上传的微调数据集存储位置
│
├── llm-eval/                   # 模型评估结果
│   └── eval-outputs/
│       └── user_name/          # 用户名称
│           └── task_name/      # 评估任务名称
│               └── datetime/   # 训练任务创建时间
│                   ├── config/     # 训练任务配置信息
│                   ├── logs/       # 训练日志信息
│                   ├── predictions/# 模型预测结果
│                   ├── reports/    # 评估报告
│                   └── reviews/    # 评估数据集
│
├── llm-model/                  # 模型存储位置
│   ├── .lock/
│   ├── models_base/            # 基座模型
│   │   ├── .lock/
│   │   ├── lockers/
│   │   └── models/             # 模型位置
│   │       ├── Hcs/            # 科大国创模型
│   │       └── Qwen/           # Qwen 系列模型
│   └── models_train/           # 模型微调
│       └── model-name/         # 模型微调的模型名
│           ├── version-datetime/   # 微调的版本、日期
│           │   ├── val_dataset.jsonl # 模型微调的训练数据集
│           │   ├── logging.jsonl     # 训练日志
│           │   └── args.json         # 训练参数
│           ├── runs/
│           └── images/               # 训练指标图表
│
└── llm-source/
    ├── evalscope/              # EvalScope 评测框架
    ├── ms-swift/               # Swift 微调框架
    ├── source/
    ├── vllm/                   # vLLM 推理框架
    └── xychat-ragflow/         # 源码框架
🔧 核心框架说明
| 框架 | 说明 |
|---|---|
| ms-swift | 一站式大模型与多模态大模型微调、推理、部署框架 |
| vLLM | 高吞吐量、高内存效率的大语言模型推理和服务引擎 |
| EvalScope | 自动化模型评测框架,专注于大模型和多模态模型的能力评估 |
🎯 项目启动指南
后端服务管理
查看自启动服务状态:
sudo systemctl status backend.service
状态说明:
Active: active (exited)→ 服务已执行Active: inactive (dead)→ 服务已关闭
开启自启动服务:
sudo systemctl enable backend.service
sudo systemctl start backend.service
关闭自启动服务:
sudo systemctl disable backend.service
手动启停后端(不关闭自启动):
# 查看 tmux 会话
tmux ls

# 接入 ragflow 会话
tmux a -t ragflow

# 关闭后端 (Ctrl+C)
Ctrl+C

# 重新启动后端
cd /home/kdgc/llm-source/xychat-ragflow
./start_backend.sh
前端服务管理
启用/禁用开机自启:
# 启用自启动
sudo systemctl enable nginx

# 禁用自启动
sudo systemctl disable nginx
手动启停服务:
# 启动前端
sudo systemctl start nginx

# 停止前端
sudo systemctl stop nginx
🚀 系统快速使用指南
一、使用准备
1. 登录与注册
- 访问地址: http://192.168.10.67:36080
- 首次使用: 点击页面中的"注册"按钮,输入邮箱、用户名及密码,点击"继续"完成账号注册
2. 模型部署
- 登录后进入微调评估界面
- 查看模型部署界面(系统已预设 XingYun-Vul-72B 和 XingYun-72B 模型部署参数)
- 点击部署模型按钮完成部署(再次点击可停止部署释放资源)
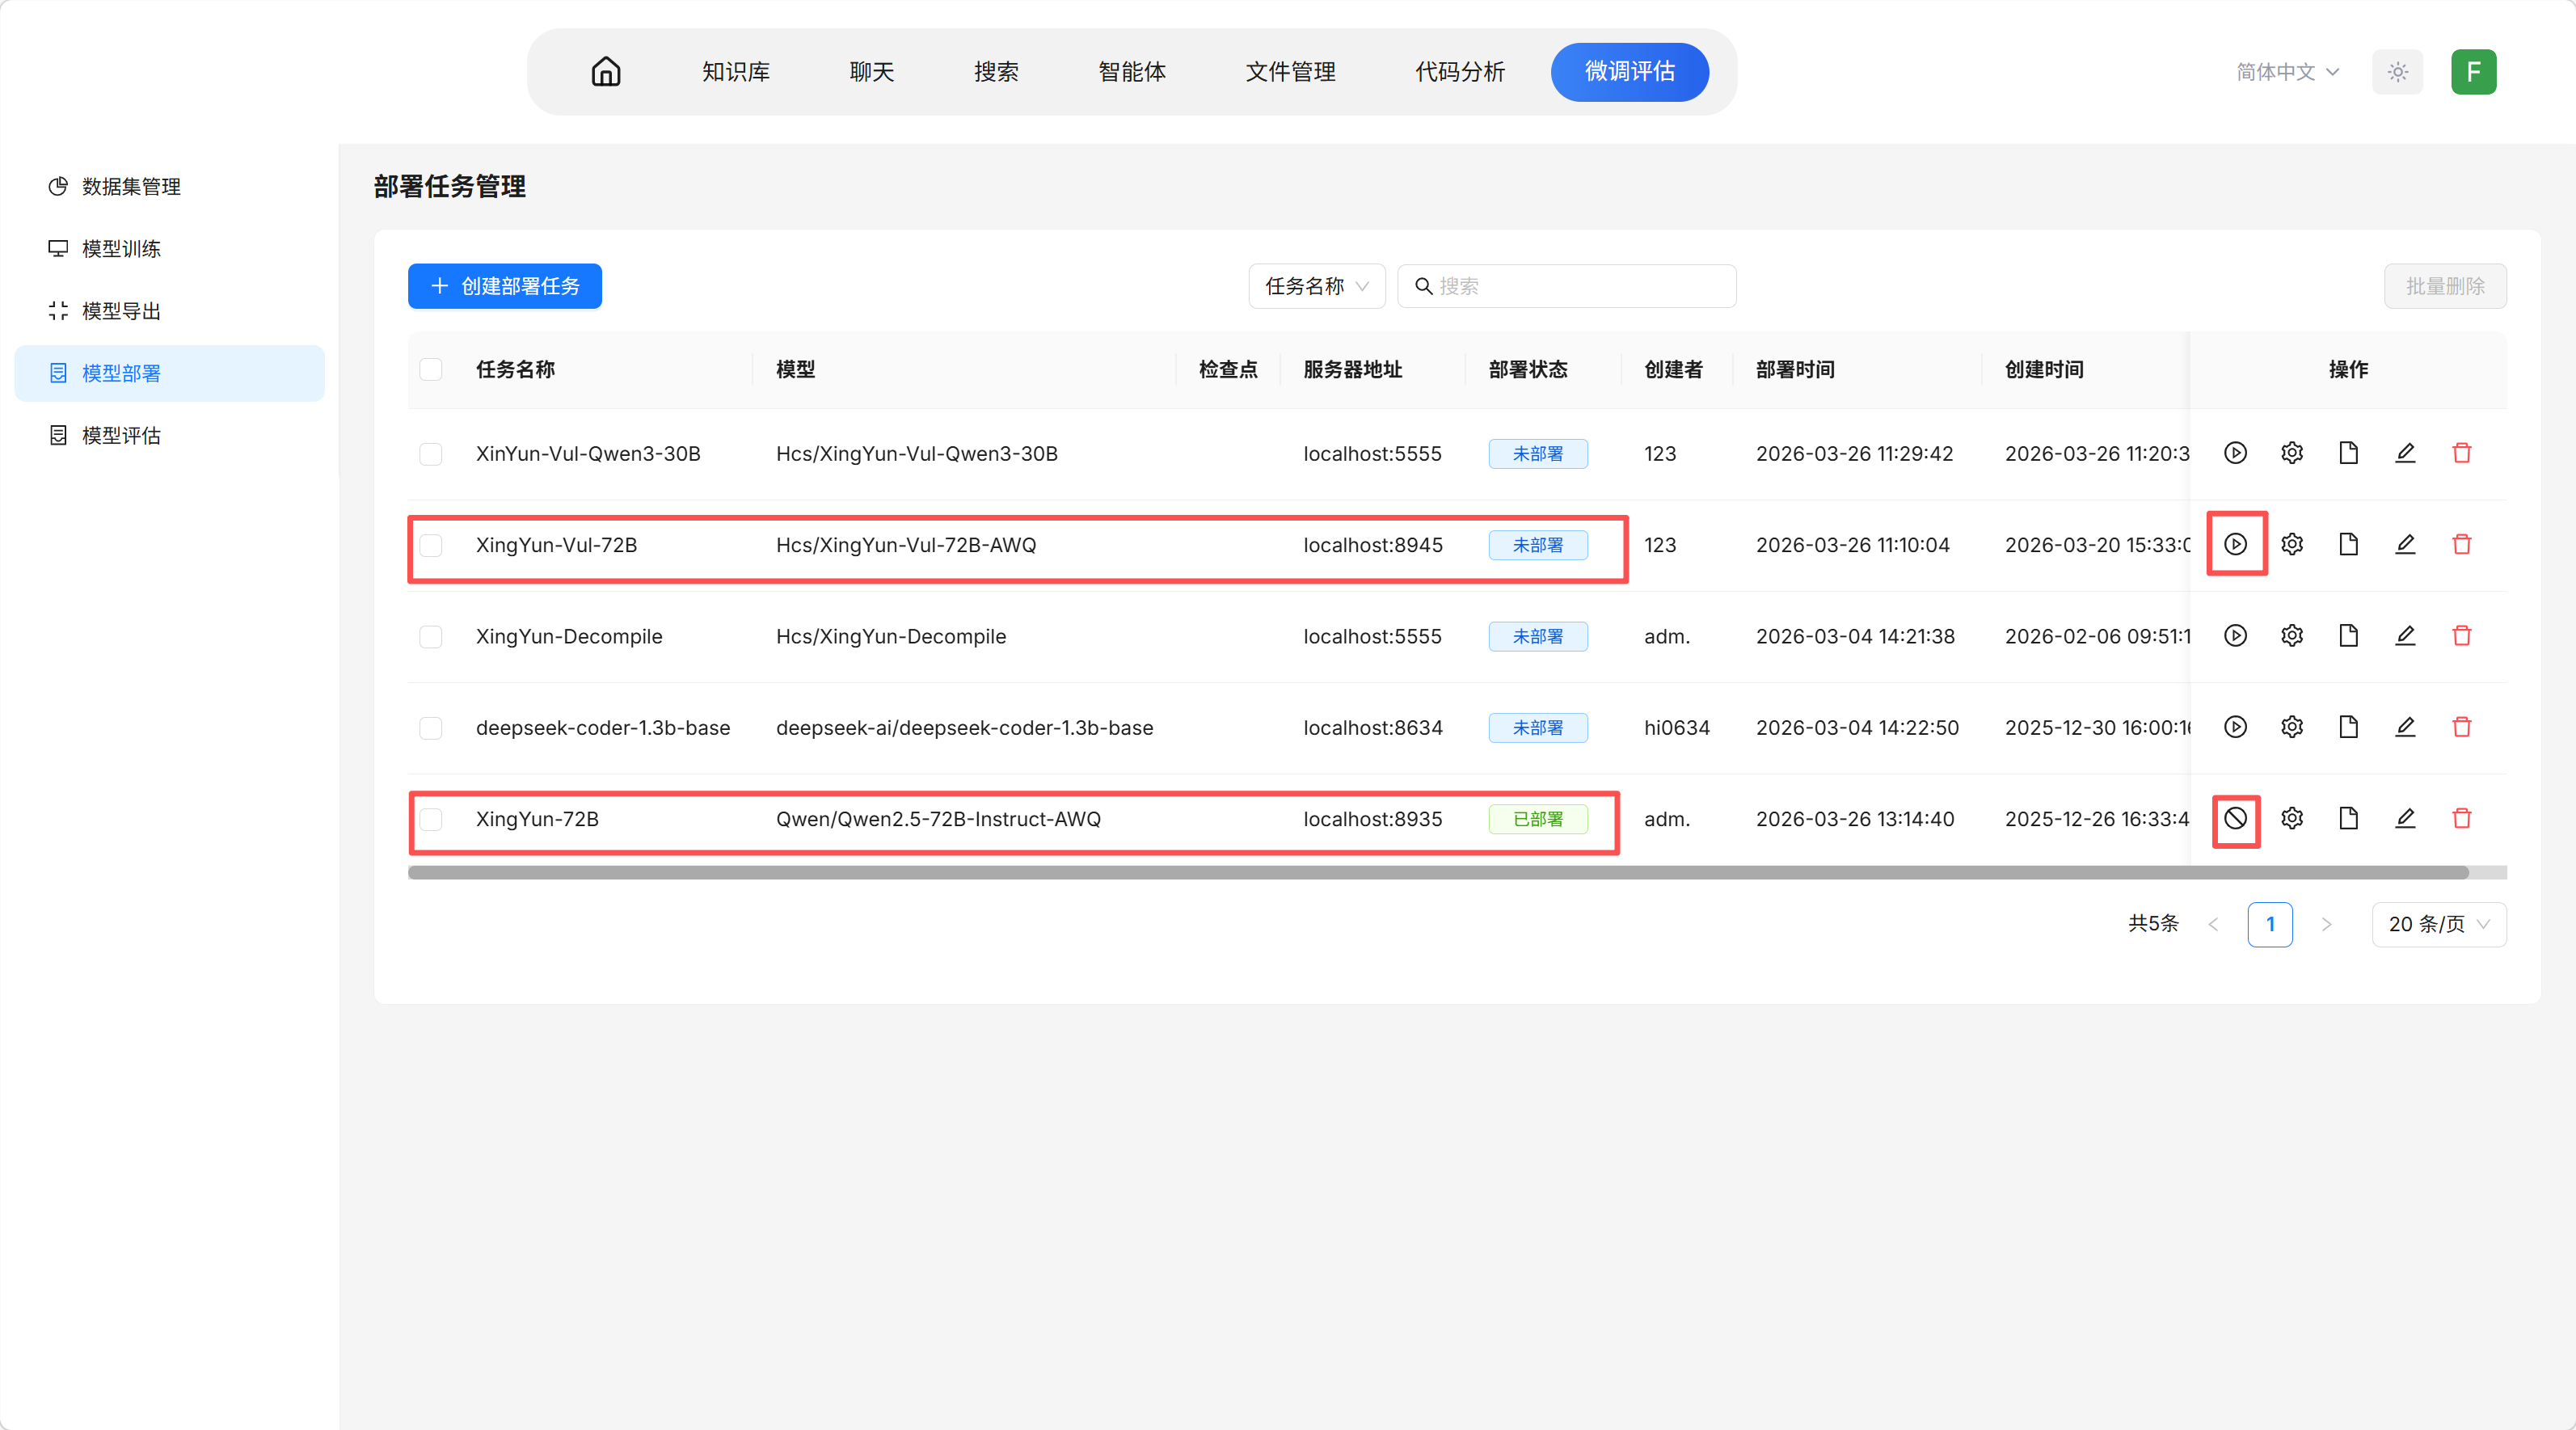
注意事项:
- XingYun-Vul-72B 和 XingYun-72B 模型部署参数未做鉴权设置
- 若因显卡占用导致部署失败,需在部署参数的资源设置中重新配置空闲显卡(可联系服务器管理员确认显卡使用情况)
3. 系统模型配置
部署的模型需配置后才能使用:
- 点击右上角账户头像进入系统概要页面
- 点击左侧菜单模型提供商进行模型配置
- 找到 vLLM 模型,点击添加模型
- 填写模型信息:
- 模型类型: 选择
chat - 模型名称: 根据部署的模型名称输入
- 基础 URL:
http://localhost:{部署端口号}/v1或http://192.168.10.67:{部署端口号}/v1 - API-Key: 根据部署时是否设置填写(未设置则留空)
- 最大 token 数: 根据需求设置
- 模型类型: 选择

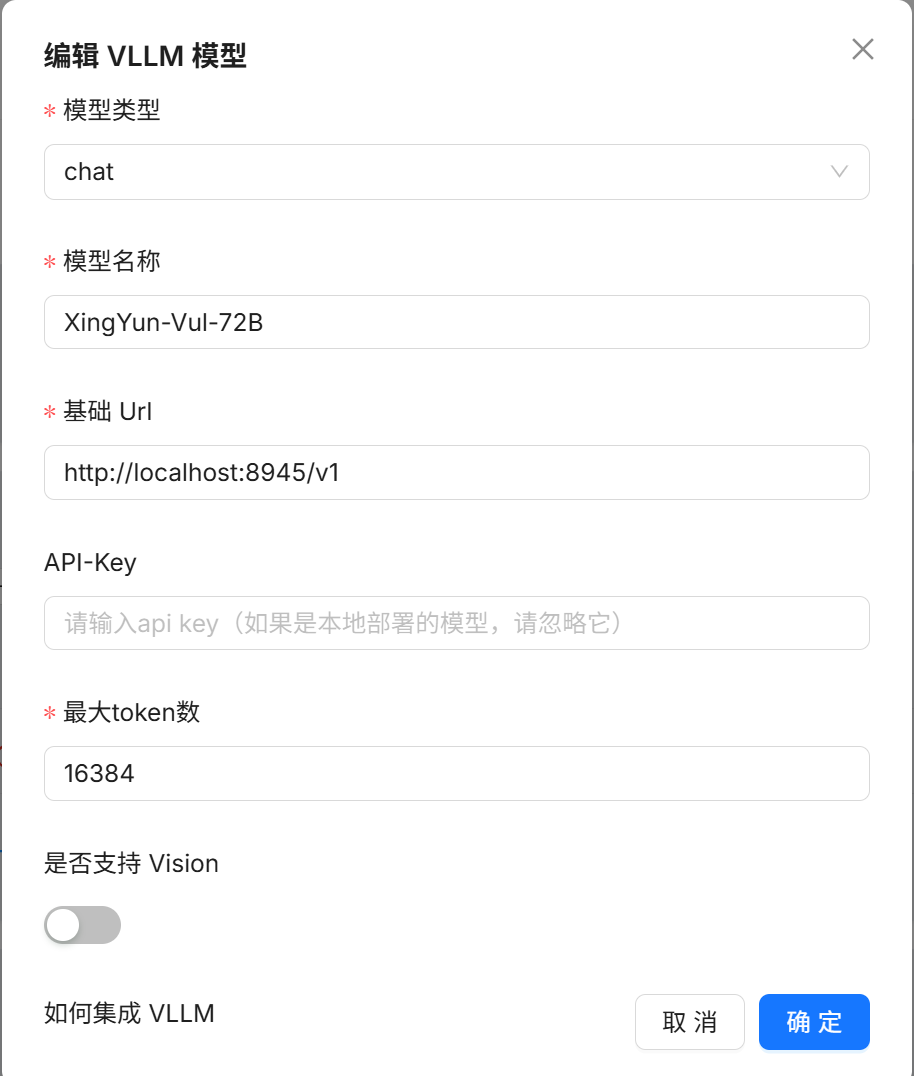
- 点击设置默认模型,选择聊天模型并确定
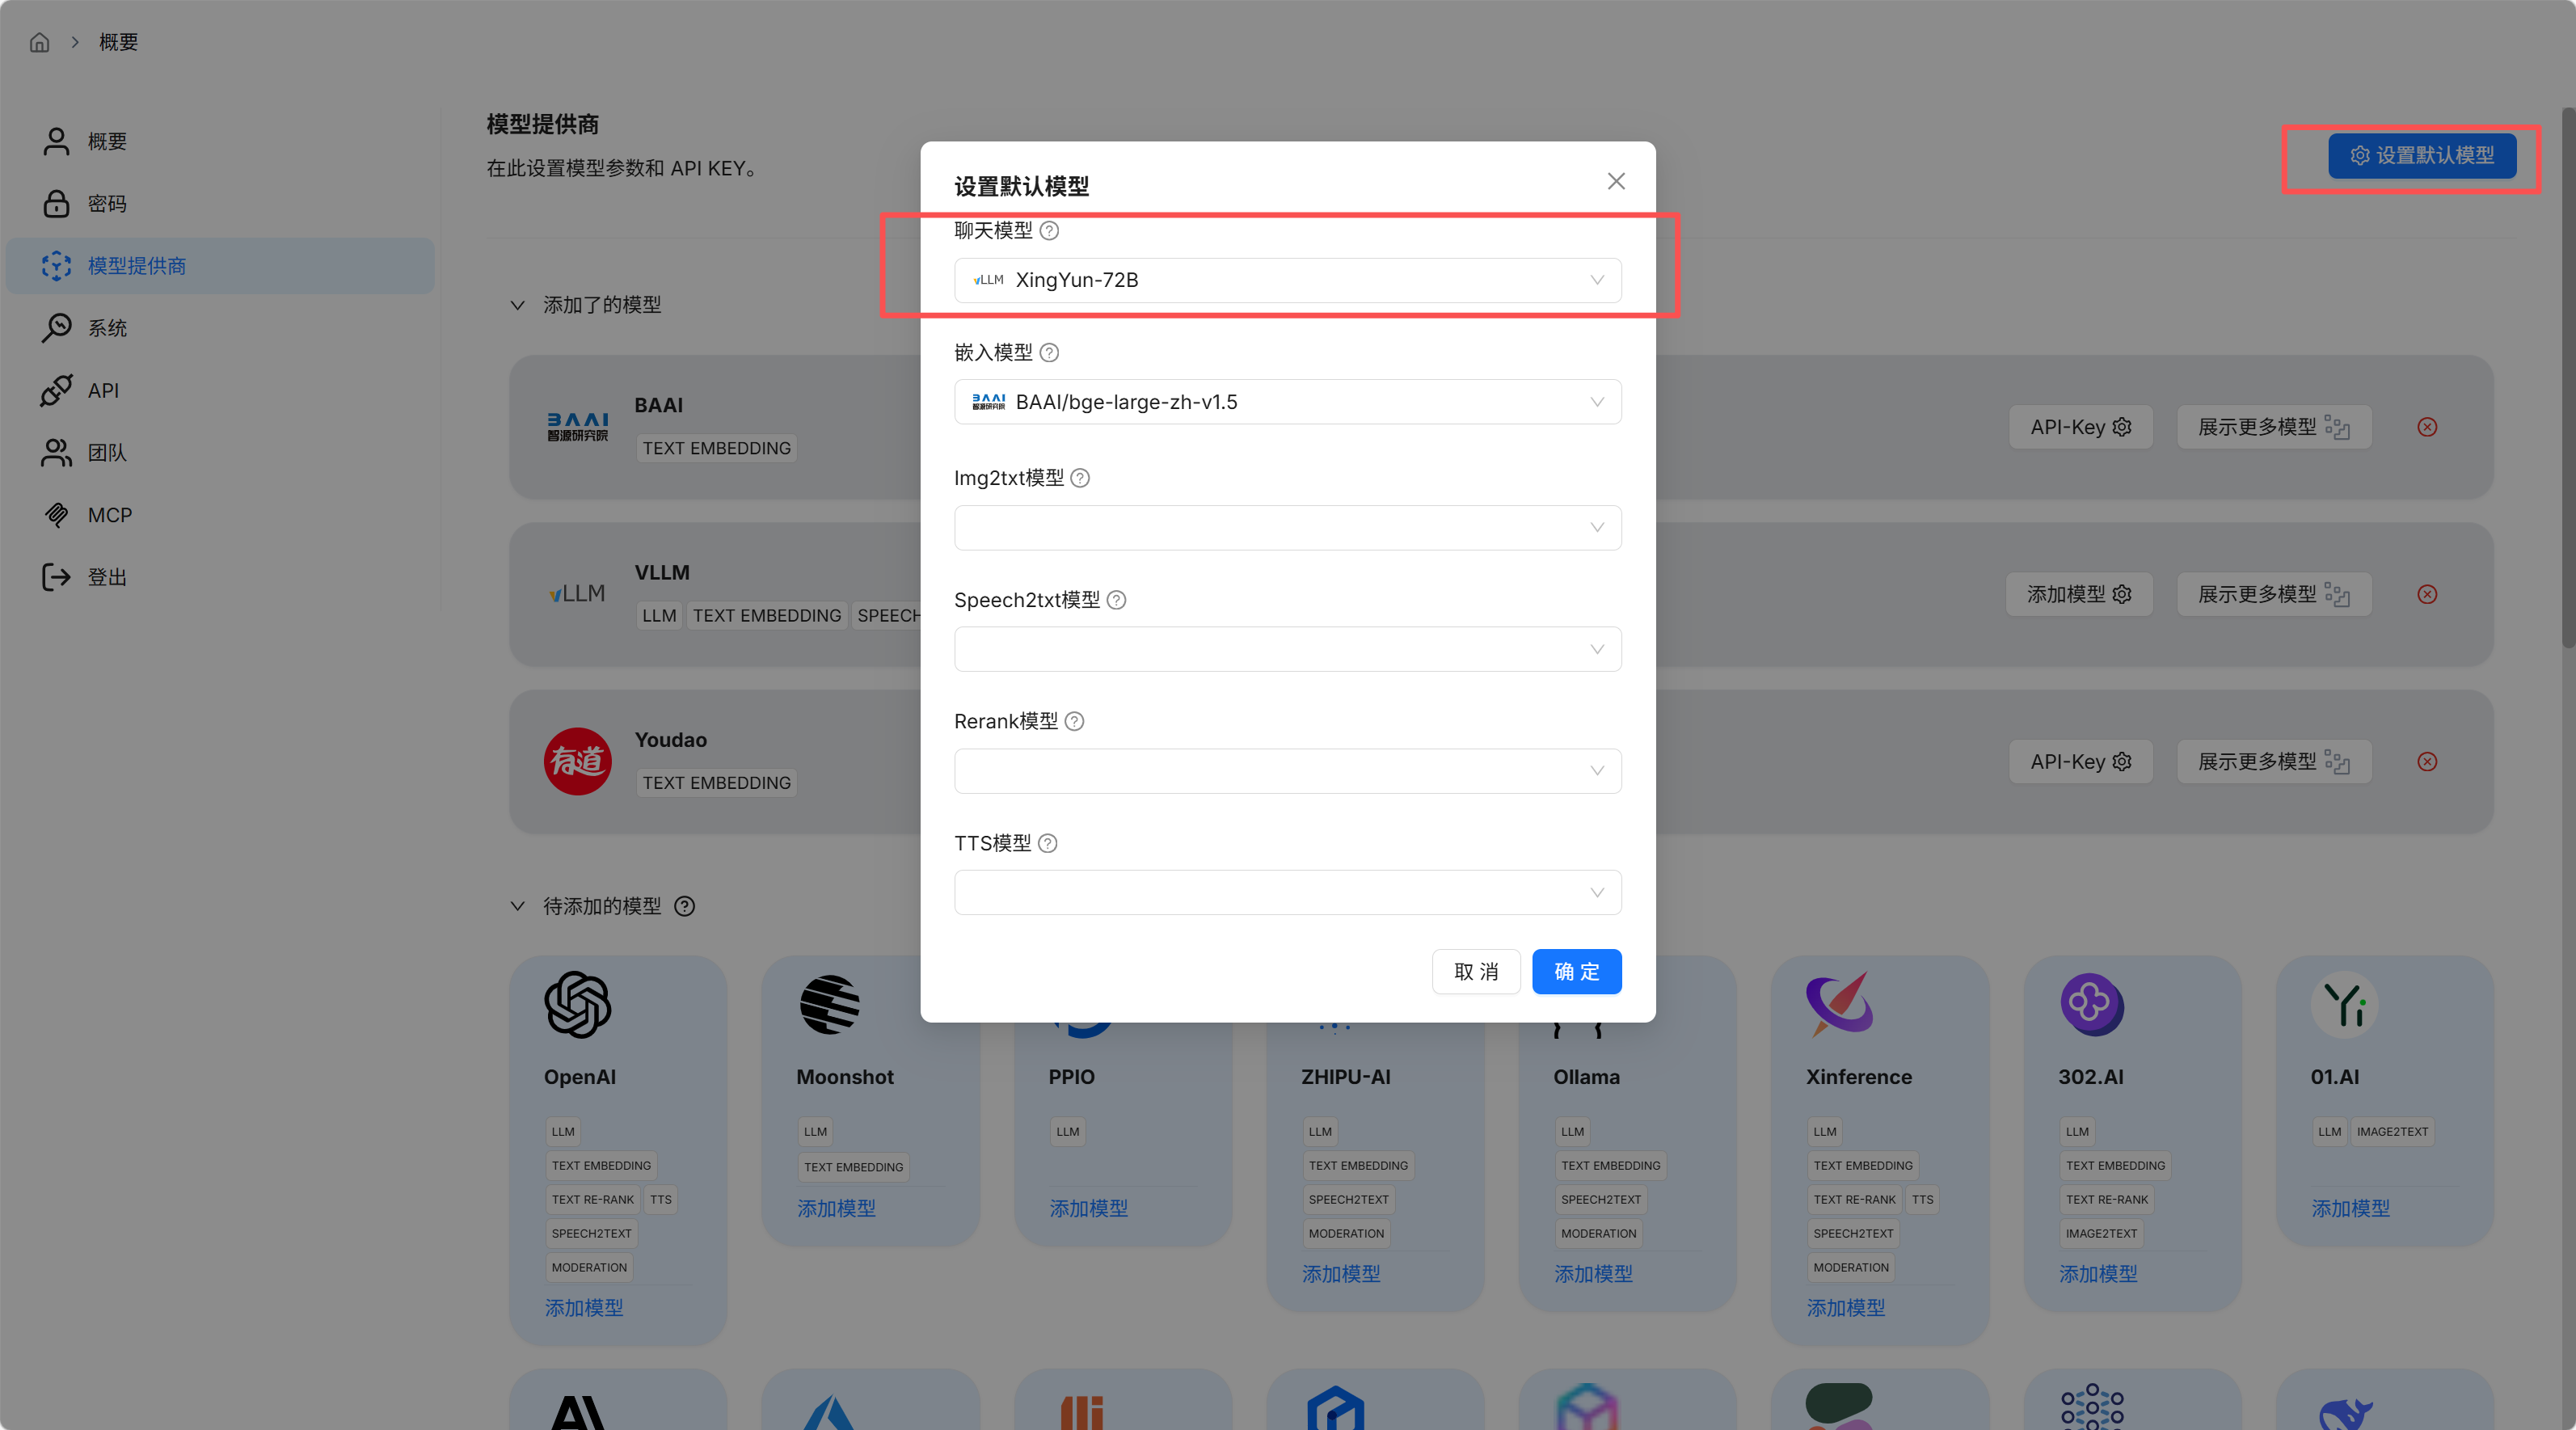
💡 用户也可配置其他供应商的模型,找到对应产品并填写所需参数即可
二、核心功能使用
1. 📚 知识库管理
路径: 主页面 → 知识库
- 系统已内置一个漏洞领域知识库(普通用户可使用)
- 支持创建个人知识库
创建步骤:
- 点击创建知识库按钮
- 填写知识库名称和嵌入模型
- 选择系统内置切片方法,点击保存
- 上传文件并点击解析按钮完成解析
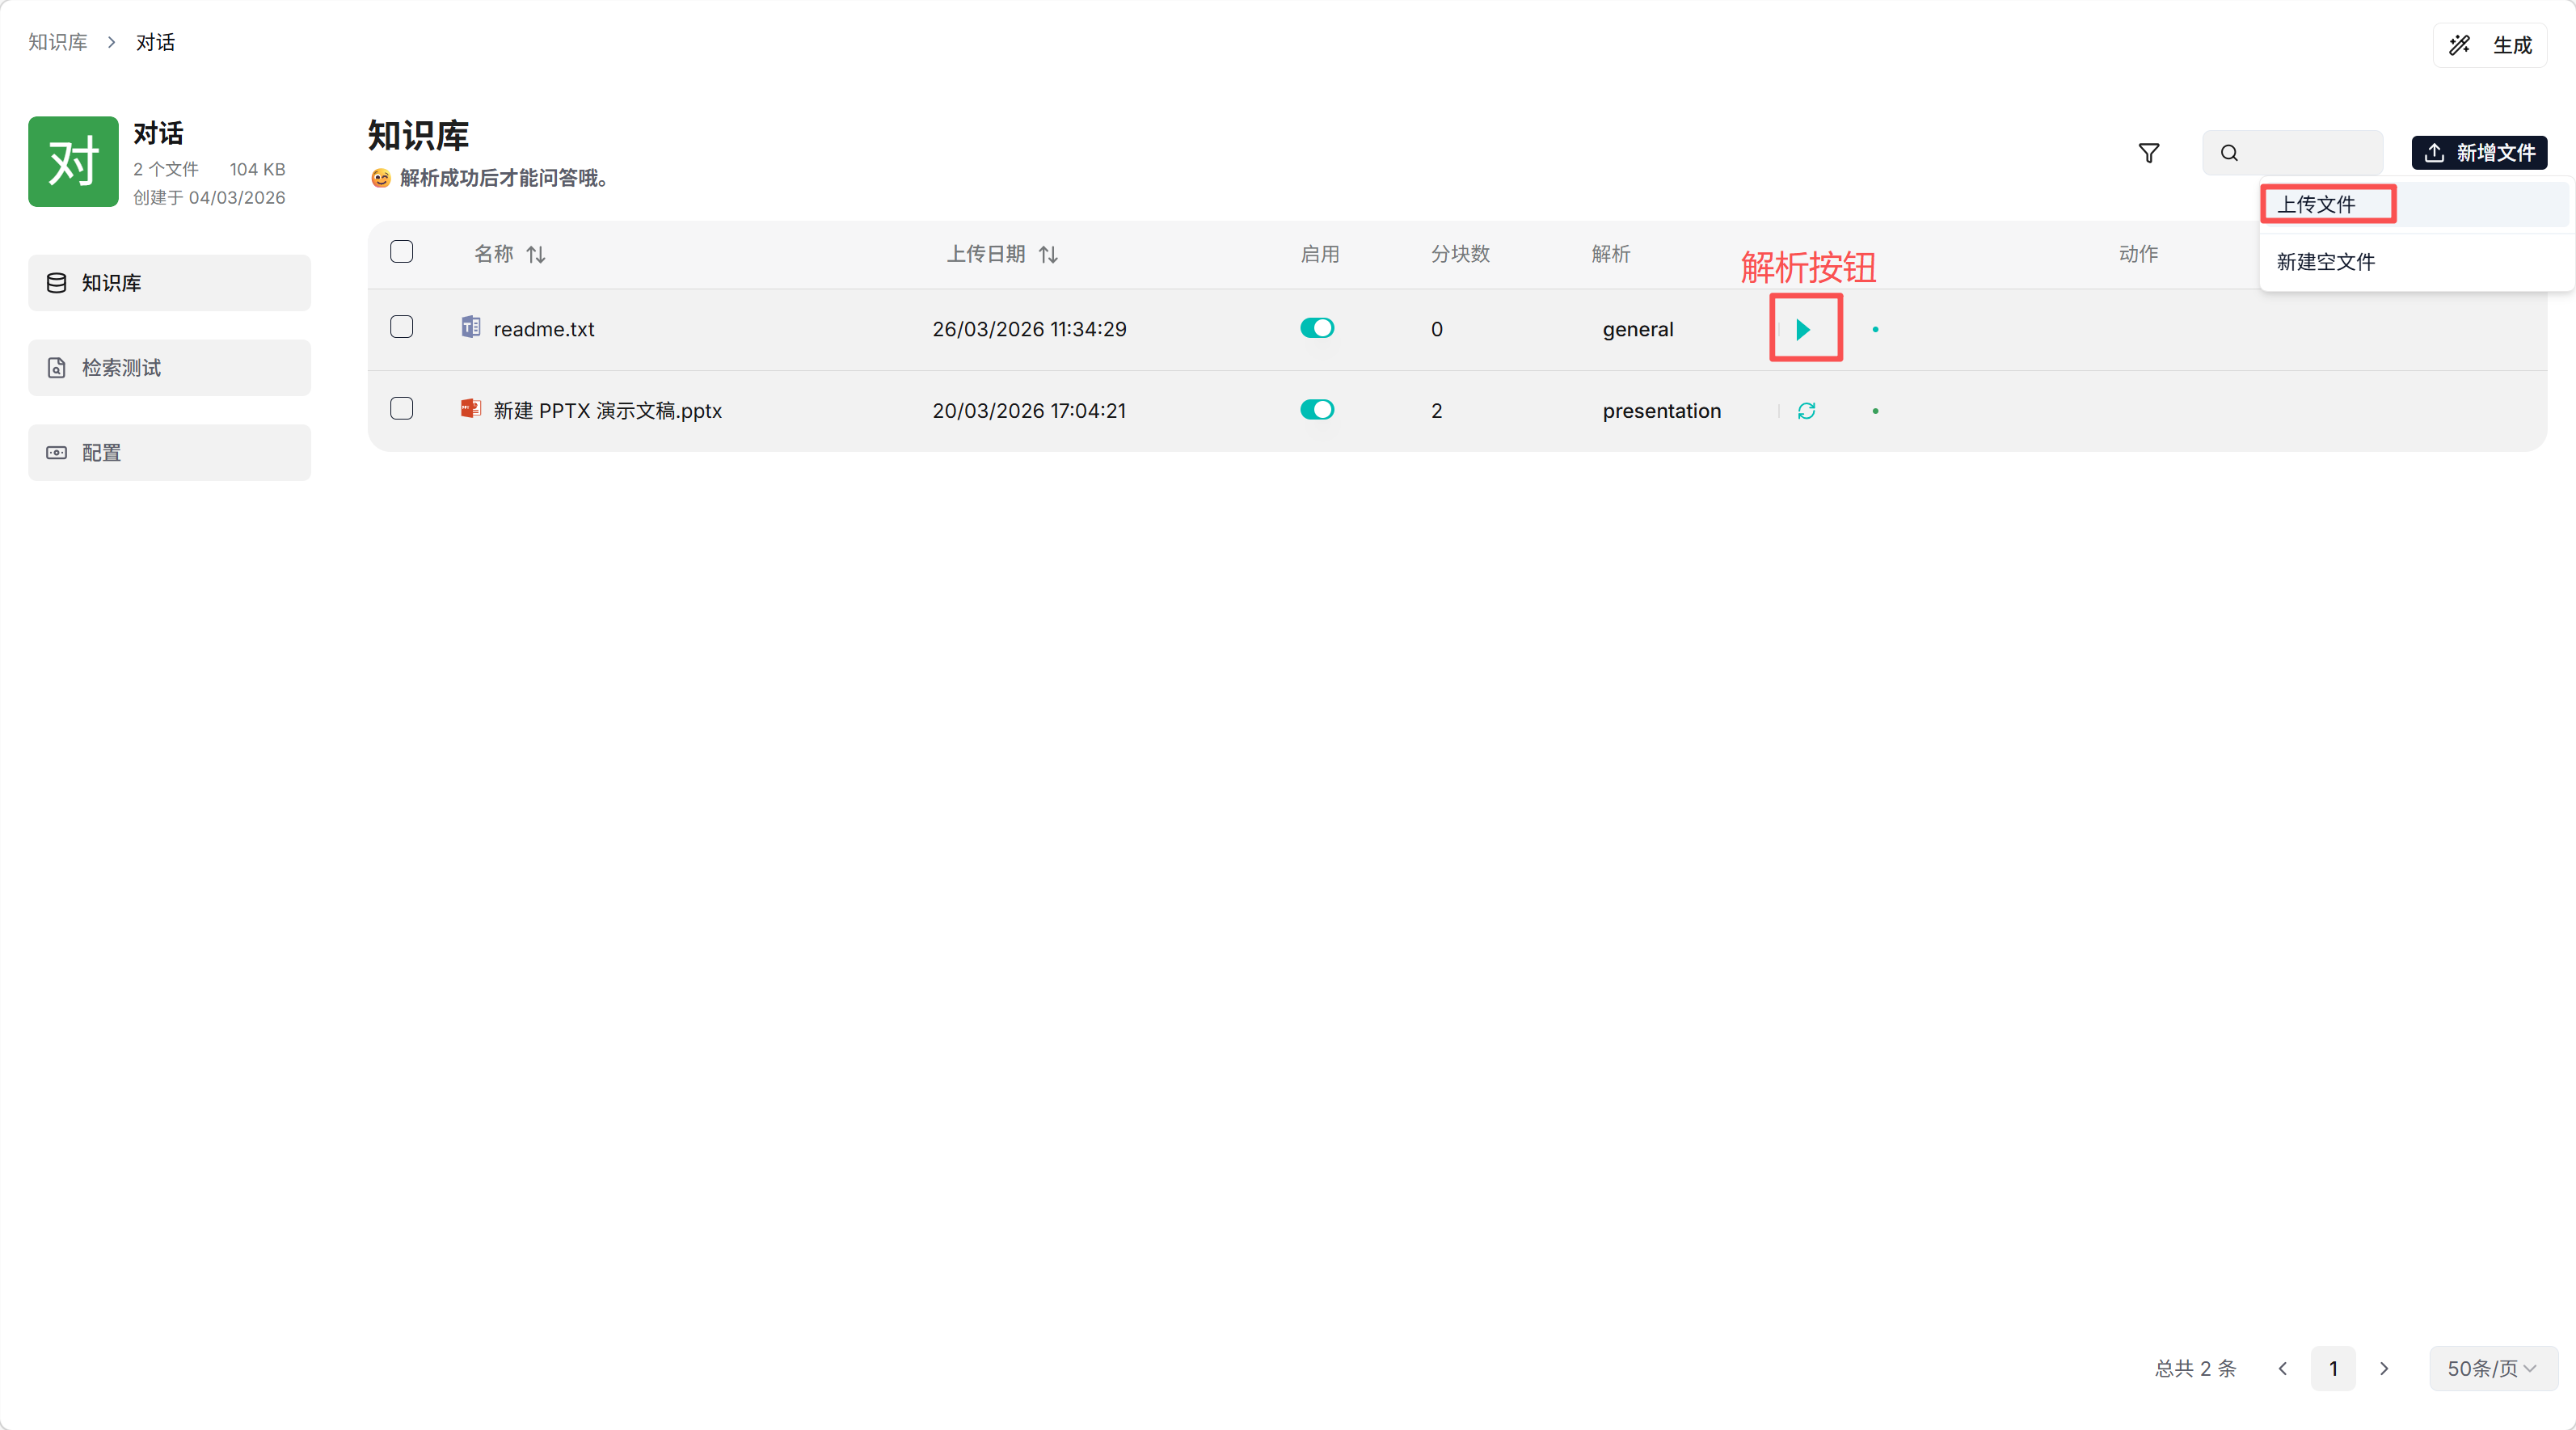
⚠️ 文件需解析完成后才能具备对应知识
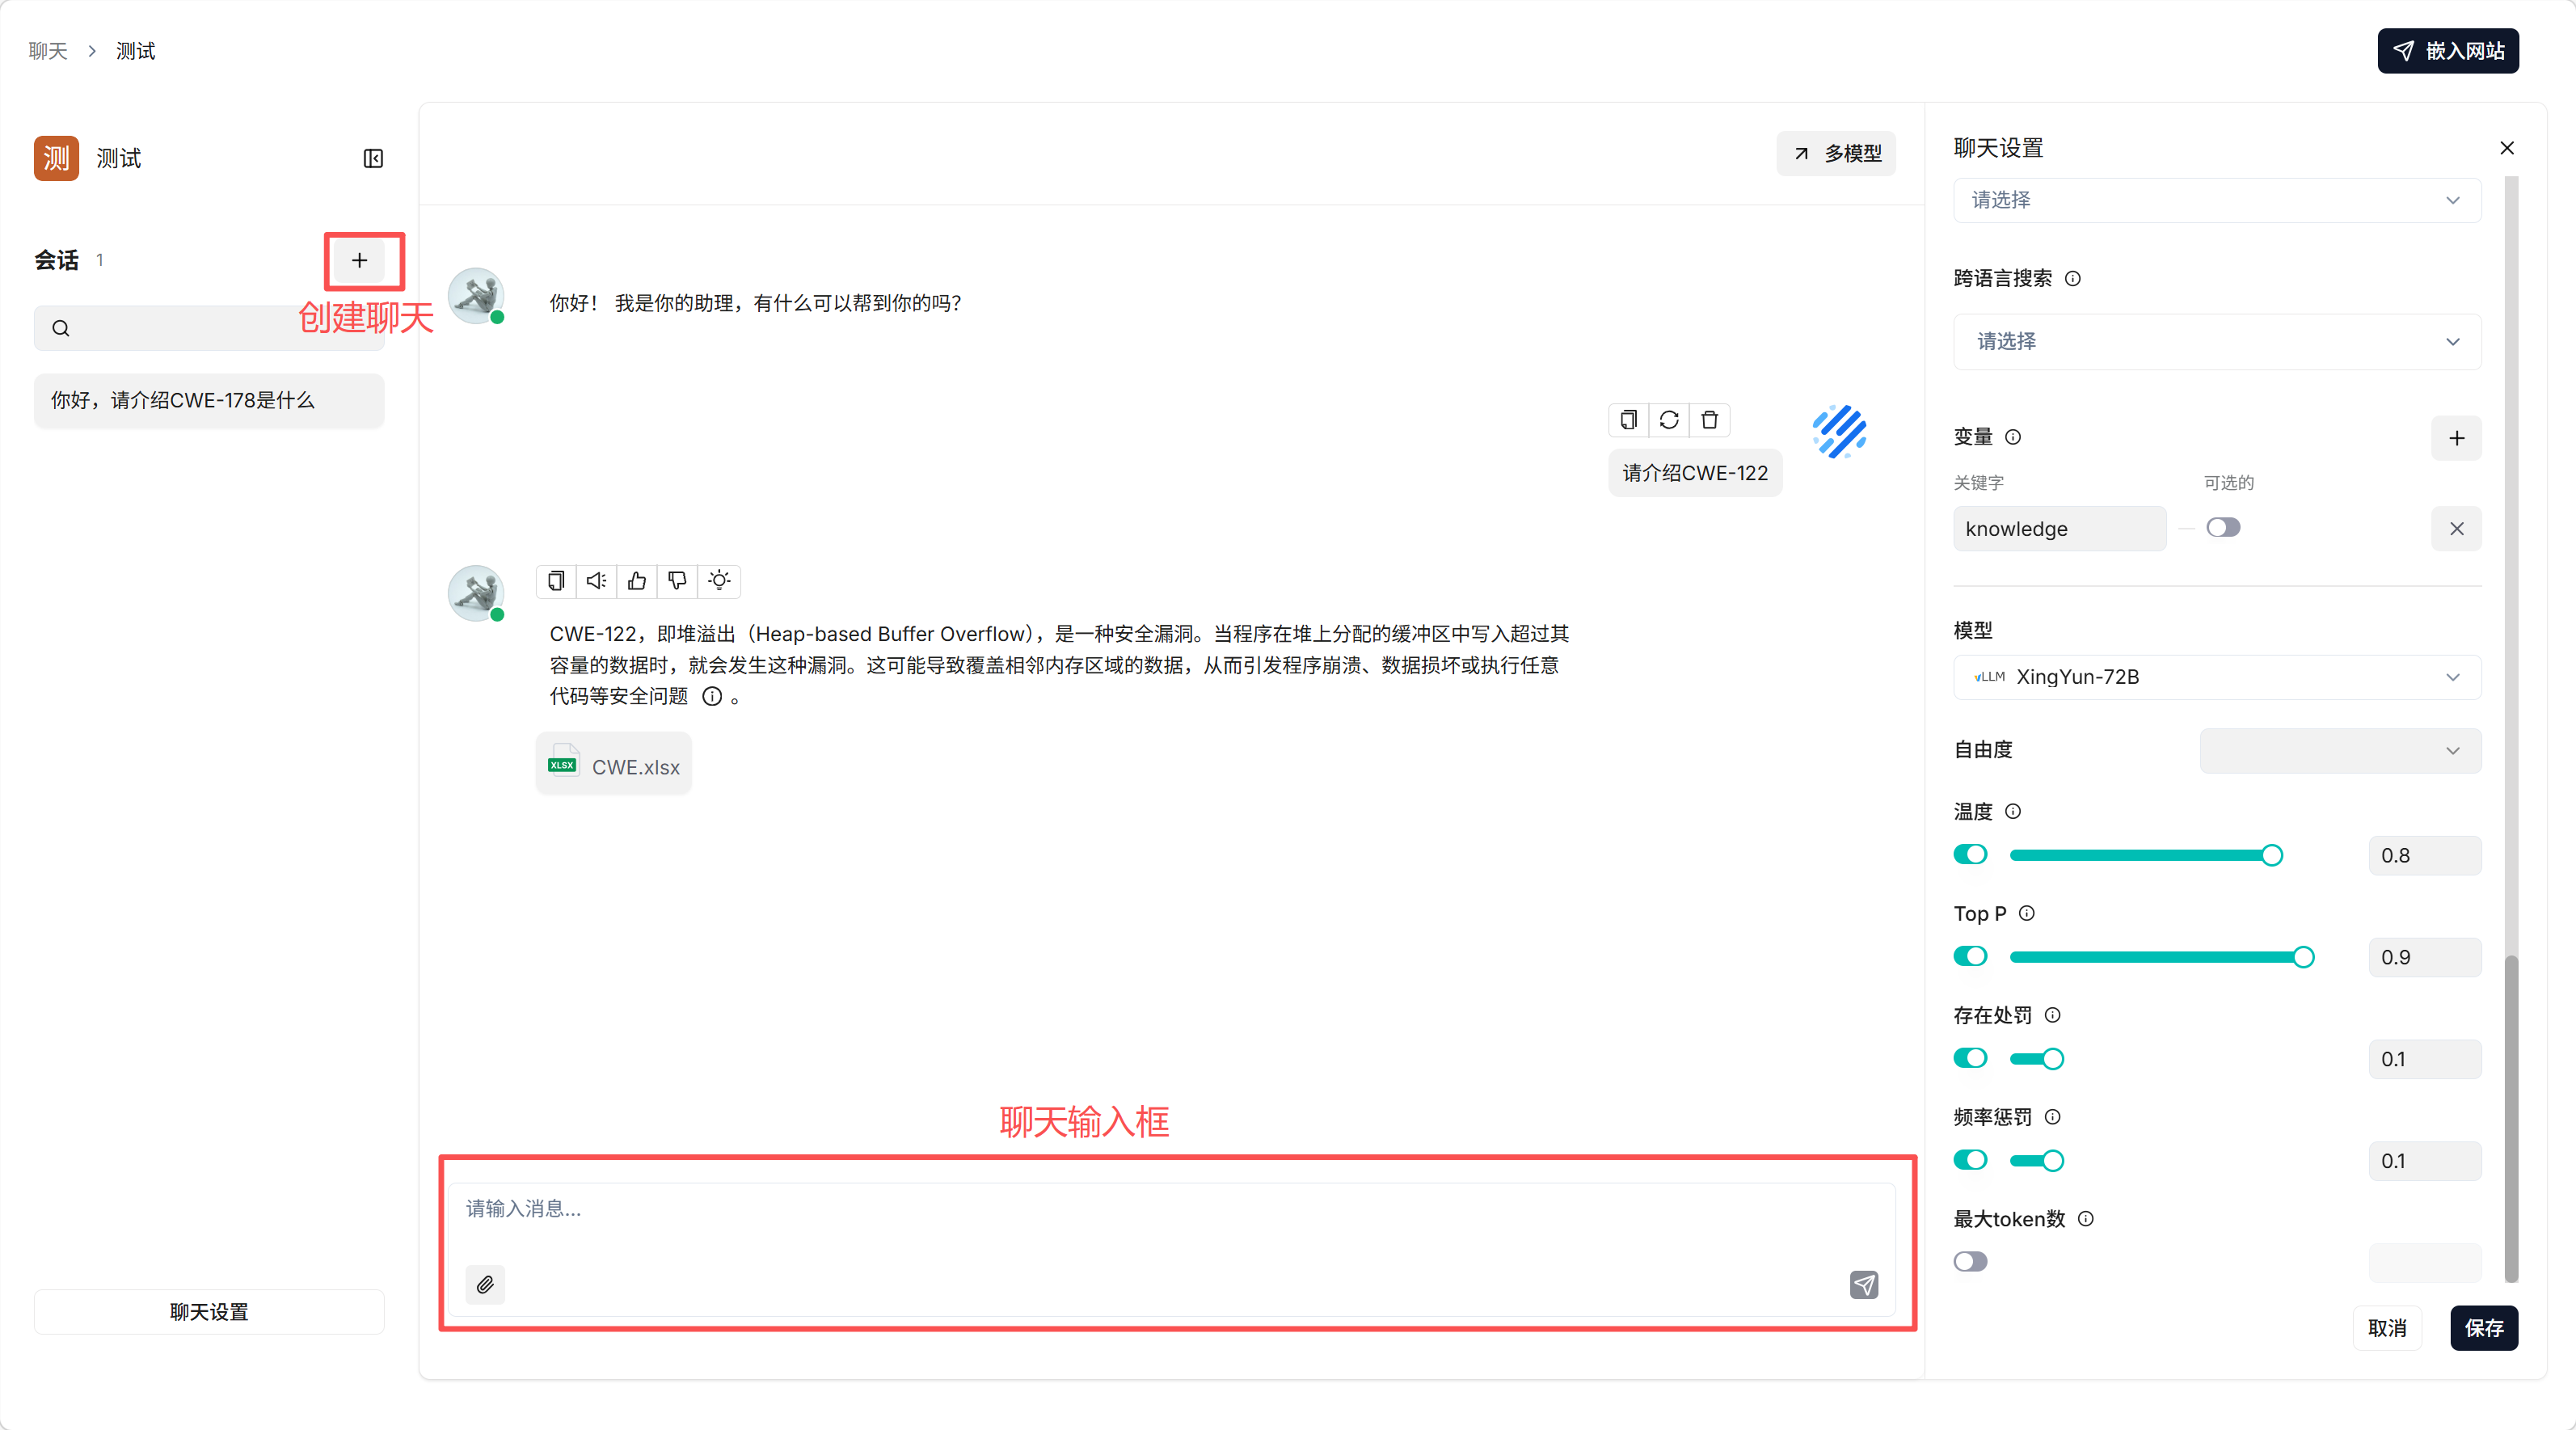
2. 💬 聊天功能
路径: 主页面 → 聊天
创建聊天:
- 点击创建聊天按钮
- 填写聊天任务名称,点击保存
基础设置:
- 知识库设置: 添加知识库索引(若不需要,需删除系统提示词中的
{knowledge}及变量) - 模型设置: 选择聊天模型,设置温度值
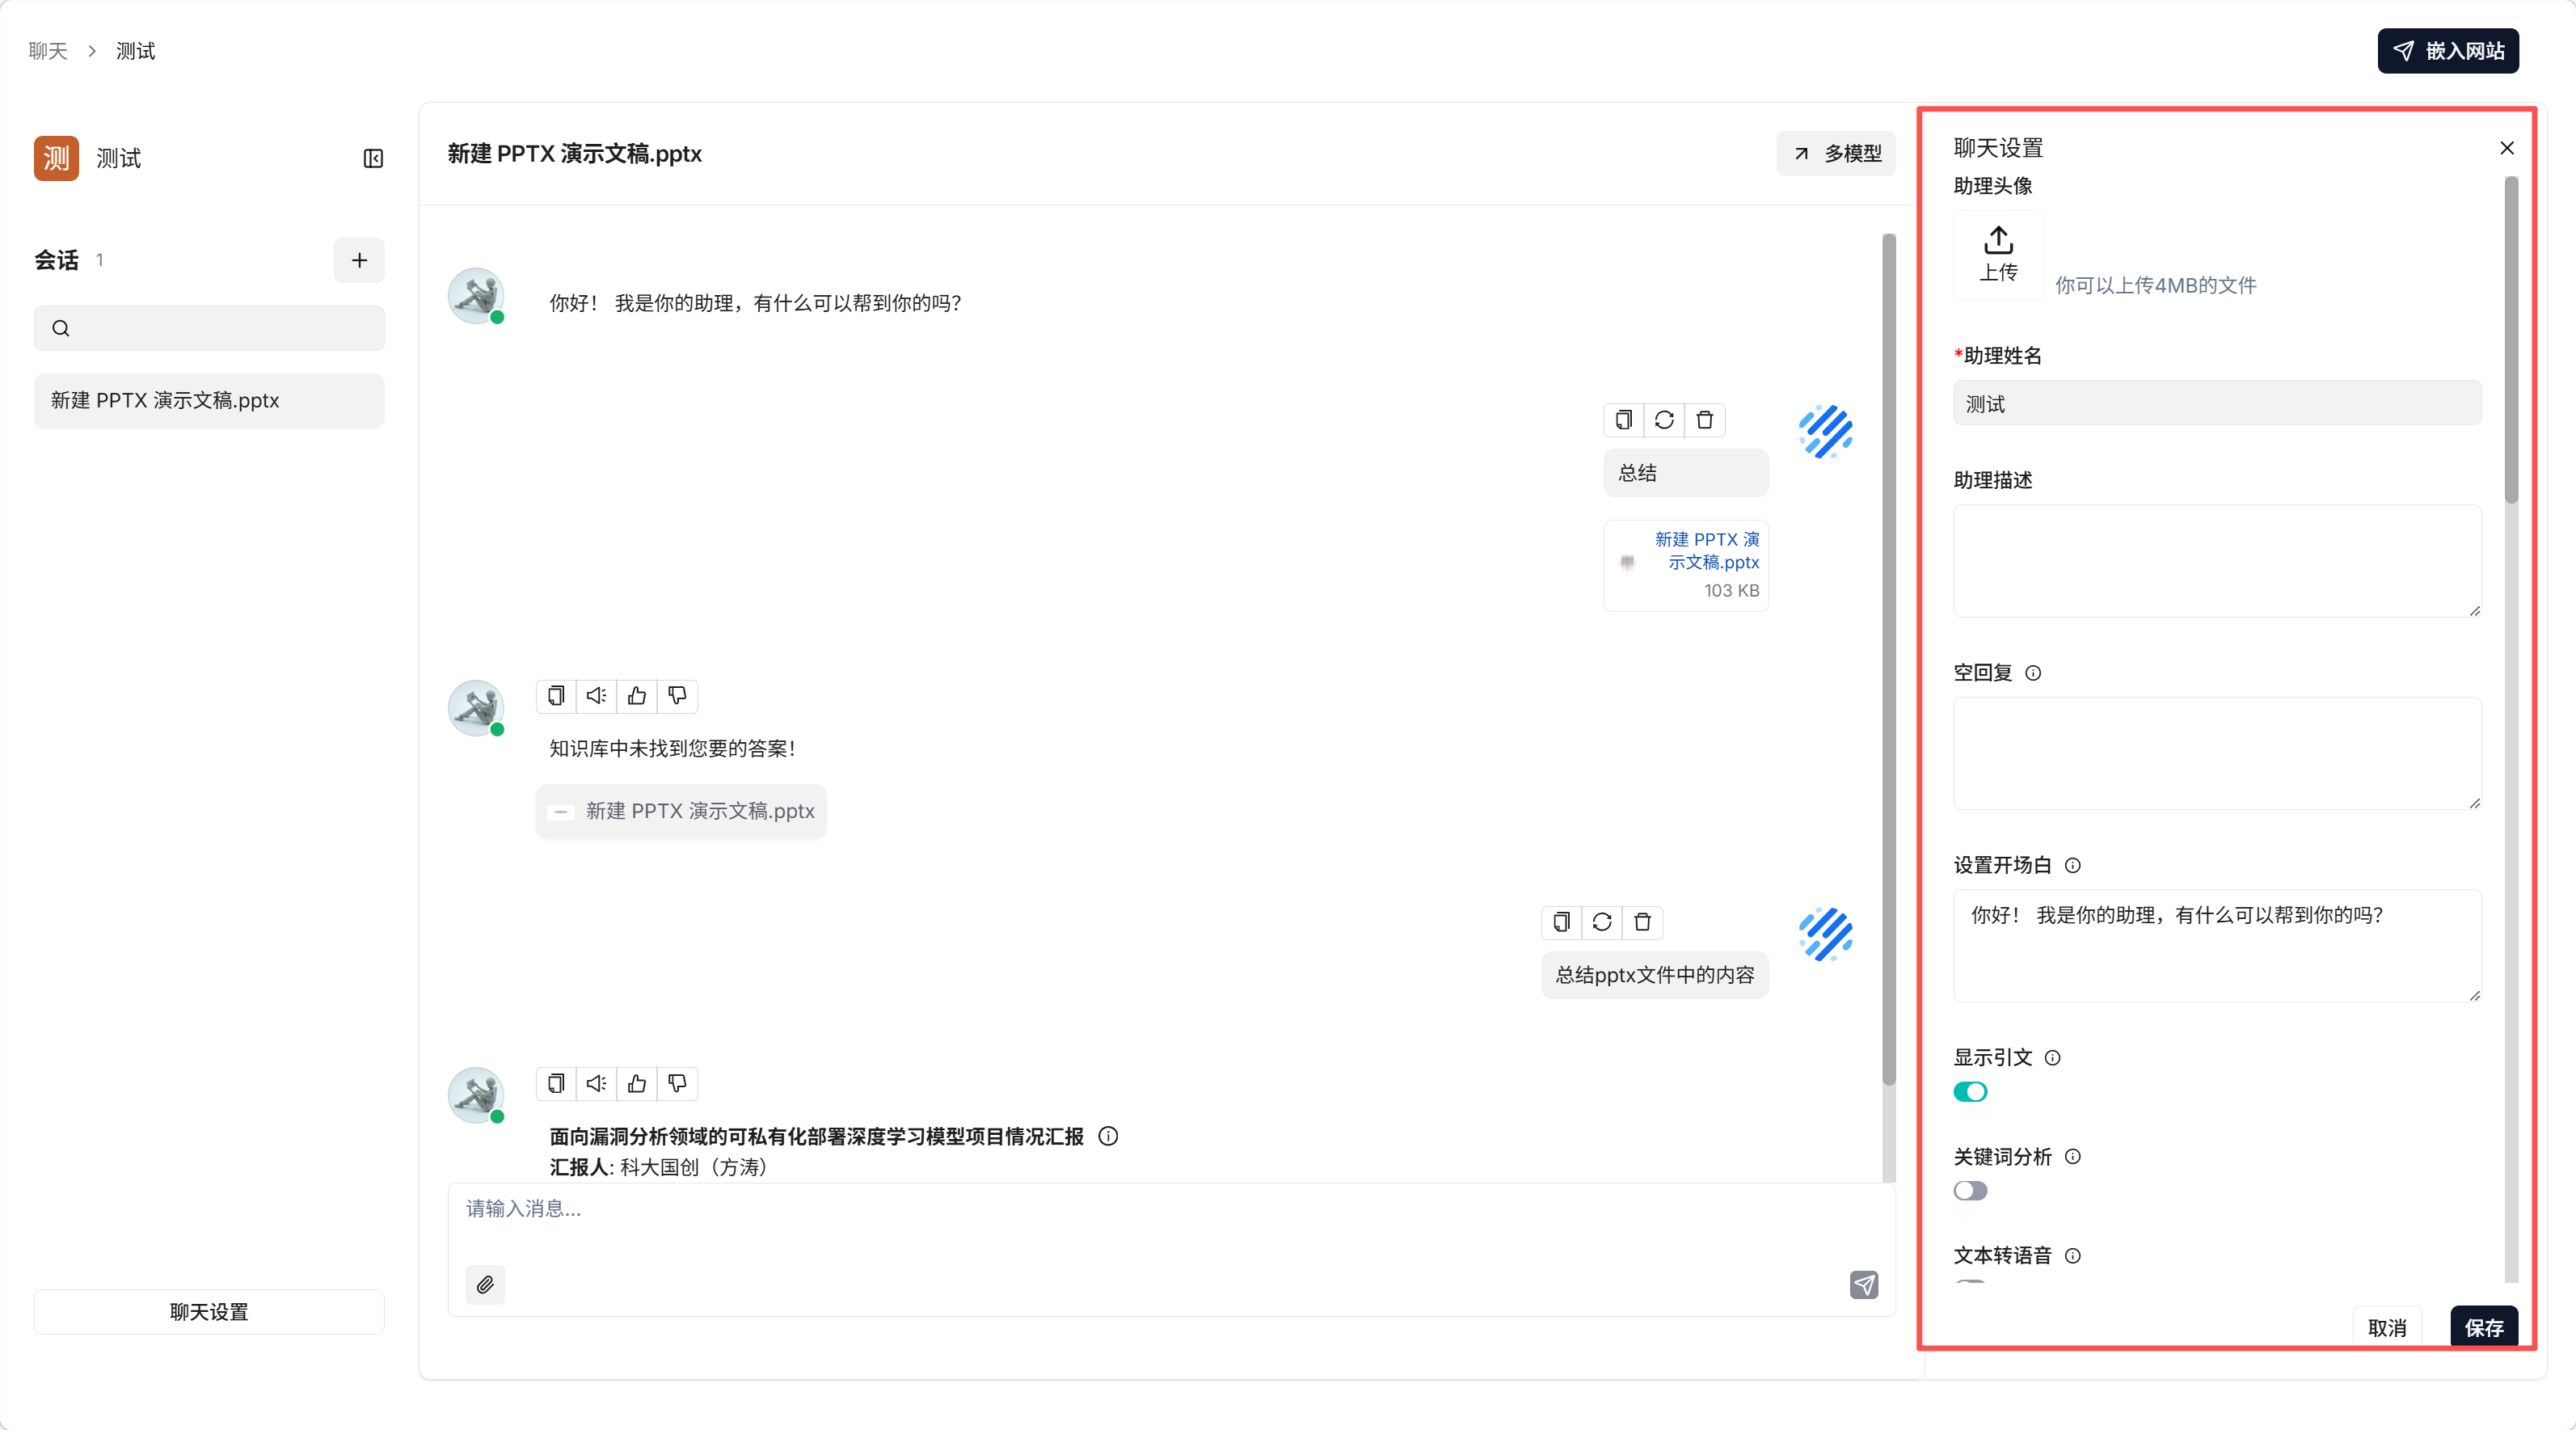
开始对话: 点击左侧"+"按钮创建聊天会话
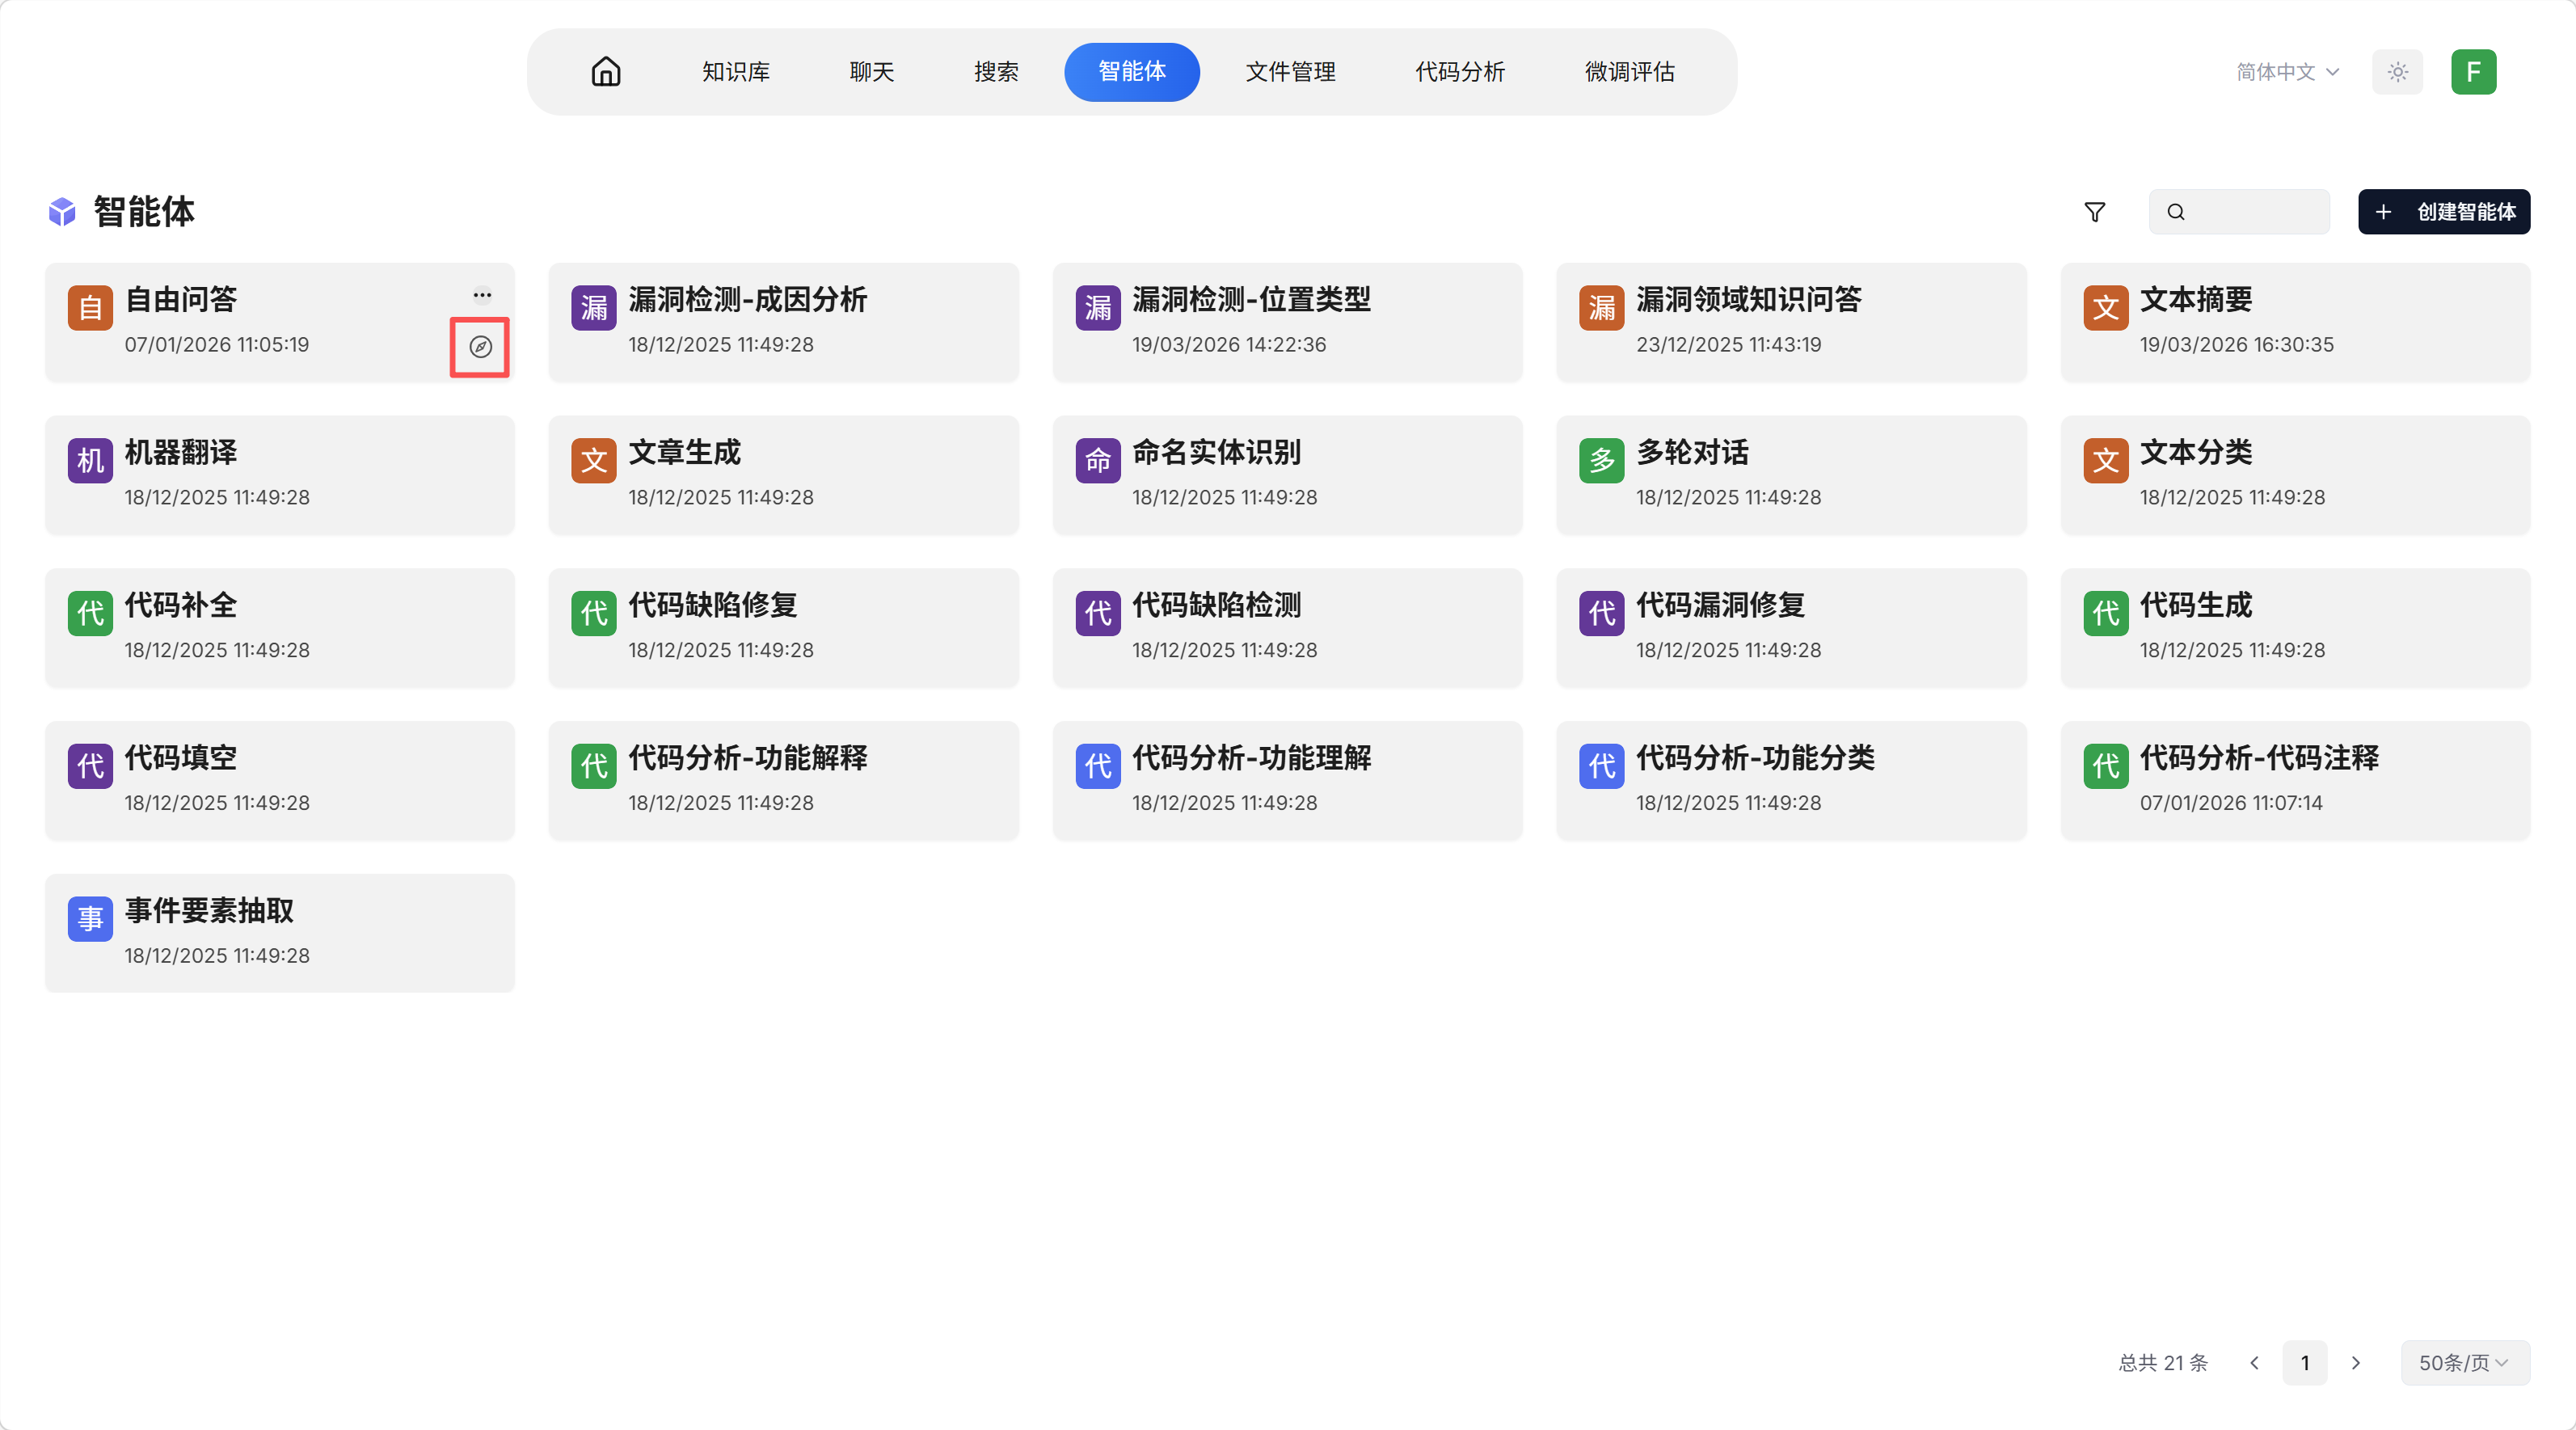
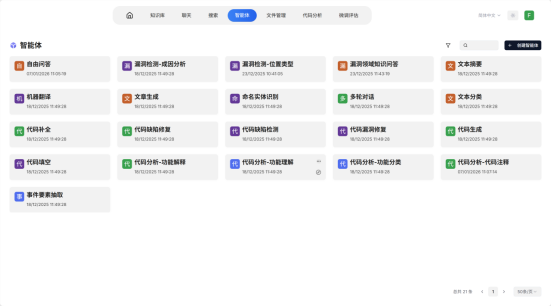
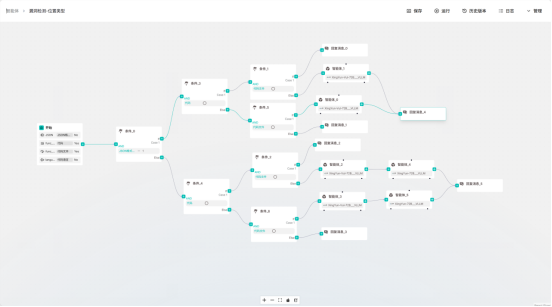
3. 🤖 智能体聊天
前置条件: 部署并配置 XingYun-Vul-72B 和 XingYun-72B 模型
路径: 主页面 → 智能体 → 点击对应智能体名称右下角按钮进入
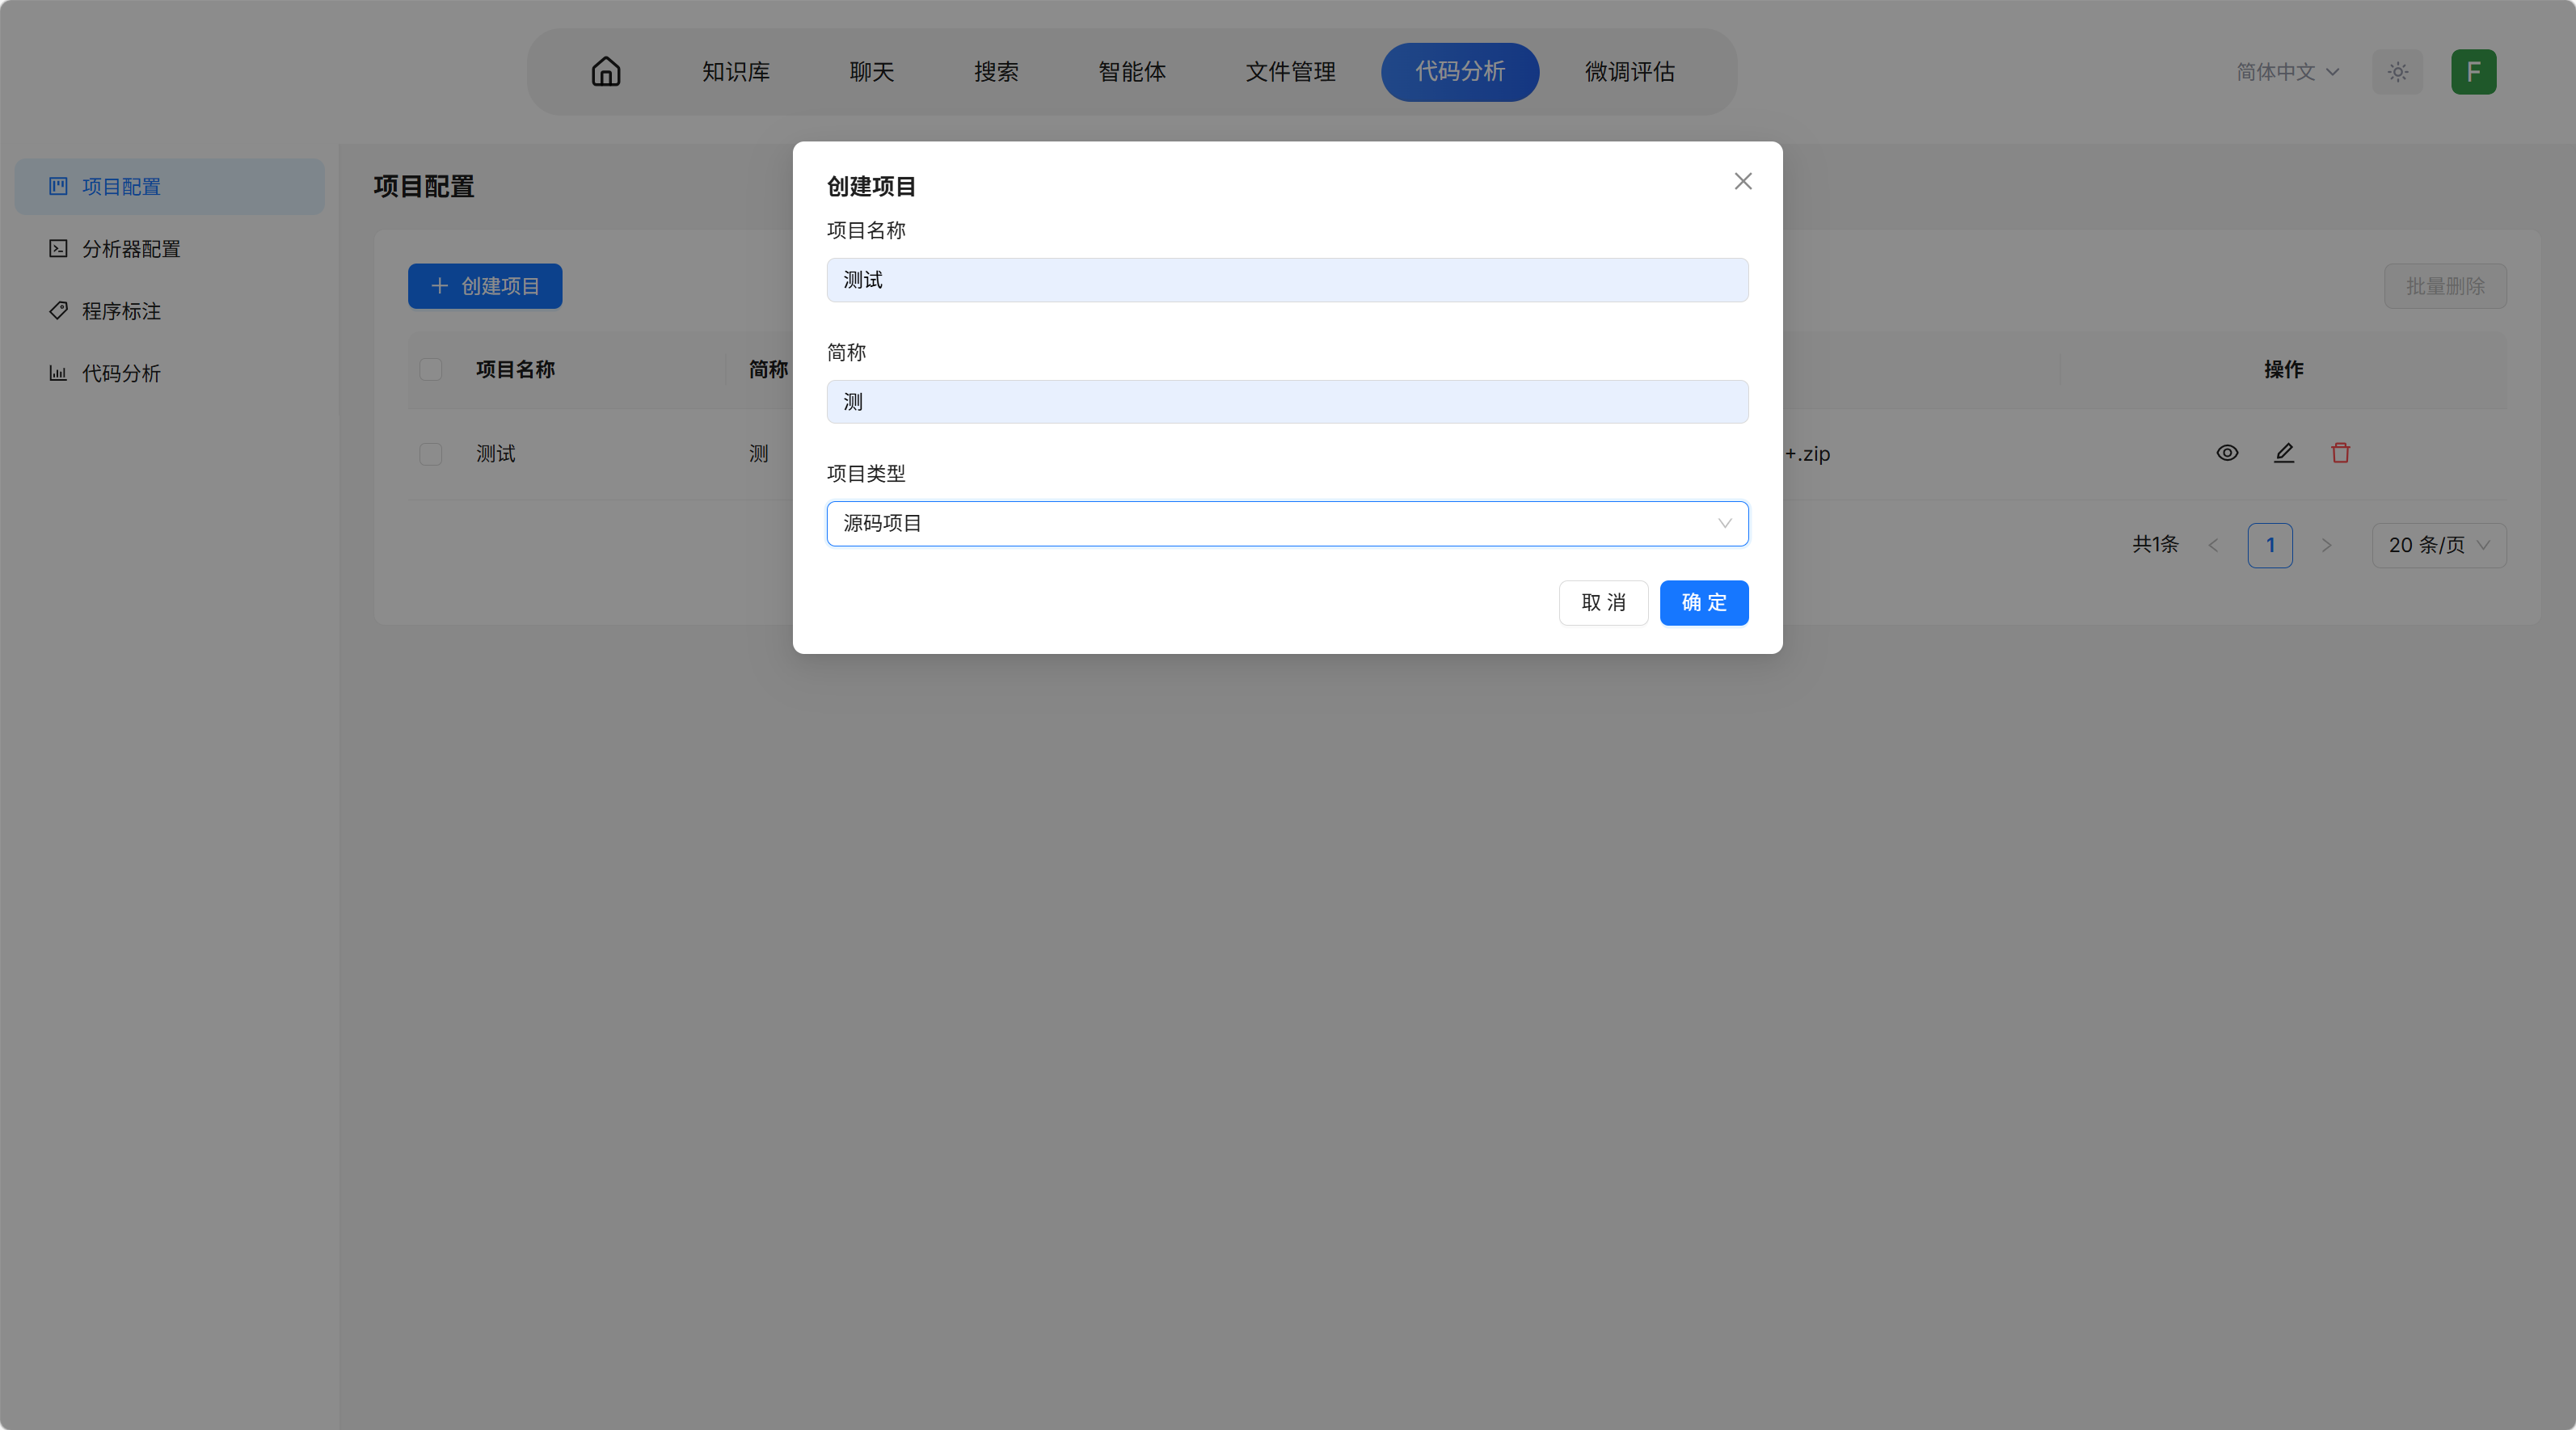
4. 🔍 代码分析
路径: 主页面 → 代码分析
4.1 项目配置
- 选择项目配置 → 点击创建项目
- 填写项目名称、简称,类型选择源码项目
- 上传待分析的文件压缩包
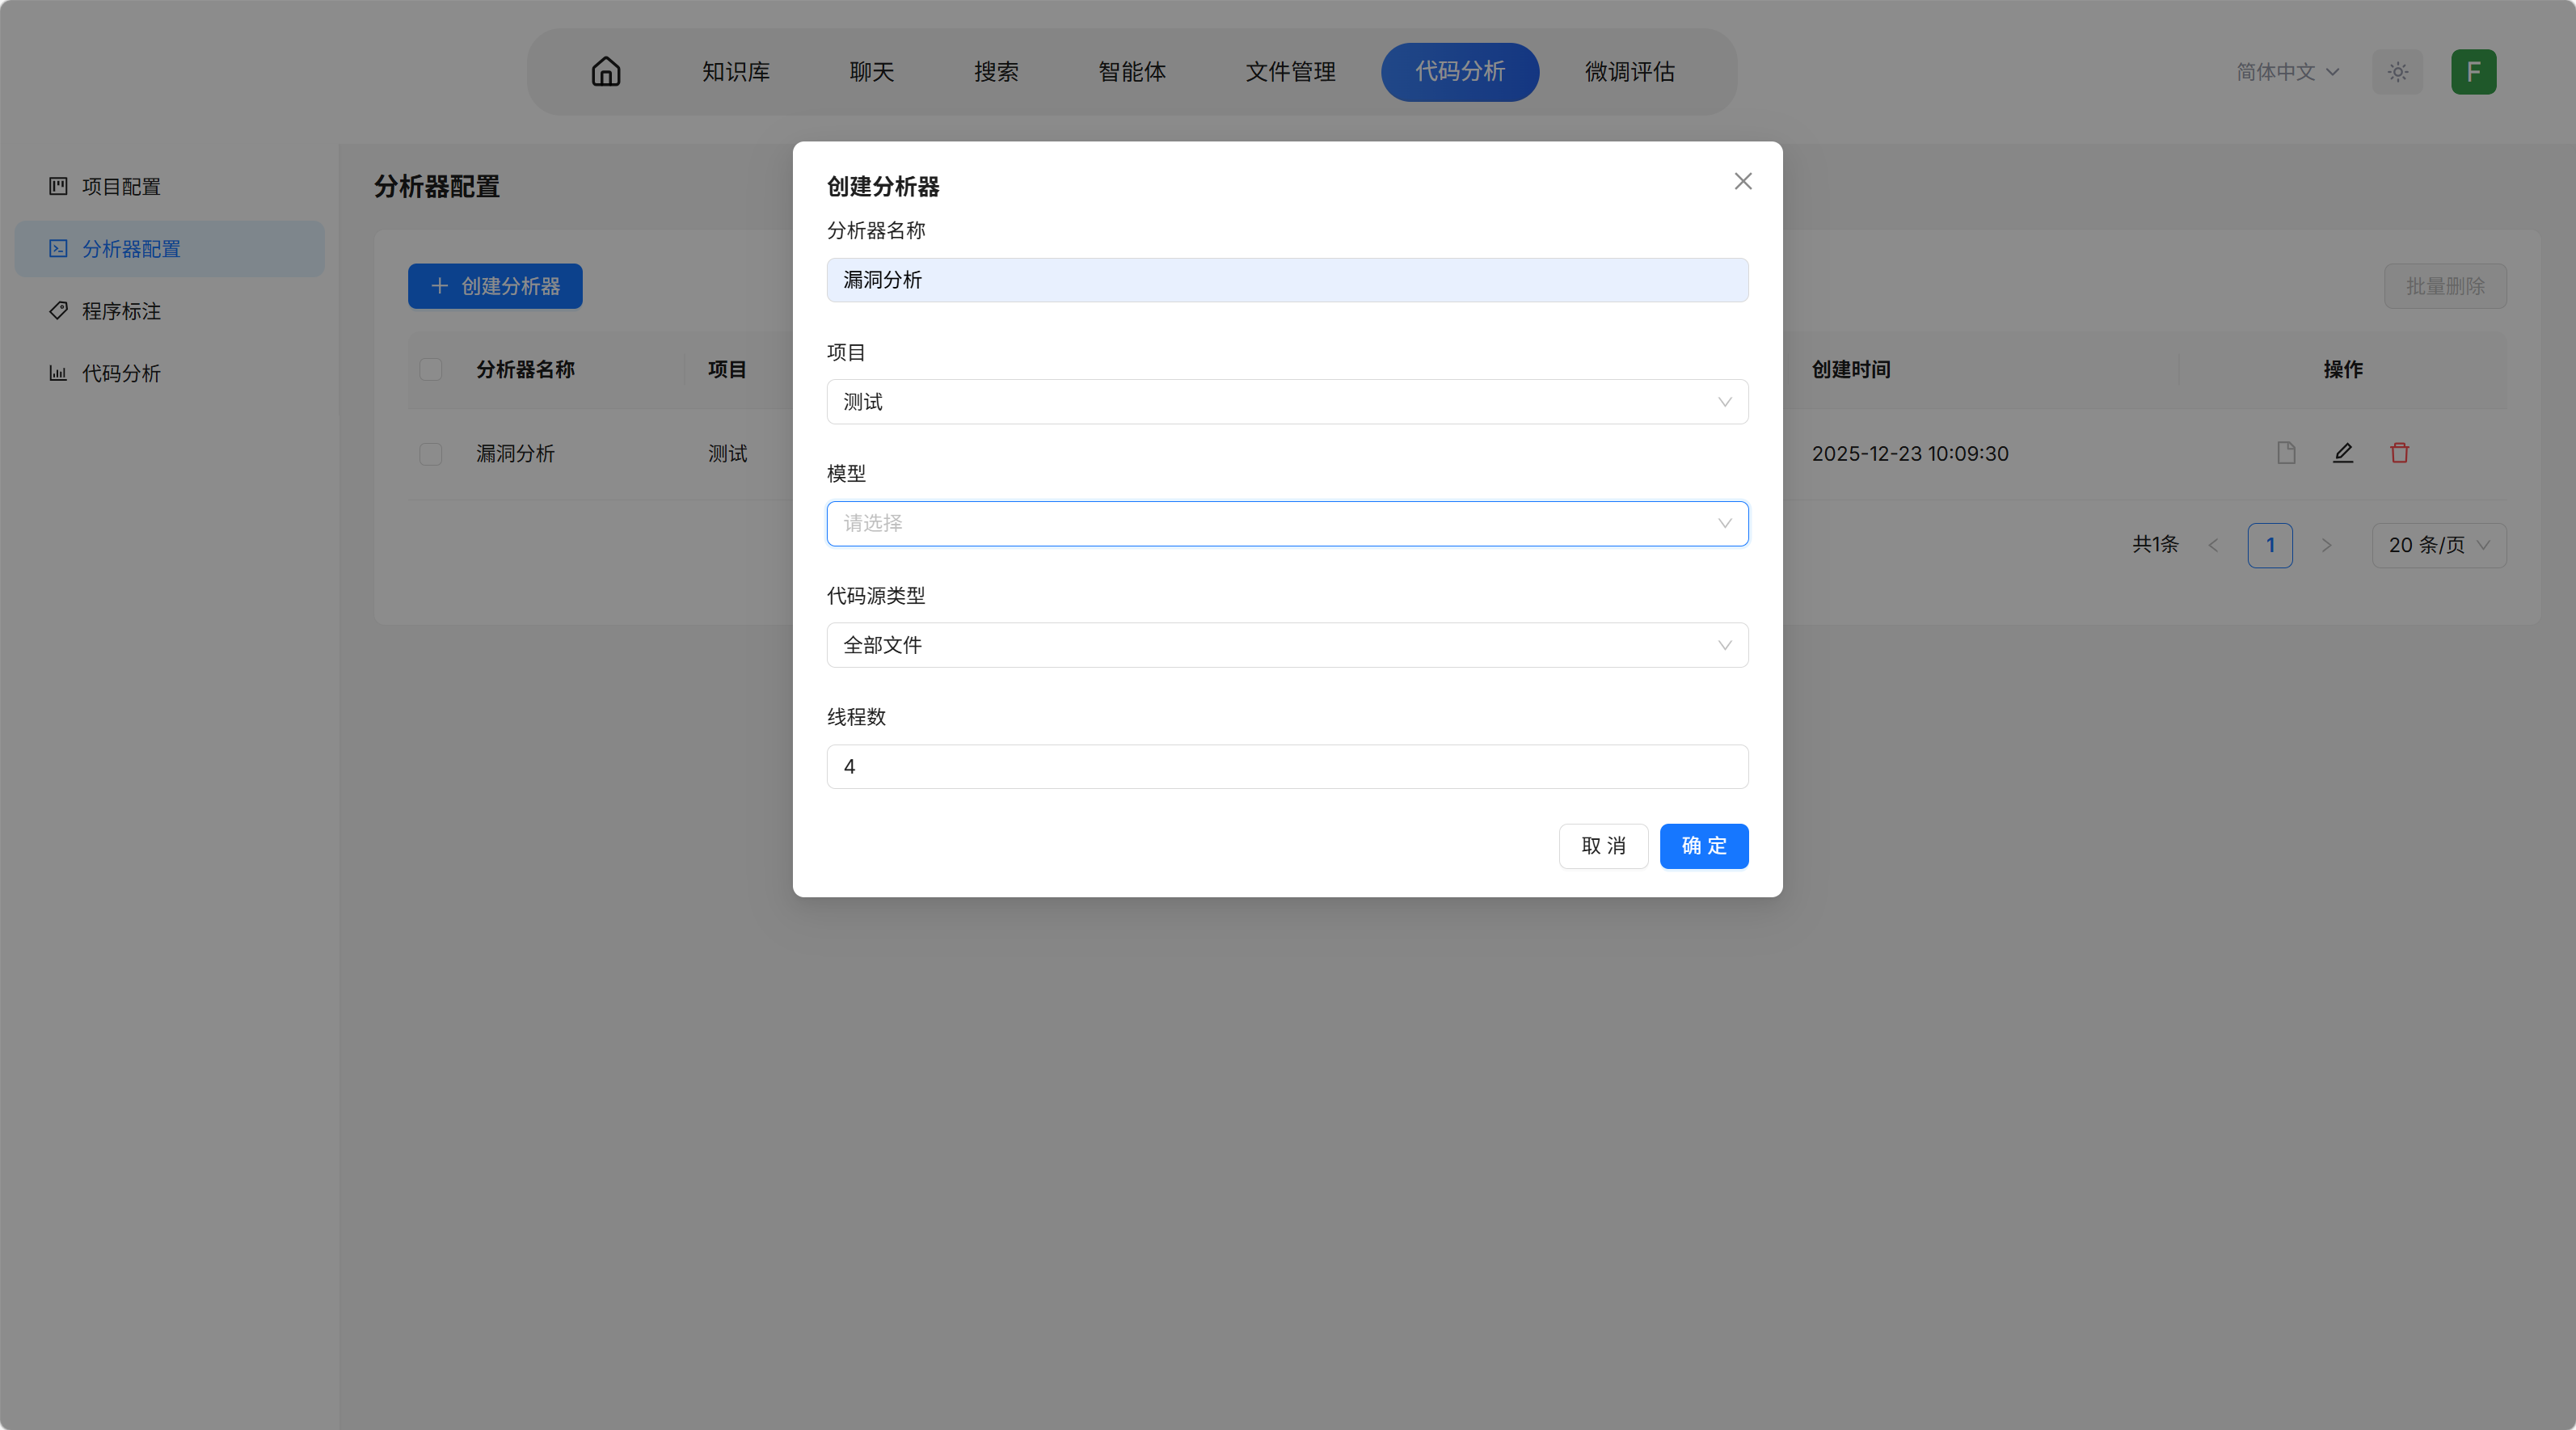
4.2 分析器配置
- 选择分析器配置 → 点击创建分析器
- 填写分析器名称、对应项目名称
- 选择分析模型、代码源类型和线程数
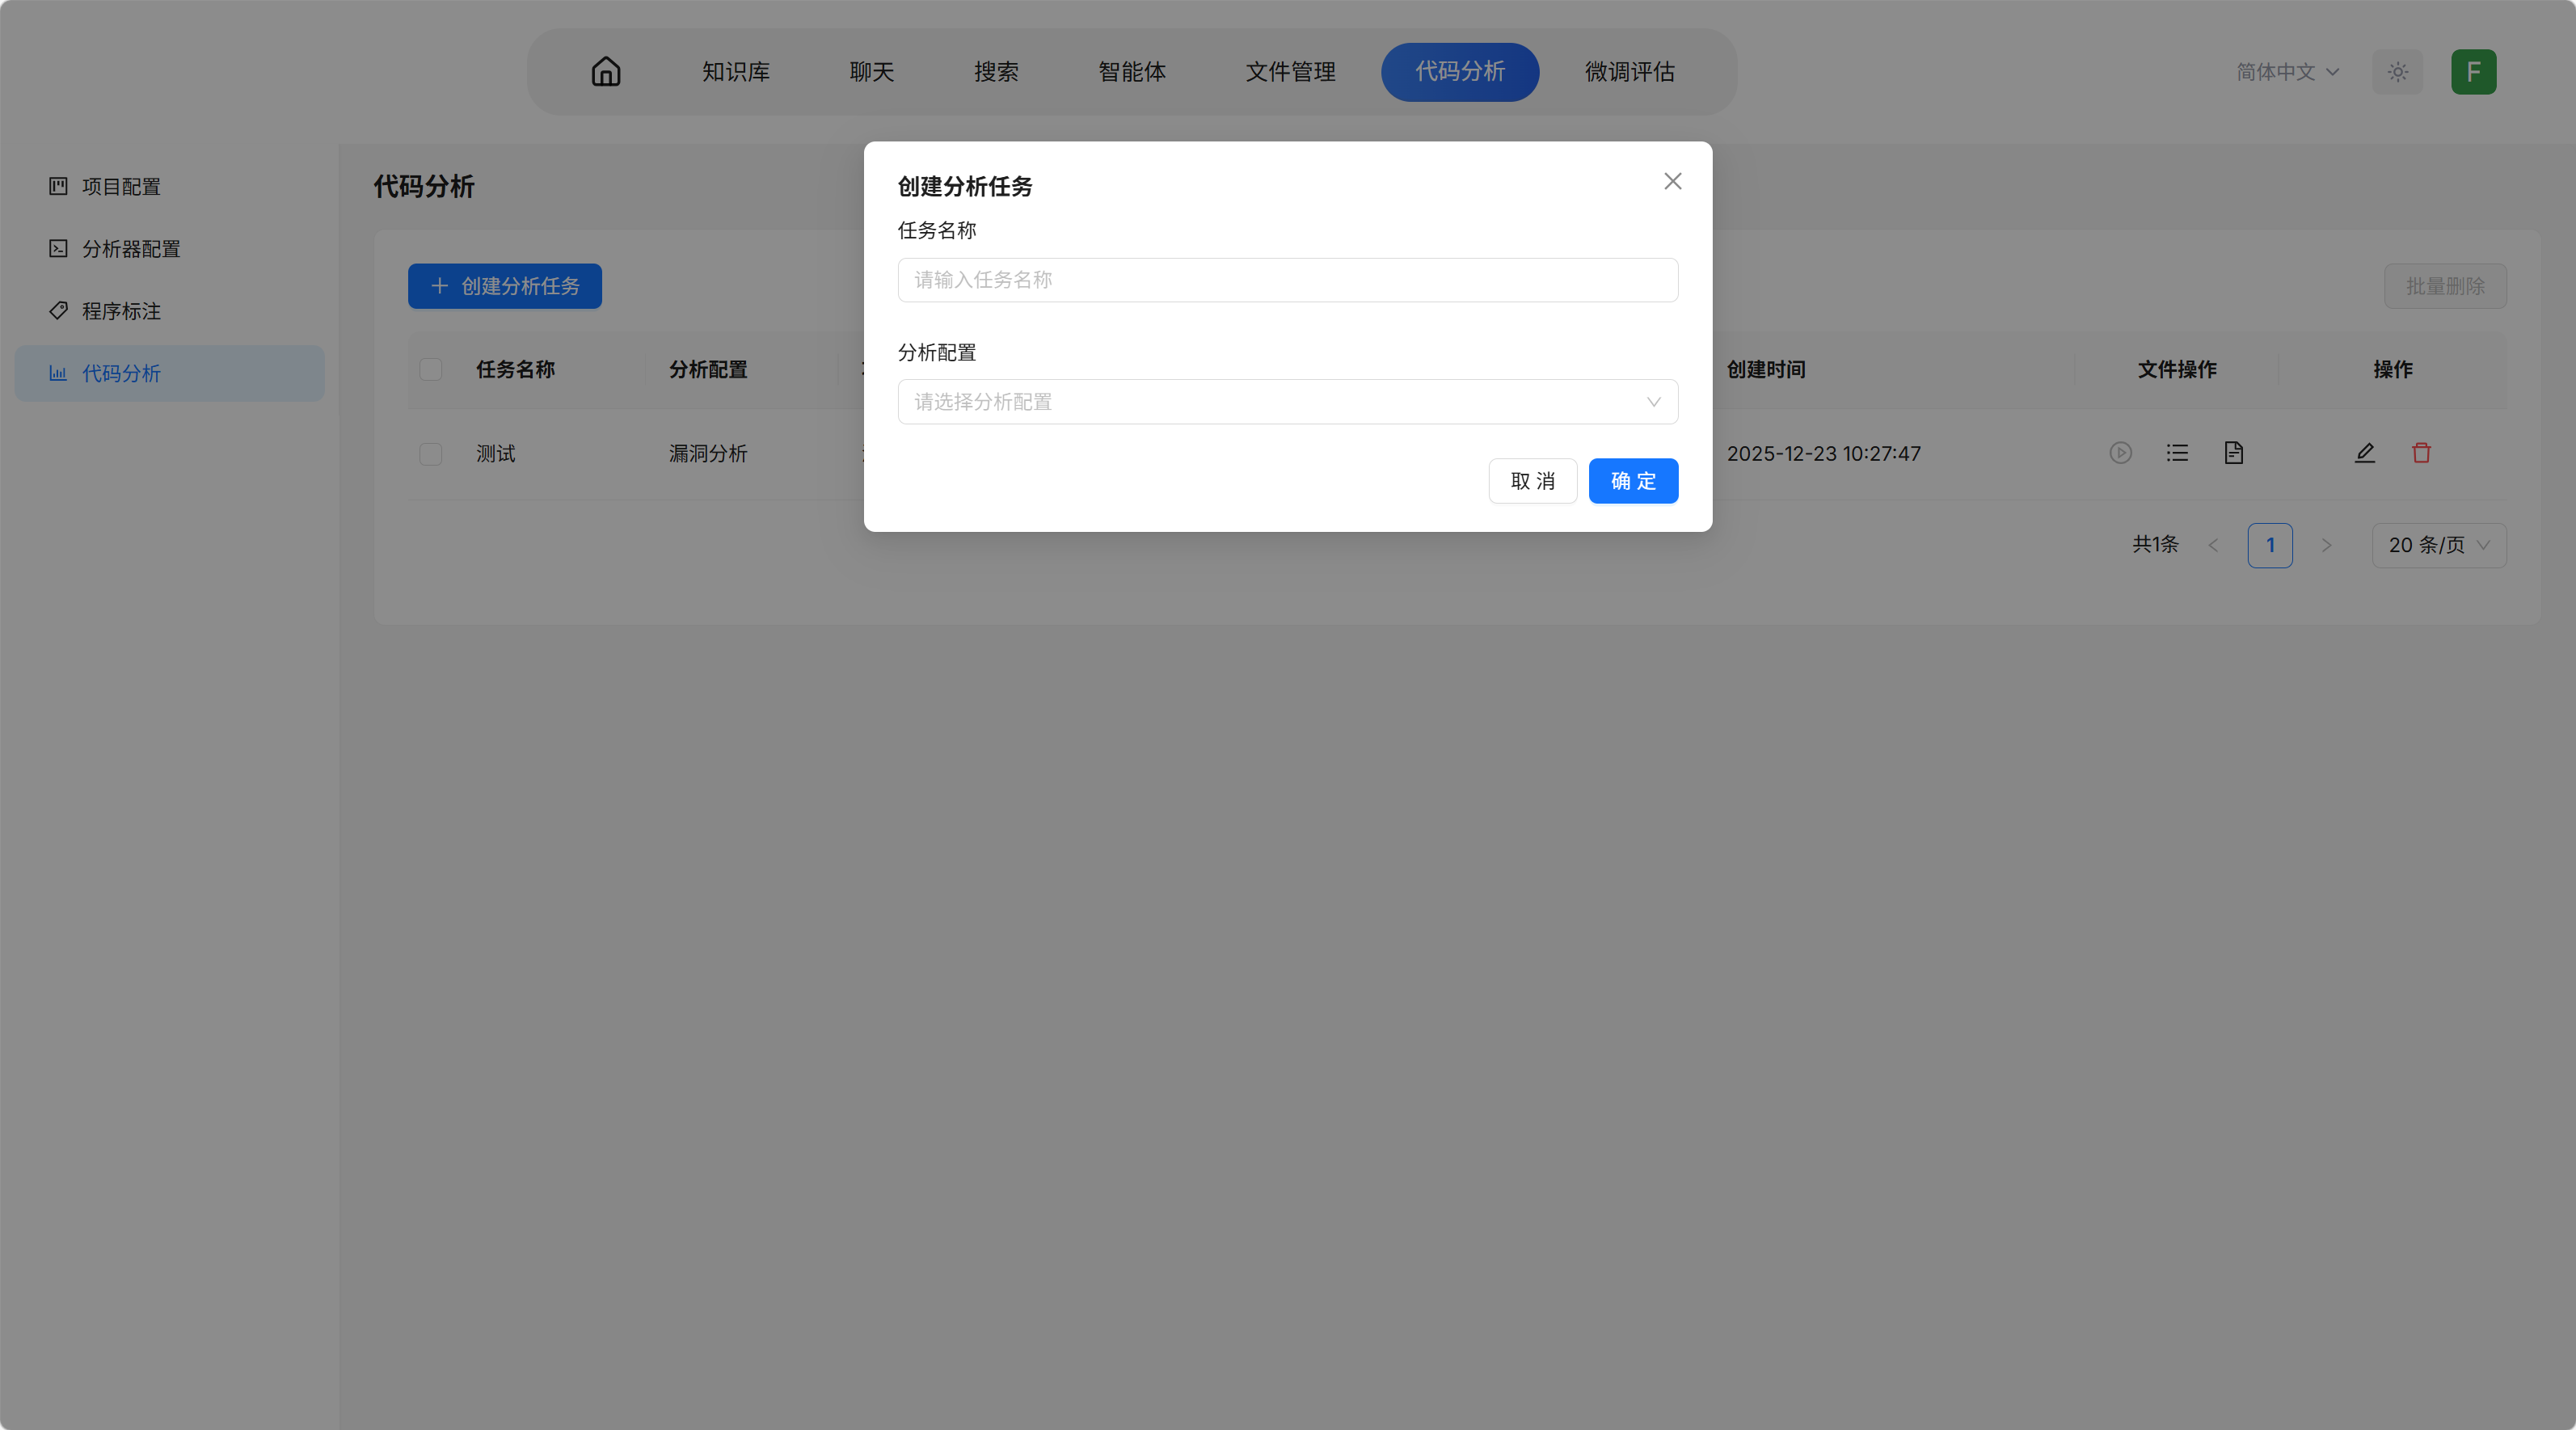
4.3 执行分析
- 选择代码分析 → 点击创建分析任务
- 填写任务名称和分析器名称
- 任务操作选项:
- 开始分析: 启动分析
- 问题列表: 查看问题列表
- 分析结果: 所有问题结果一览
5. 🏷️ 代码标注
路径: 主页面 → 代码分析 → 程序标注
5.1 项目配置(同代码分析)
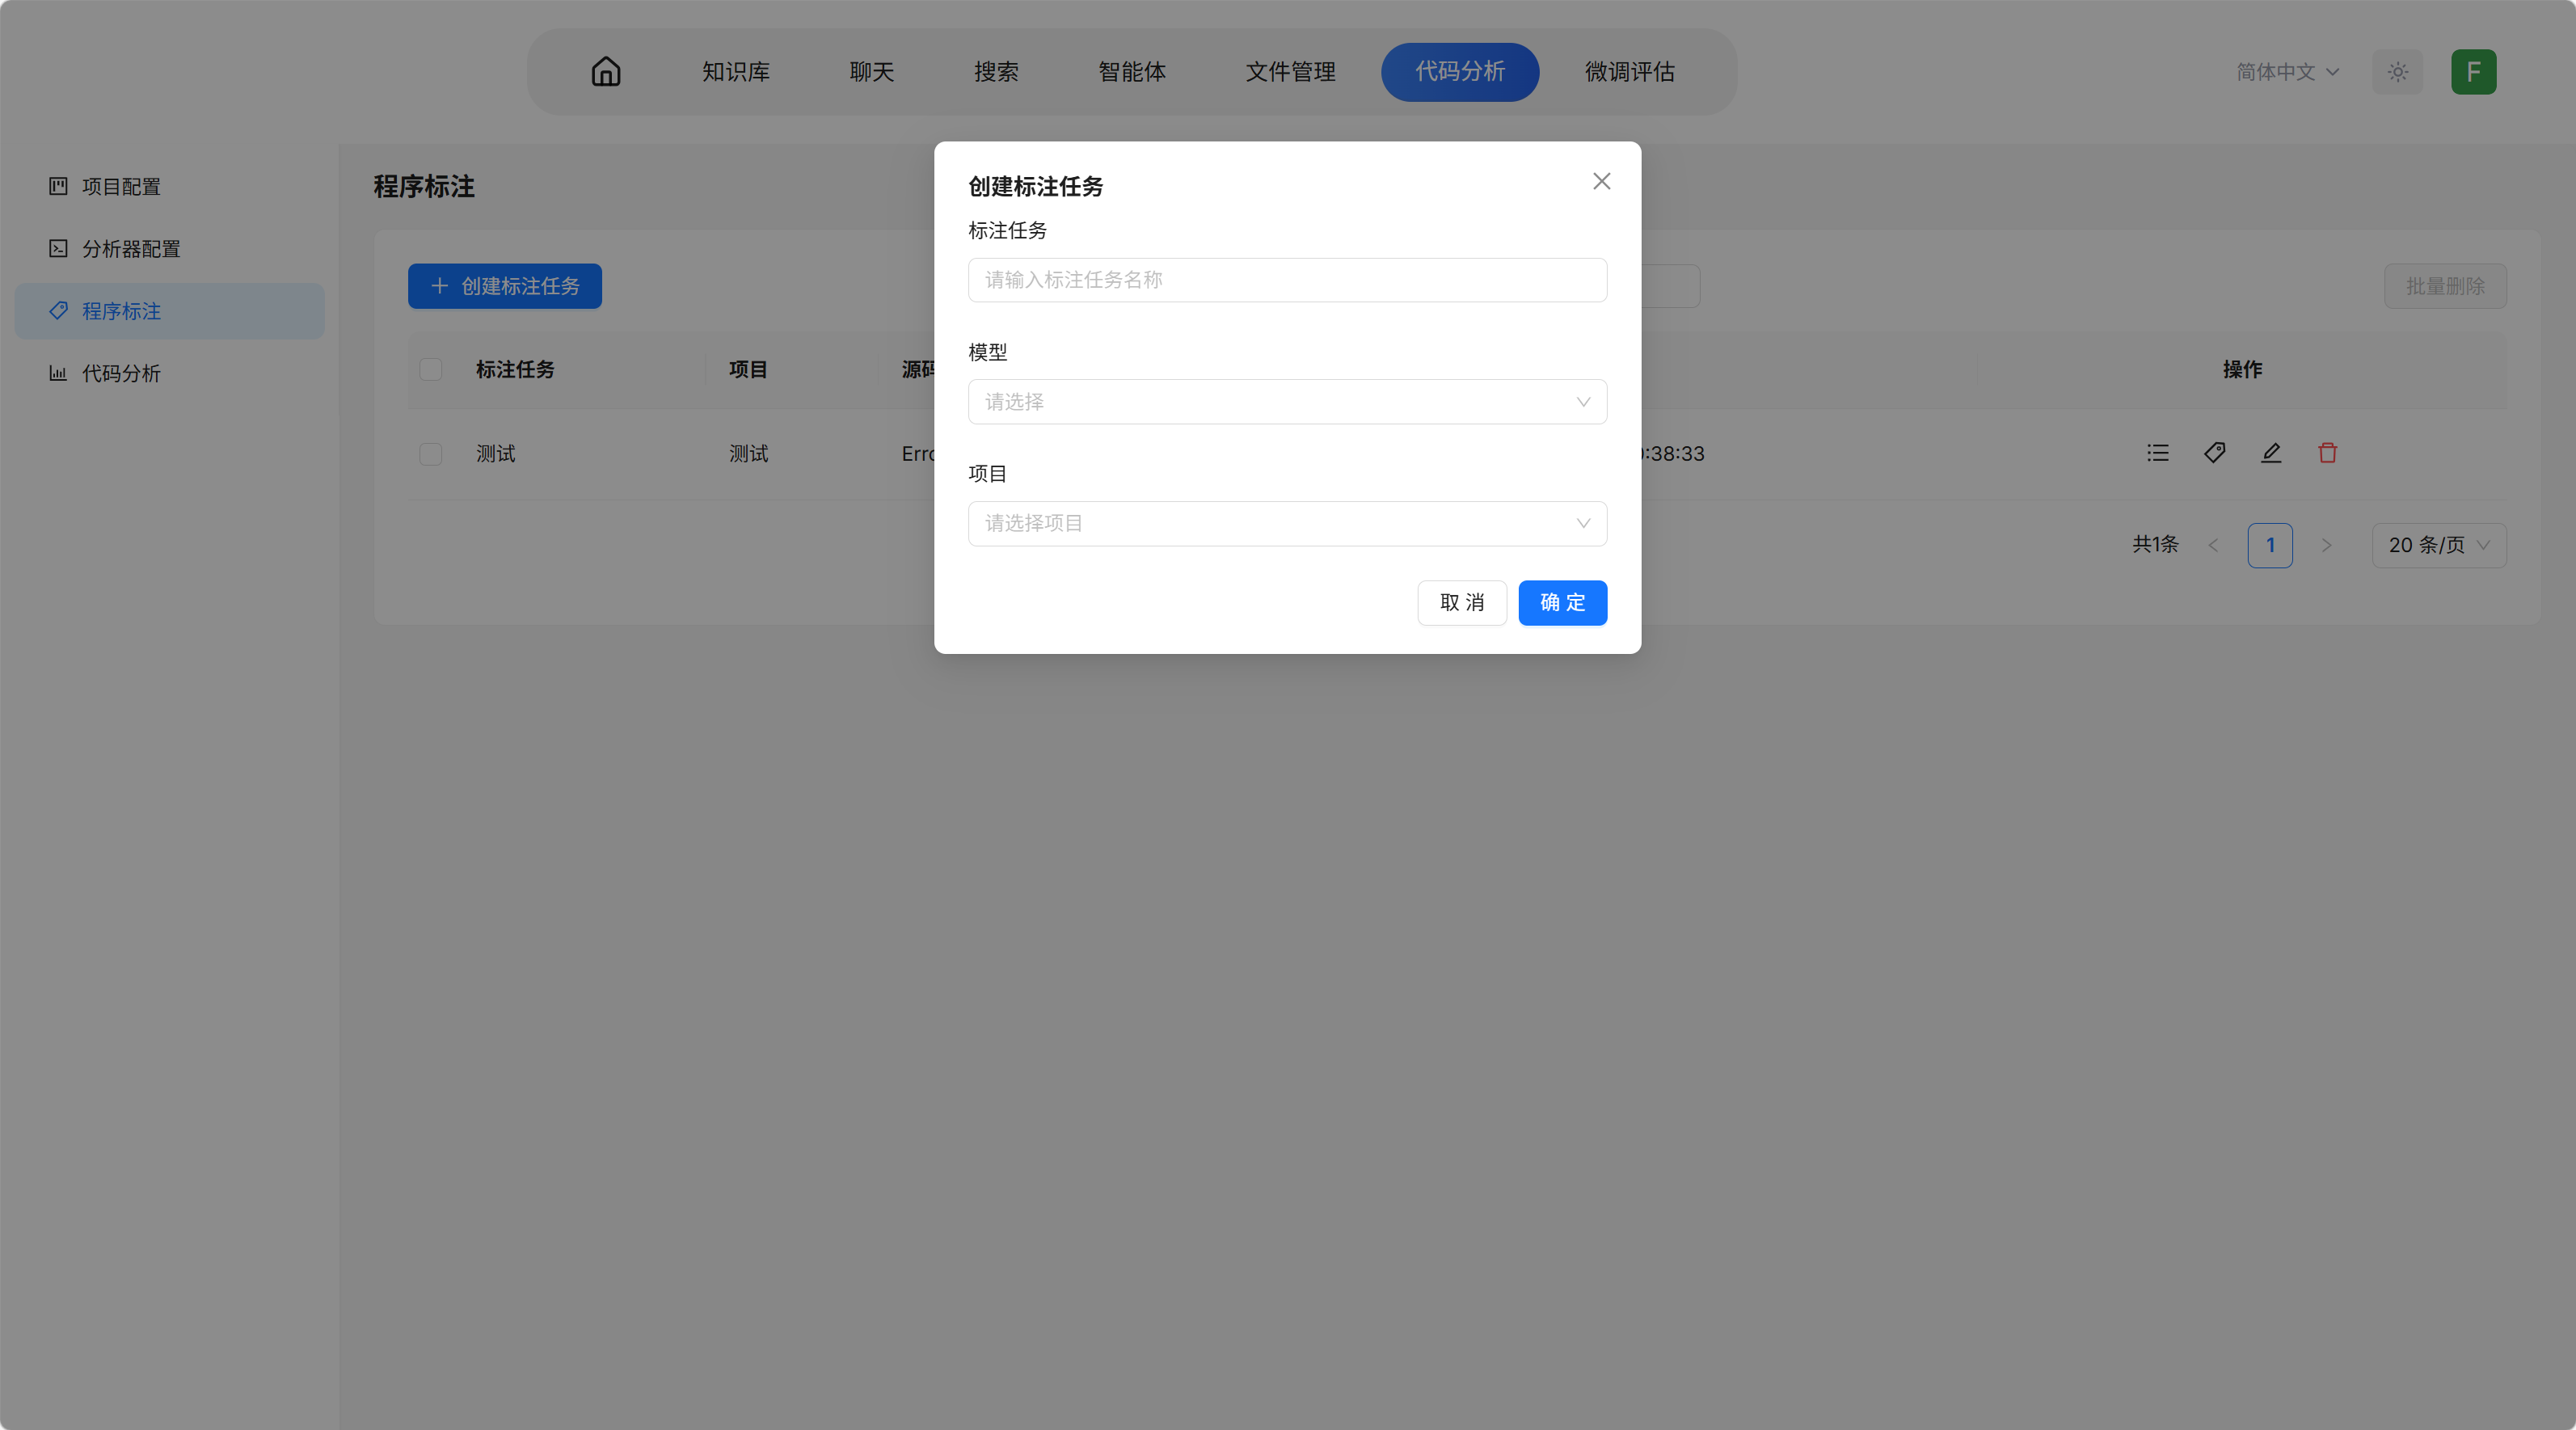
5.2 创建标注任务
- 点击创建标注任务
- 填写标注任务名称
- 选择自动分析模型和对应项目
- 任务操作选项:
- 标注列表: 查看已完成的标注
- 标注: 进入标注工具界面
- 编辑: 编辑任务
- 删除: 删除任务
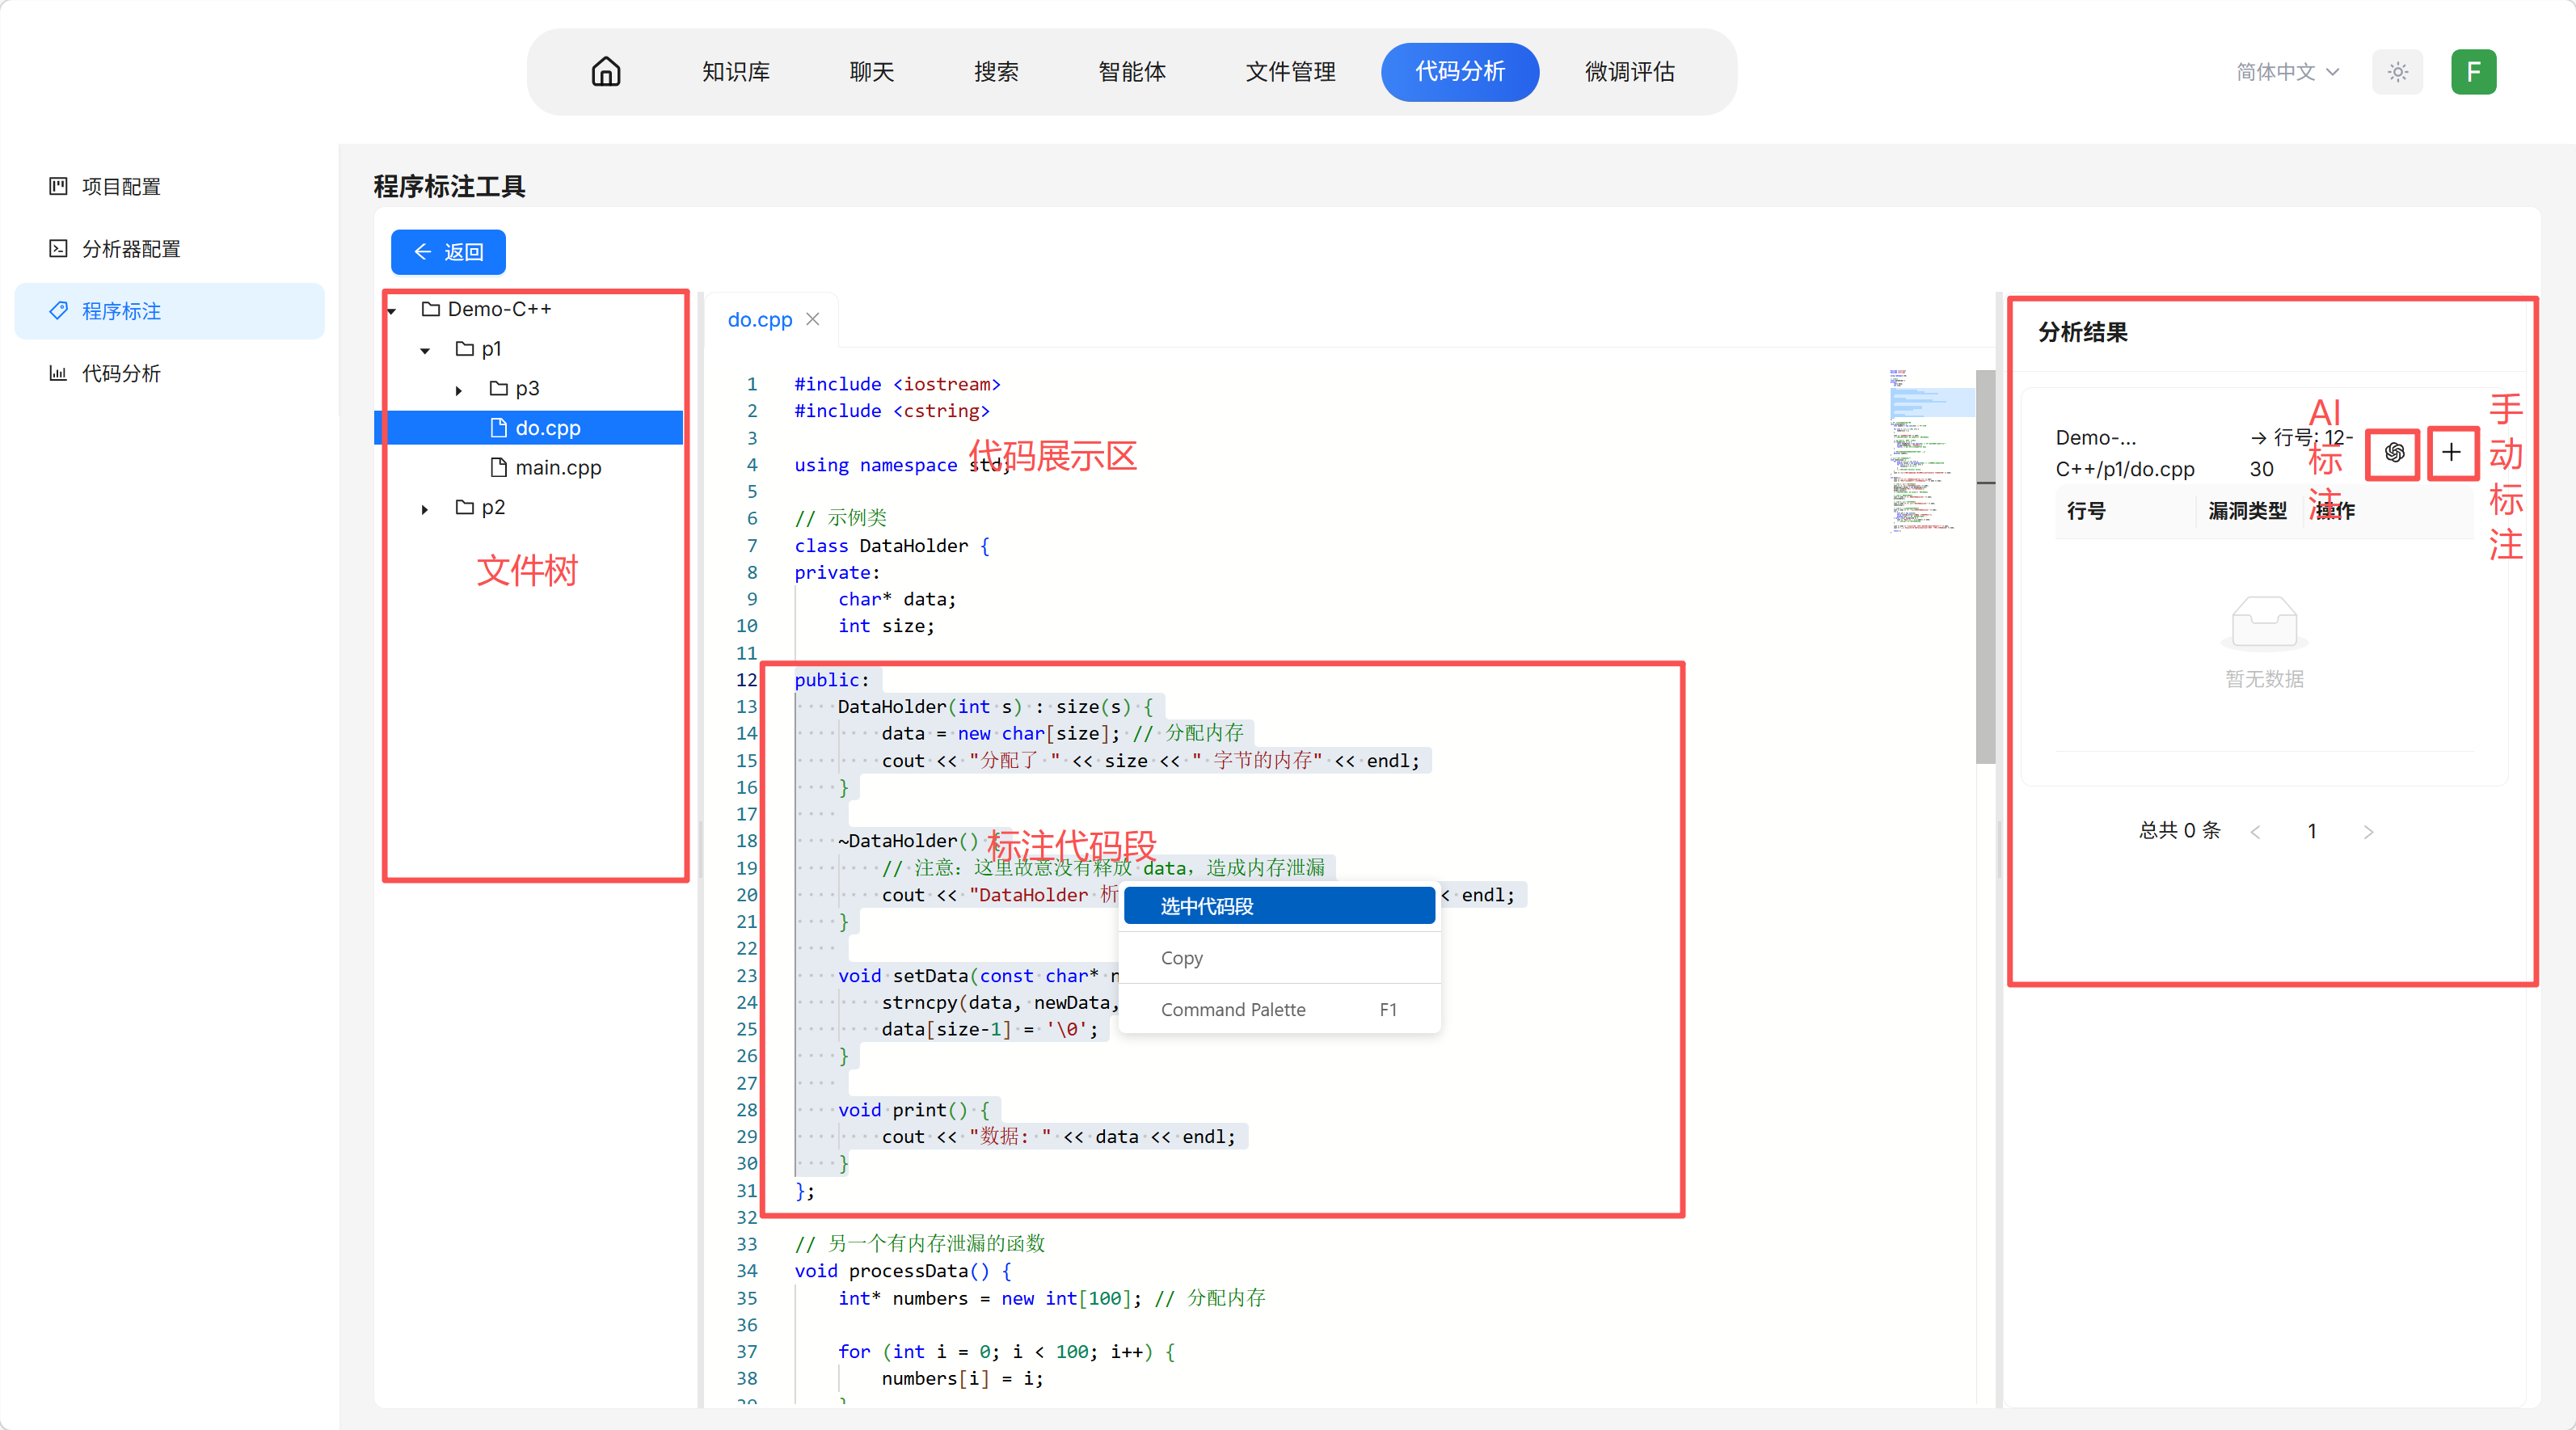
5.3 标注操作
- 点击标注进入标注工具页面
- 左侧文件树打开需要标注的文件
- 选择代码片段,点击选中代码段
- 右侧创建临时代码段表格
- 选择人工标注或AI 辅助标注进行标注
📝 若项目类型为"数据集项目":
- 左侧:漏洞数据集中的全部漏洞代码文件
- 右侧:从漏洞数据集中提取的全部漏洞信息
- 不选择文件时默认展示全部漏洞信息,选择后仅显示当前文件的漏洞信息
- 数据集项目文件必须与漏洞分析数据中的字段一致,可参考2.4.3.4节
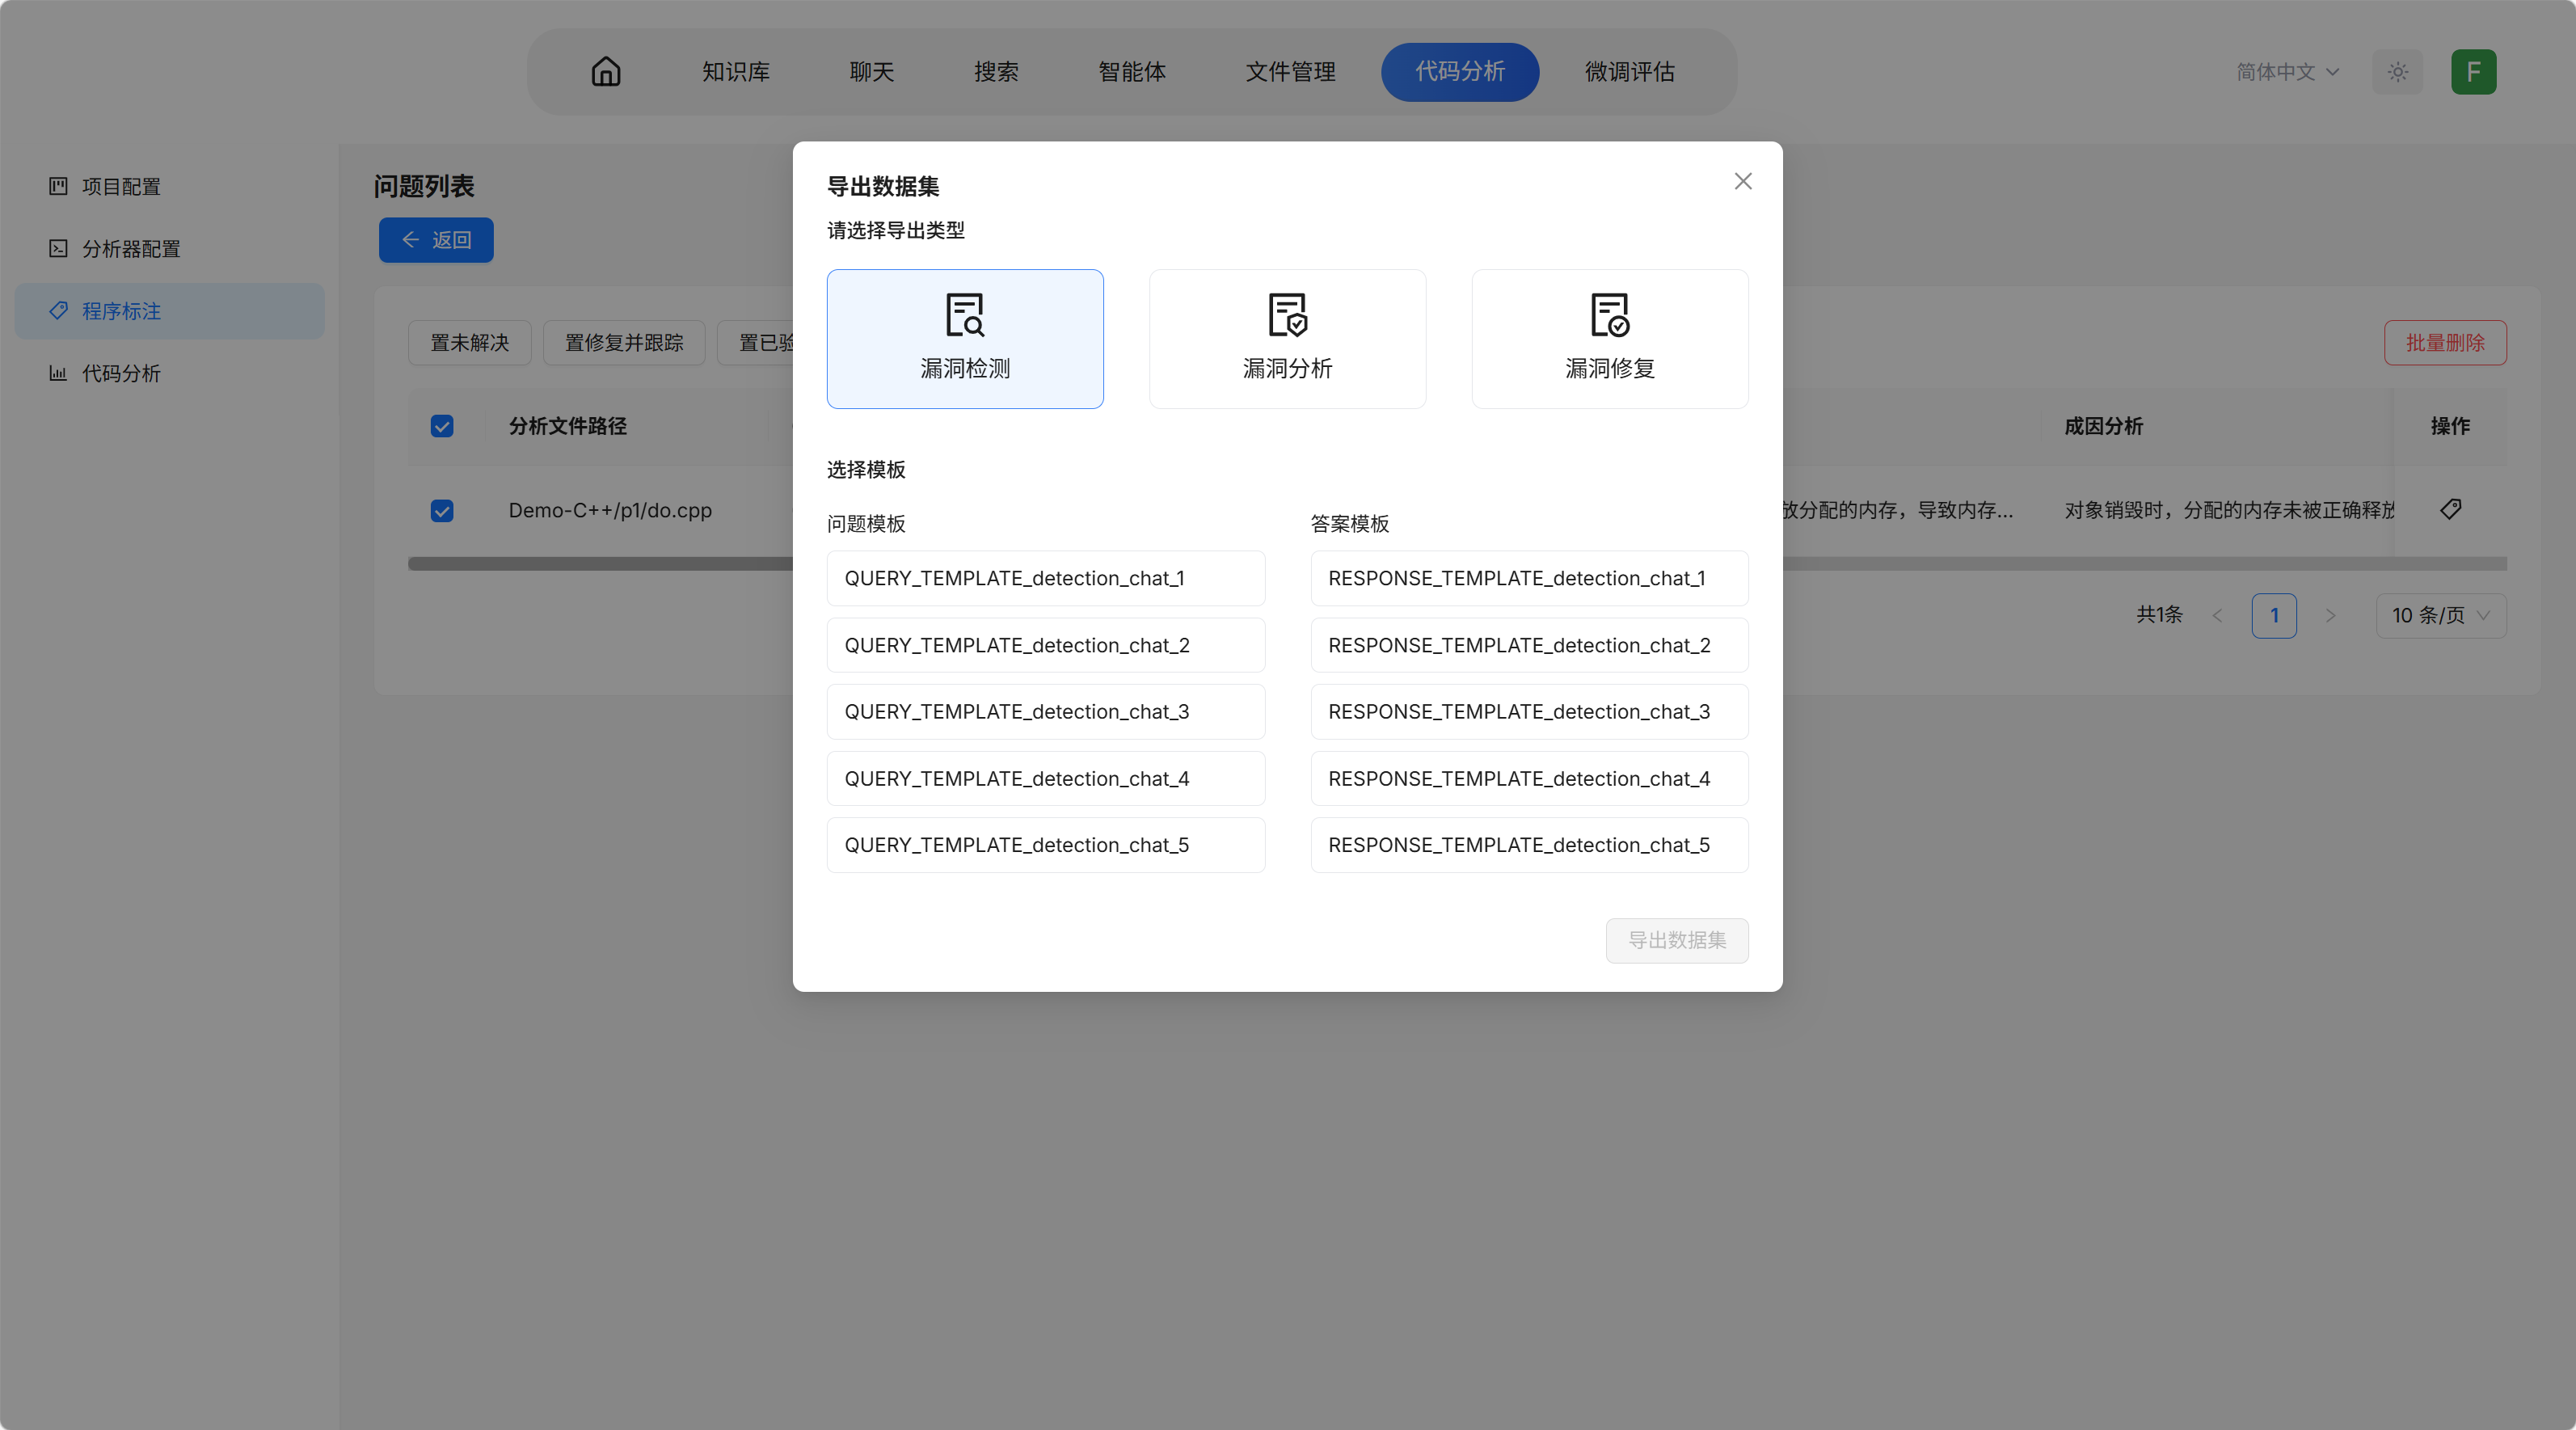
5.4 训练数据导出
- 点击标注列表进入问题列表
- 选择需要导出的标注
- 点击导出模板,选择导出类型和模板
- 数据将导出到模型微调评估 → 数据集管理
三、模型训练案例
下面将以OpenVul中公开的1个SFT数据集,对Qwen3.5-4B模型进行微调。案例原地址:https://github.com/youpengl/OpenVul
1. 数据集下载
本样例使用数据集为OpenVul_Rejection_Sampling_based_Vulnerability_Reasoning_Dataset_for_SFT,该数据集提供了经过正确性筛选的高质量漏洞推理数据,旨在支持未来研究中专用漏洞检测大模型的监督微调。
点击下载链接,并在数据集主页的Files and Version中下载文件train-00000-of-00001.parquet。
注:huggingface.co访问速度较慢,建议使用VPN进行加速。
2. 训练数据构建
2.1 标准训练数据集格式选择
用于监督微调的数据集需要转化为本系统支持的标准数据集格式。本系统支持的标准数据集格式包括Messages格式、System/Query/Response格式、System/Instruction/Input/Output格式和简易格式(system/user/assistant),用户可通过在系统微调评估->数据集管理页面下,点击导入数据集,下载并查看系统支持的标准数据集格式详细信息: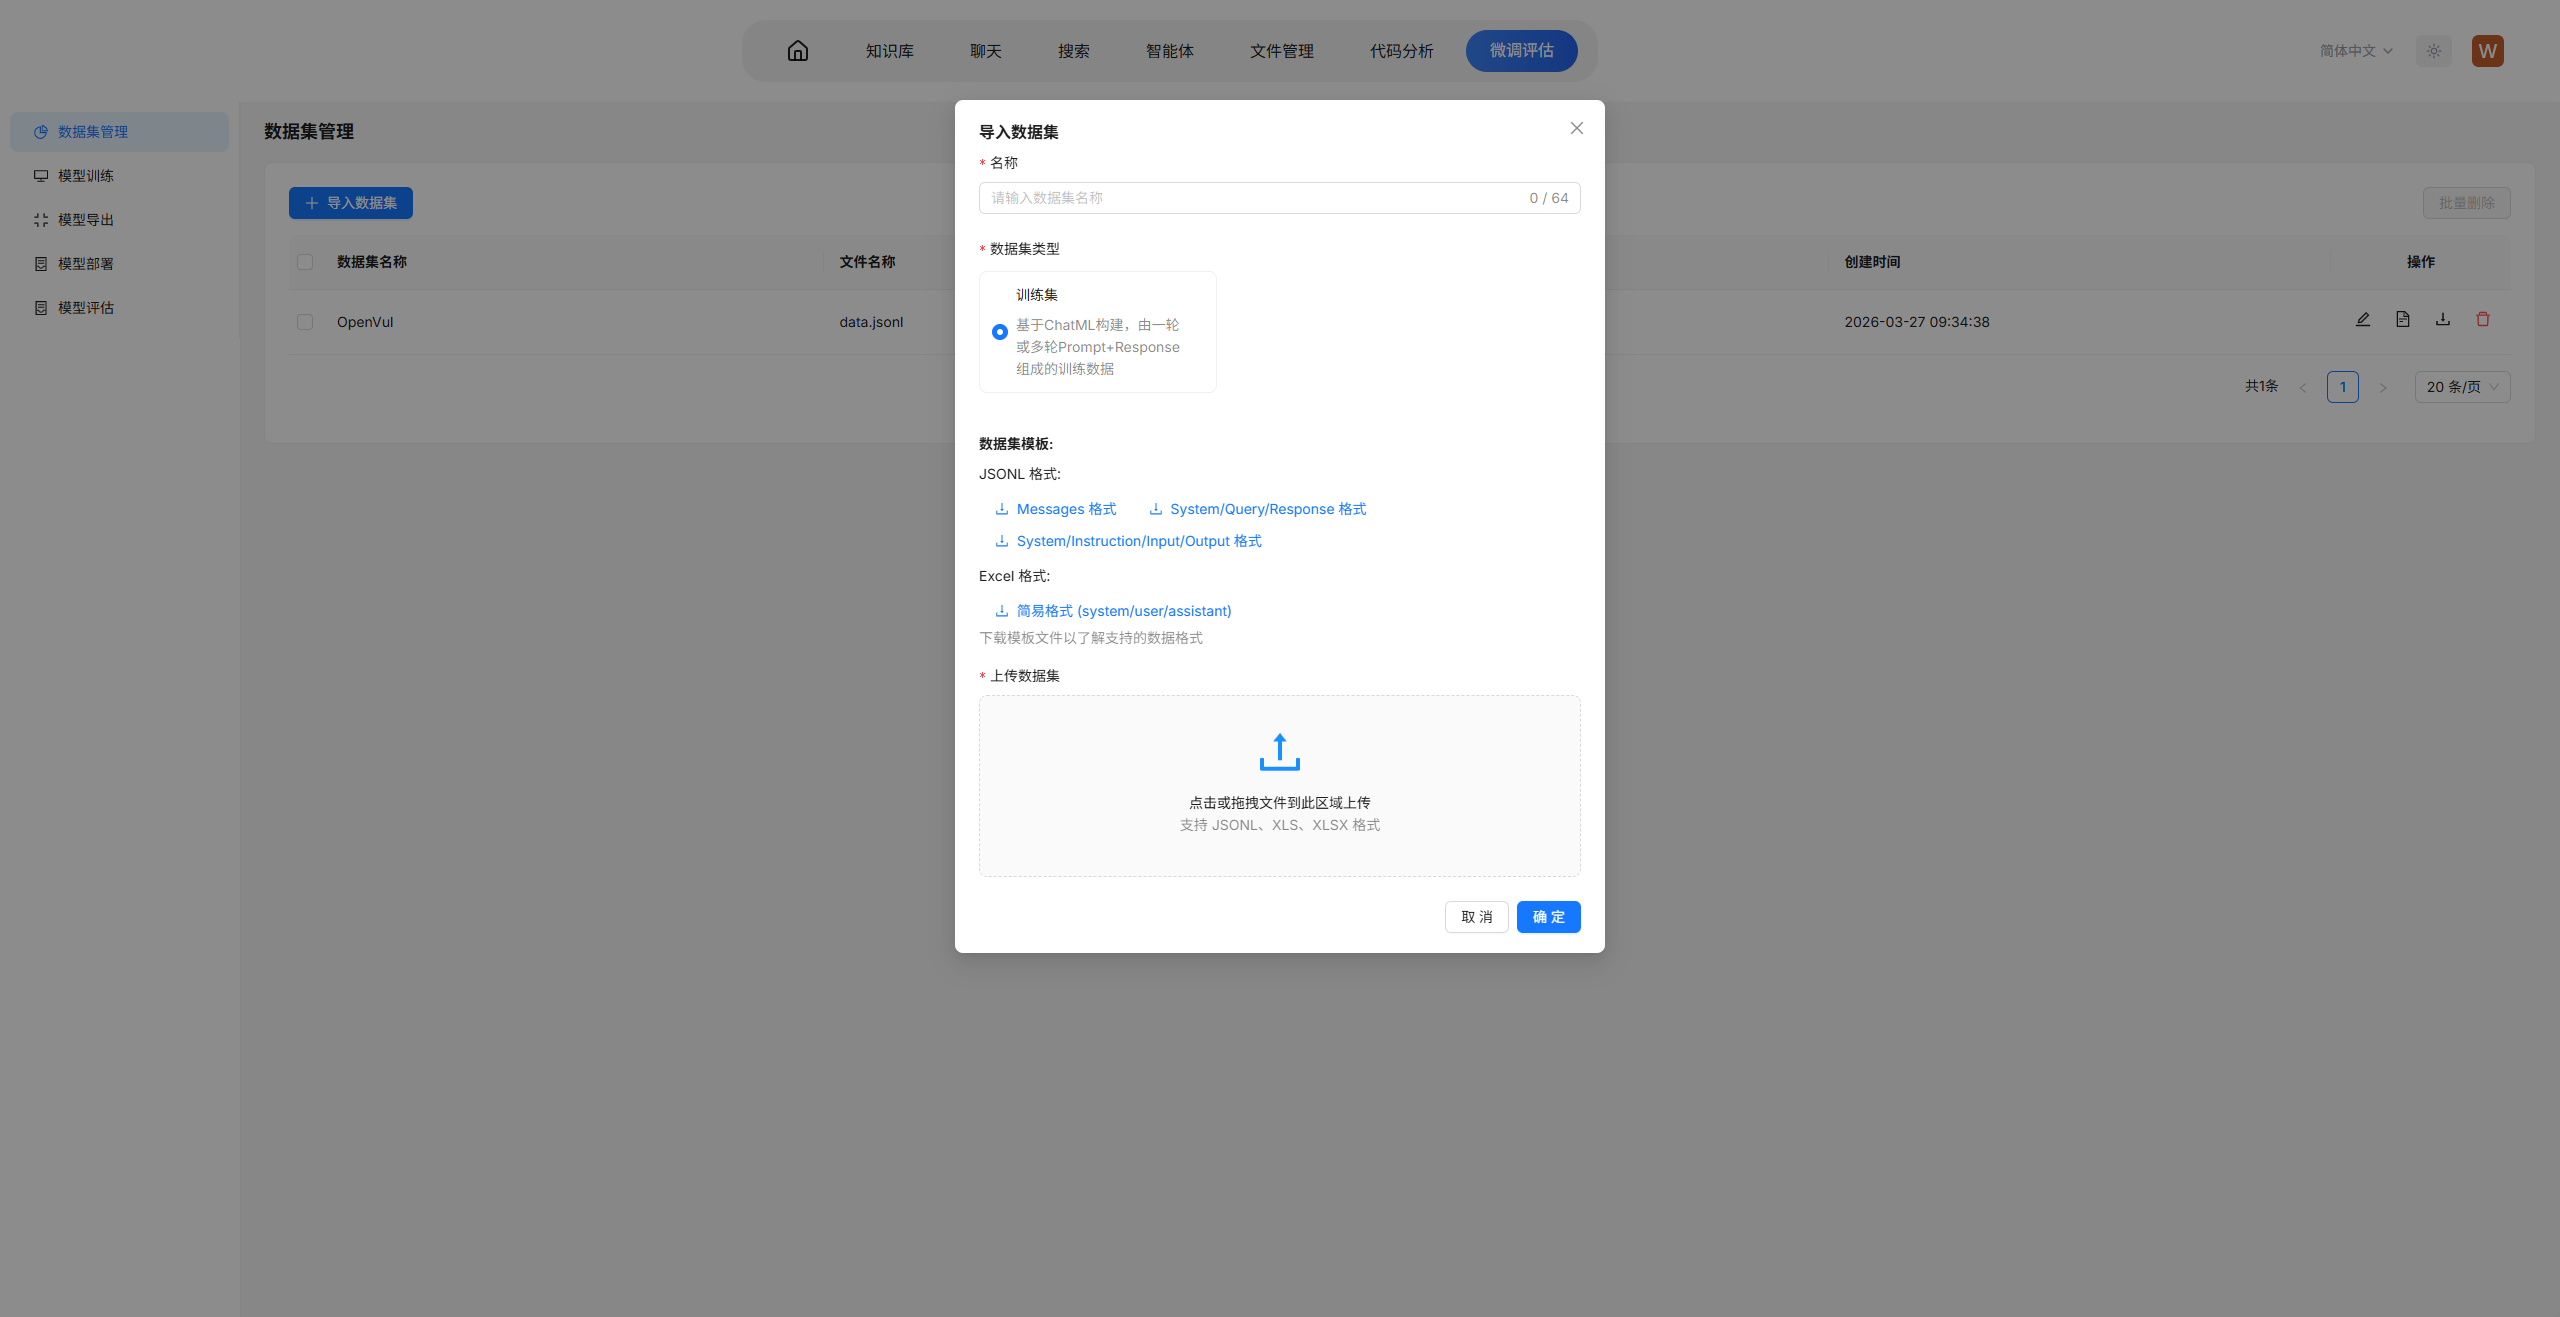
在本样例中,我们选择Messages格式,即需将原始数据集parquet文件转换为messages格式的jsonl文件。messages格式是本系统推荐使用的标准数据集格式,其模板如下所示:
{
    "messages": [
        {
            "content": "你是一个 helpful 的 AI 动手",
            "role": "system"
        },
        {
            "content": "你好",
            "role": "user"
        },
        {
            "content": "你好!有什么我可以帮助你的吗?",
            "role": "assistant"
        }
    ]
}
2.2 标准训练数据集格式转换
2.2.1 原始数据集内容查看
huggingface中的数据集,在其Data Studio中可以直接查看数据内容,本样例中,原始数据集内容如下: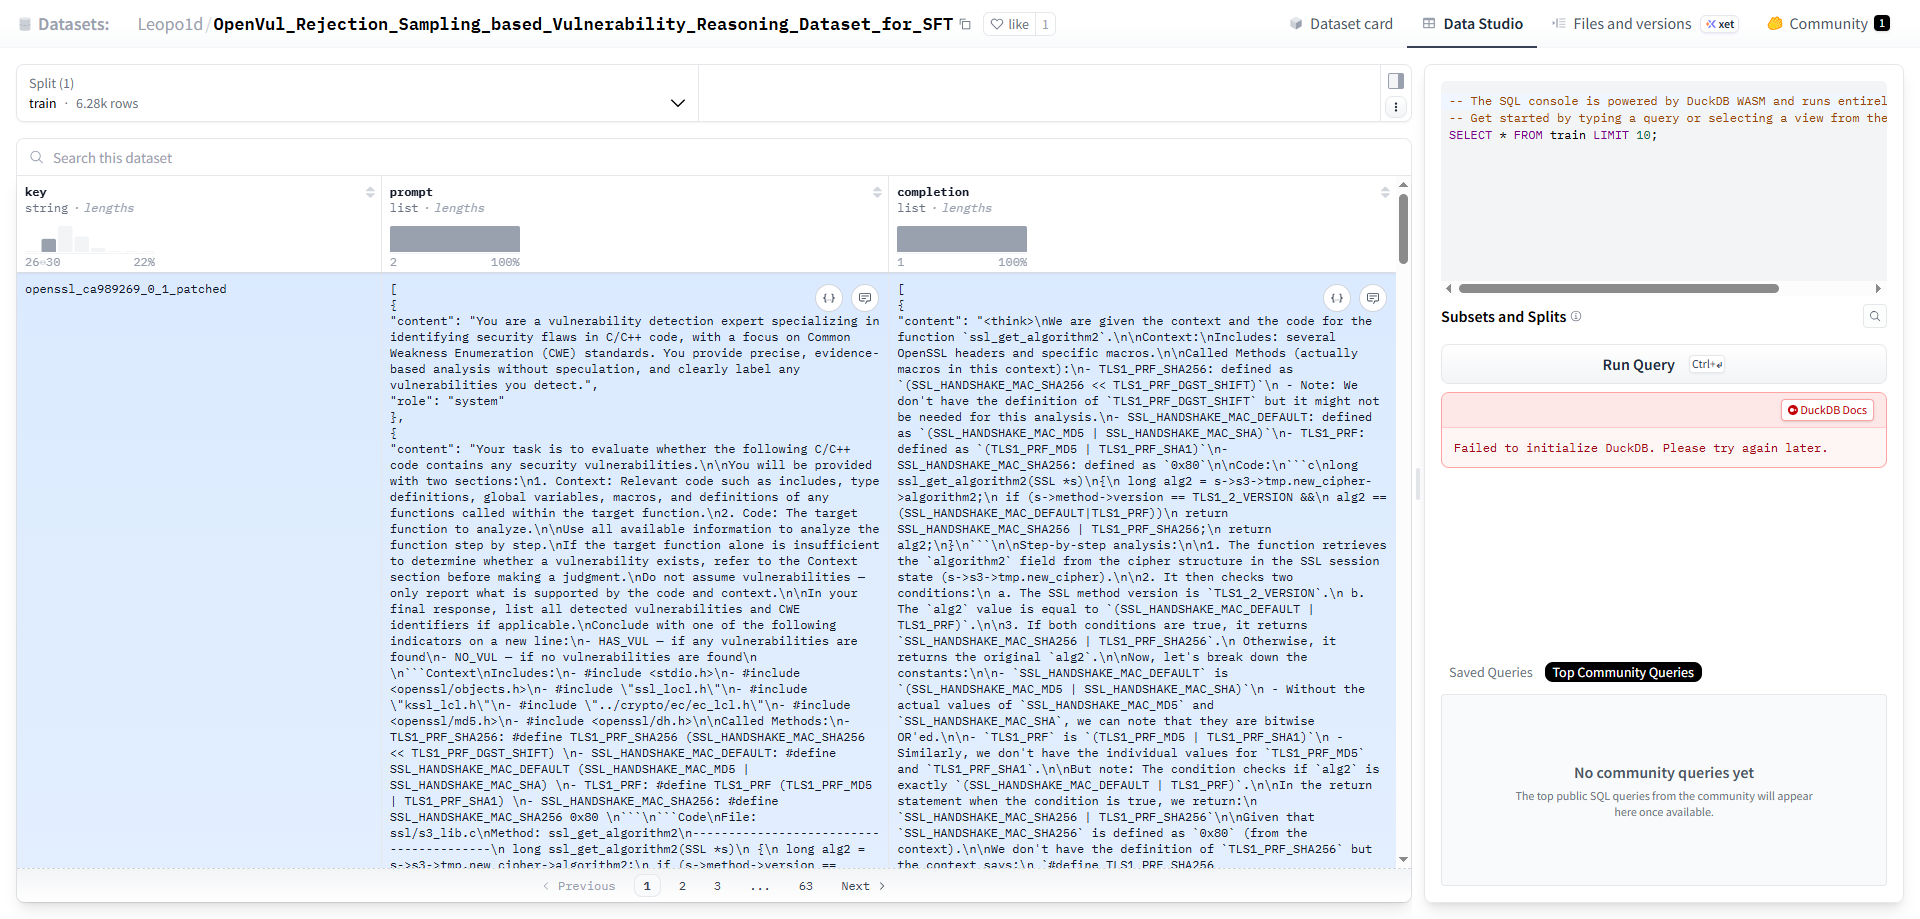
在原始数据集中每一条数据包含key、prompt和completion三个字段,重点为prompt和completion字段。
prompt字段:
[
  {
    "content": "You are a vulnerability detection expert specializing in identifying security flaws in C/C++ code, with a focus on Common Weakness Enumeration (CWE) standards. You provide precise, evidence-based analysis without speculation, and clearly label any vulnerabilities you detect.",
    "role": "system"
  },
  {
    "content": "Your task is to evaluate whether the following C/C++ code contains any security vulnerabilities.\n\nYou will be provided with two sections:\n1. Context: Relevant code such as includes, type definitions, global variables, macros, and definitions of any functions called within the target function.\n2. Code: The target function to analyze.\n\nUse all available information to analyze the function step by step.\nIf the target function alone is insufficient to determine whether a vulnerability exists, refer to the Context section before making a judgment.\nDo not assume vulnerabilities — only report what is supported by the code and context.\n\nIn your final response, list all detected vulnerabilities and CWE identifiers if applicable.\nConclude with one of the following indicators on a new line:\n- HAS_VUL — if any vulnerabilities are found\n- NO_VUL — if no vulnerabilities are found\n    \n```Context\nIncludes:\n- #include <stdio.h>\n- #include <openssl/objects.h>\n- #include \"ssl_locl.h\"\n- #include \"kssl_lcl.h\"\n- #include \"../crypto/ec/ec_lcl.h\"\n- #include <openssl/md5.h>\n- #include <openssl/dh.h>\n\nCalled Methods:\n- TLS1_PRF_SHA256: #define TLS1_PRF_SHA256 (SSL_HANDSHAKE_MAC_SHA256 << TLS1_PRF_DGST_SHIFT)   \n- SSL_HANDSHAKE_MAC_DEFAULT: #define SSL_HANDSHAKE_MAC_DEFAULT (SSL_HANDSHAKE_MAC_MD5 | SSL_HANDSHAKE_MAC_SHA)   \n- TLS1_PRF: #define TLS1_PRF (TLS1_PRF_MD5 | TLS1_PRF_SHA1)   \n- SSL_HANDSHAKE_MAC_SHA256: #define SSL_HANDSHAKE_MAC_SHA256 0x80   \n```\n```Code\nFile: ssl/s3_lib.c\nMethod: ssl_get_algorithm2\n----------------------------------------\n long ssl_get_algorithm2(SSL *s)\n        {\n        long alg2 = s->s3->tmp.new_cipher->algorithm2;\n       if (s->method->version == TLS1_2_VERSION &&\n            alg2 == (SSL_HANDSHAKE_MAC_DEFAULT|TLS1_PRF))\n                return SSL_HANDSHAKE_MAC_SHA256 | TLS1_PRF_SHA256;\n        return alg2;\n\t}\n```\n\nAnalyze the code now.",
    "role": "user"
  }
]
completion字段:
[
  {
    "content": "<think>\nWe are given the context and the code for the function `ssl_get_algorithm2`.\n\nContext:\nIncludes: several OpenSSL headers and specific macros.\n\nCalled Methods (actually macros in this context):\n- TLS1_PRF_SHA256: defined as `(SSL_HANDSHAKE_MAC_SHA256 << TLS1_PRF_DGST_SHIFT)`\n  - Note: We don't have the definition of `TLS1_PRF_DGST_SHIFT` but it might not be needed for this analysis.\n- SSL_HANDSHAKE_MAC_DEFAULT: defined as `(SSL_HANDSHAKE_MAC_MD5 | SSL_HANDSHAKE_MAC_SHA)`\n- TLS1_PRF: defined as `(TLS1_PRF_MD5 | TLS1_PRF_SHA1)`\n- SSL_HANDSHAKE_MAC_SHA256: defined as `0x80`\n\nCode:\n```c\nlong ssl_get_algorithm2(SSL *s)\n{\n    long alg2 = s->s3->tmp.new_cipher->algorithm2;\n    if (s->method->version == TLS1_2_VERSION &&\n        alg2 == (SSL_HANDSHAKE_MAC_DEFAULT|TLS1_PRF))\n        return SSL_HANDSHAKE_MAC_SHA256 | TLS1_PRF_SHA256;\n    return alg2;\n}\n```\n\nStep-by-step analysis:\n\n1. The function retrieves the `algorithm2` field from the cipher structure in the SSL session state (s->s3->tmp.new_cipher).\n\n2. It then checks two conditions:\n   a. The SSL method version is `TLS1_2_VERSION`.\n   b. The `alg2` value is equal to `(SSL_HANDSHAKE_MAC_DEFAULT | TLS1_PRF)`.\n\n3. If both conditions are true, it returns `SSL_HANDSHAKE_MAC_SHA256 | TLS1_PRF_SHA256`.\n   Otherwise, it returns the original `alg2`.\n\nNow, let's break down the constants:\n\n- `SSL_HANDSHAKE_MAC_DEFAULT` is `(SSL_HANDSHAKE_MAC_MD5 | SSL_HANDSHAKE_MAC_SHA)`\n  - Without the actual values of `SSL_HANDSHAKE_MAC_MD5` and `SSL_HANDSHAKE_MAC_SHA`, we can note that they are bitwise OR'ed.\n\n- `TLS1_PRF` is `(TLS1_PRF_MD5 | TLS1_PRF_SHA1)`\n  - Similarly, we don't have the individual values for `TLS1_PRF_MD5` and `TLS1_PRF_SHA1`.\n\nBut note: The condition checks if `alg2` is exactly `(SSL_HANDSHAKE_MAC_DEFAULT | TLS1_PRF)`.\n\nIn the return statement when the condition is true, we return:\n  `SSL_HANDSHAKE_MAC_SHA256 | TLS1_PRF_SHA256`\n\nGiven that `SSL_HANDSHAKE_MAC_SHA256` is defined as `0x80` (from the context).\n\nWe don't have the definition of `TLS1_PRF_SHA256` but the context says:\n  `#define TLS1_PRF_SHA256 (SSL_HANDSHAKE_MAC_SHA256 << TLS1_PRF_DGST_SHIFT)`\n\nWithout knowing `TLS1_PRF_DGST_SHIFT`, we cannot compute the exact value, but note that the condition and the return are both using bitwise operations.\n\nHowever, the code does not contain any obvious security vulnerabilities. It is simply selecting a different algorithm set when the version is TLS 1.2 and the algorithm2 matches a particular legacy value.\n\nPotential issues to consider:\n\n1. **Type Mismatch or Undefined Behavior**: The types used are `long` for the algorithm identifiers. The bitwise operations are standard and should not cause issues.\n\n2. **Null Pointers**: The function dereferences `s`, `s->s3`, `s->s3->tmp.new_cipher`, and `s->method`. However, the function does not check if these pointers are valid. But note that this function is part of a larger codebase and might be called in a context where these pointers are always valid. Without more context about the calling function, we cannot assume that these pointers can be NULL. Since the problem states to not assume vulnerabilities without evidence, and we are not given any context that these pointers might be NULL, we cannot flag this as a vulnerability.\n\n3. **Incorrect Constants**: The condition checks for a specific combination (SSL_HANDSHAKE_MAC_DEFAULT|TLS1_PRF). This combination might be a legacy one for older TLS versions. For TLS 1.2, it replaces it with a more secure set (using SHA256). This is likely an upgrade mechanism. There is no obvious flaw in this logic.\n\n4. **Bitwise Operations**: The bitwise operations are consistent and use defined constants. There is no risk of integer overflow because the values are bit flags and not arithmetic.\n\nGiven the above, we do not see any security vulnerability in this function.\n\nTherefore, we conclude that there are no vulnerabilities detected.\n\nFinal Response:\n\nNO_VUL\n</think>\n### Analysis of `ssl_get_algorithm2`\n\n1. **Function Logic**:\n   - Retrieves `algorithm2` from the cipher suite (`s->s3->tmp.new_cipher->algorithm2`).\n   - If the SSL/TLS version is `TLS1_2_VERSION` and `algorithm2` matches `(SSL_HANDSHAKE_MAC_DEFAULT | TLS1_PRF)`, it returns a hardcoded value `SSL_HANDSHAKE_MAC_SHA256 | TLS1_PRF_SHA256`.\n   - Otherwise, returns the original `algorithm2`.\n\n2. **Pointer Dereferences**:\n   - Dereferences `s->s3`, `s->s3->tmp.new_cipher`, and `s->method` without explicit NULL checks.\n   - However, these pointers are part of OpenSSL's internal state management and are expected to be valid during this function's execution (e.g., `s->s3` is initialized early in the handshake). No evidence suggests they can be NULL here.\n\n3. **Macro Values**:\n   - `SSL_HANDSHAKE_MAC_DEFAULT | TLS1_PRF` is a fixed expression using predefined constants.\n   - The condition and return values are compile-time constants with no input-dependent vulnerabilities (e.g., no integer overflows).\n\n4. **Vulnerability Assessment**:\n   - **No NULL Pointer Checks**: Lack of NULL checks is typical in internal functions where preconditions ensure validity. No CWE applies without evidence of a NULL-dereference scenario.\n   - **No Arithmetic Issues**: All operations are bitwise-ORs on constants or assignments; no risk of overflows or underflows.\n   - **Control Flow**: The logic is deterministic and side-effect-free.\n\n**Conclusion**:  \nThe function contains no detectable security vulnerabilities. It safely handles algorithm selection for TLS 1.2 without introducing weaknesses.\n\nNO_VUL",
    "role": "assistant"
  }
]
2.2.2 数据转换
通过对比原始数据集与训练数据集Messages格式发现只需要写一个简易脚本,提取原始数据集的prompt和completion字段,写入一条jsonl数据即可完成数据转换。
首先创建以下文件目录,其中data.parquet为已下载的原始数据集(本案例为train-00000-of-00001.parquet),process.py为数据转换脚本。
data_process
│   process.py
│   data.parquet
在本样例中,我们准备的脚本process.py如下:
import json
import pandas as pd
from pathlib import Path

def convert_parquet_to_jsonl(input_file, output_file=None):
    """将parquet转换为JSONL,合并prompt和completion为messages"""

    input_file = Path(input_file)
    if output_file is None:
        output_file = input_file.with_suffix('.jsonl')

    # 读取parquet
    df = pd.read_parquet(input_file)

    # 转换并写入
    with open(output_file, 'w', encoding='utf-8') as f:
        for _, row in df.iterrows():
            # 获取prompt和completion,转为列表
            prompt = row['prompt'].tolist()
            completion = row['completion'].tolist()

            # 合并messages
            messages = prompt + completion

            # 写入jsonl
            f.write(json.dumps({"messages": messages}, ensure_ascii=False) + '\n')

    print(f"完成!输出: {output_file}")

if __name__ == "__main__":
    import sys
    if len(sys.argv) > 1:
        convert_parquet_to_jsonl(sys.argv[1])
    else:
        print("用法: python process.py data.parquet [output.jsonl]")
为了执行该脚本,确保已安装conda,在命令行中执行以下命令:
# 创建一个名为"process"的Python虚拟环境,并在其中安装必要的数据处理库
conda create -n process python pandas pyarrow -y
conda activate process
在文件目录data_process下执行以下命令,即可返回符合messages格式的指令数据集文件data.jsonl:
# 原始命令为python process.py data.parquet
# data.parquet为下载的原始数据集,本案例为train-00000-of-00001.parquet
python process.py train-00000-of-00001.parquet
处理后的一条jsonl数据如下所示:
{
    "messages": [
        {
            "content": "You are a vulnerability detection expert specializing in identifying security flaws in C/C++ code, with a focus on Common Weakness Enumeration (CWE) standards. You provide precise, evidence-based analysis without speculation, and clearly label any vulnerabilities you detect.",
            "role": "system"
        },
        {
            "content": "Your task is to evaluate whether the following C/C++ code contains any security vulnerabilities.\n\nYou will be provided with two sections:\n1. Context: Relevant code such as includes, type definitions, global variables, macros, and definitions of any functions called within the target function.\n2. Code: The target function to analyze.\n\nUse all available information to analyze the function step by step.\nIf the target function alone is insufficient to determine whether a vulnerability exists, refer to the Context section before making a judgment.\nDo not assume vulnerabilities — only report what is supported by the code and context.\n\nIn your final response, list all detected vulnerabilities and CWE identifiers if applicable.\nConclude with one of the following indicators on a new line:\n- HAS_VUL — if any vulnerabilities are found\n- NO_VUL — if no vulnerabilities are found\n    \n```Context\nIncludes:\n- #include <stdio.h>\n- #include <openssl/objects.h>\n- #include \"ssl_locl.h\"\n- #include \"kssl_lcl.h\"\n- #include \"../crypto/ec/ec_lcl.h\"\n- #include <openssl/md5.h>\n- #include <openssl/dh.h>\n\nCalled Methods:\n- TLS1_PRF_SHA256: #define TLS1_PRF_SHA256 (SSL_HANDSHAKE_MAC_SHA256 << TLS1_PRF_DGST_SHIFT)   \n- SSL_HANDSHAKE_MAC_DEFAULT: #define SSL_HANDSHAKE_MAC_DEFAULT (SSL_HANDSHAKE_MAC_MD5 | SSL_HANDSHAKE_MAC_SHA)   \n- TLS1_PRF: #define TLS1_PRF (TLS1_PRF_MD5 | TLS1_PRF_SHA1)   \n- SSL_HANDSHAKE_MAC_SHA256: #define SSL_HANDSHAKE_MAC_SHA256 0x80   \n```\n```Code\nFile: ssl/s3_lib.c\nMethod: ssl_get_algorithm2\n----------------------------------------\n long ssl_get_algorithm2(SSL *s)\n        {\n        long alg2 = s->s3->tmp.new_cipher->algorithm2;\n       if (s->method->version == TLS1_2_VERSION &&\n            alg2 == (SSL_HANDSHAKE_MAC_DEFAULT|TLS1_PRF))\n                return SSL_HANDSHAKE_MAC_SHA256 | TLS1_PRF_SHA256;\n        return alg2;\n\t}\n```\n\nAnalyze the code now.",
            "role": "user"
        },
        {
            "content": "<think>\nWe are given the context and the code for the function `ssl_get_algorithm2`.\n\nContext:\nIncludes: several OpenSSL headers and specific macros.\n\nCalled Methods (actually macros in this context):\n- TLS1_PRF_SHA256: defined as `(SSL_HANDSHAKE_MAC_SHA256 << TLS1_PRF_DGST_SHIFT)`\n  - Note: We don't have the definition of `TLS1_PRF_DGST_SHIFT` but it might not be needed for this analysis.\n- SSL_HANDSHAKE_MAC_DEFAULT: defined as `(SSL_HANDSHAKE_MAC_MD5 | SSL_HANDSHAKE_MAC_SHA)`\n- TLS1_PRF: defined as `(TLS1_PRF_MD5 | TLS1_PRF_SHA1)`\n- SSL_HANDSHAKE_MAC_SHA256: defined as `0x80`\n\nCode:\n```c\nlong ssl_get_algorithm2(SSL *s)\n{\n    long alg2 = s->s3->tmp.new_cipher->algorithm2;\n    if (s->method->version == TLS1_2_VERSION &&\n        alg2 == (SSL_HANDSHAKE_MAC_DEFAULT|TLS1_PRF))\n        return SSL_HANDSHAKE_MAC_SHA256 | TLS1_PRF_SHA256;\n    return alg2;\n}\n```\n\nStep-by-step analysis:\n\n1. The function retrieves the `algorithm2` field from the cipher structure in the SSL session state (s->s3->tmp.new_cipher).\n\n2. It then checks two conditions:\n   a. The SSL method version is `TLS1_2_VERSION`.\n   b. The `alg2` value is equal to `(SSL_HANDSHAKE_MAC_DEFAULT | TLS1_PRF)`.\n\n3. If both conditions are true, it returns `SSL_HANDSHAKE_MAC_SHA256 | TLS1_PRF_SHA256`.\n   Otherwise, it returns the original `alg2`.\n\nNow, let's break down the constants:\n\n- `SSL_HANDSHAKE_MAC_DEFAULT` is `(SSL_HANDSHAKE_MAC_MD5 | SSL_HANDSHAKE_MAC_SHA)`\n  - Without the actual values of `SSL_HANDSHAKE_MAC_MD5` and `SSL_HANDSHAKE_MAC_SHA`, we can note that they are bitwise OR'ed.\n\n- `TLS1_PRF` is `(TLS1_PRF_MD5 | TLS1_PRF_SHA1)`\n  - Similarly, we don't have the individual values for `TLS1_PRF_MD5` and `TLS1_PRF_SHA1`.\n\nBut note: The condition checks if `alg2` is exactly `(SSL_HANDSHAKE_MAC_DEFAULT | TLS1_PRF)`.\n\nIn the return statement when the condition is true, we return:\n  `SSL_HANDSHAKE_MAC_SHA256 | TLS1_PRF_SHA256`\n\nGiven that `SSL_HANDSHAKE_MAC_SHA256` is defined as `0x80` (from the context).\n\nWe don't have the definition of `TLS1_PRF_SHA256` but the context says:\n  `#define TLS1_PRF_SHA256 (SSL_HANDSHAKE_MAC_SHA256 << TLS1_PRF_DGST_SHIFT)`\n\nWithout knowing `TLS1_PRF_DGST_SHIFT`, we cannot compute the exact value, but note that the condition and the return are both using bitwise operations.\n\nHowever, the code does not contain any obvious security vulnerabilities. It is simply selecting a different algorithm set when the version is TLS 1.2 and the algorithm2 matches a particular legacy value.\n\nPotential issues to consider:\n\n1. **Type Mismatch or Undefined Behavior**: The types used are `long` for the algorithm identifiers. The bitwise operations are standard and should not cause issues.\n\n2. **Null Pointers**: The function dereferences `s`, `s->s3`, `s->s3->tmp.new_cipher`, and `s->method`. However, the function does not check if these pointers are valid. But note that this function is part of a larger codebase and might be called in a context where these pointers are always valid. Without more context about the calling function, we cannot assume that these pointers can be NULL. Since the problem states to not assume vulnerabilities without evidence, and we are not given any context that these pointers might be NULL, we cannot flag this as a vulnerability.\n\n3. **Incorrect Constants**: The condition checks for a specific combination (SSL_HANDSHAKE_MAC_DEFAULT|TLS1_PRF). This combination might be a legacy one for older TLS versions. For TLS 1.2, it replaces it with a more secure set (using SHA256). This is likely an upgrade mechanism. There is no obvious flaw in this logic.\n\n4. **Bitwise Operations**: The bitwise operations are consistent and use defined constants. There is no risk of integer overflow because the values are bit flags and not arithmetic.\n\nGiven the above, we do not see any security vulnerability in this function.\n\nTherefore, we conclude that there are no vulnerabilities detected.\n\nFinal Response:\n\nNO_VUL\n</think>\n### Analysis of `ssl_get_algorithm2`\n\n1. **Function Logic**:\n   - Retrieves `algorithm2` from the cipher suite (`s->s3->tmp.new_cipher->algorithm2`).\n   - If the SSL/TLS version is `TLS1_2_VERSION` and `algorithm2` matches `(SSL_HANDSHAKE_MAC_DEFAULT | TLS1_PRF)`, it returns a hardcoded value `SSL_HANDSHAKE_MAC_SHA256 | TLS1_PRF_SHA256`.\n   - Otherwise, returns the original `algorithm2`.\n\n2. **Pointer Dereferences**:\n   - Dereferences `s->s3`, `s->s3->tmp.new_cipher`, and `s->method` without explicit NULL checks.\n   - However, these pointers are part of OpenSSL's internal state management and are expected to be valid during this function's execution (e.g., `s->s3` is initialized early in the handshake). No evidence suggests they can be NULL here.\n\n3. **Macro Values**:\n   - `SSL_HANDSHAKE_MAC_DEFAULT | TLS1_PRF` is a fixed expression using predefined constants.\n   - The condition and return values are compile-time constants with no input-dependent vulnerabilities (e.g., no integer overflows).\n\n4. **Vulnerability Assessment**:\n   - **No NULL Pointer Checks**: Lack of NULL checks is typical in internal functions where preconditions ensure validity. No CWE applies without evidence of a NULL-dereference scenario.\n   - **No Arithmetic Issues**: All operations are bitwise-ORs on constants or assignments; no risk of overflows or underflows.\n   - **Control Flow**: The logic is deterministic and side-effect-free.\n\n**Conclusion**:  \nThe function contains no detectable security vulnerabilities. It safely handles algorithm selection for TLS 1.2 without introducing weaknesses.\n\nNO_VUL",
            "role": "assistant"
        }
    ]
}
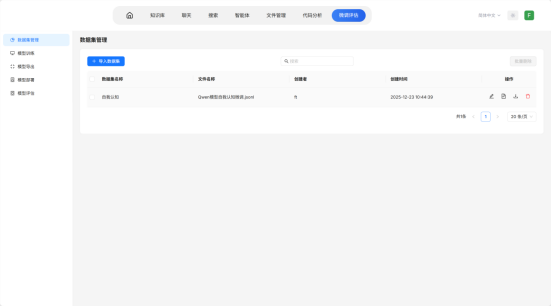
3. 导入数据集
在系统微调评估->数据集管理页面下,点击导入数据集,输入数据集名称(本案例中命名为OpenVul),并通过弹出窗口上传处理好的data.jsonl即可(本案例为train-00000-of-00001.jsonl)。
4. 模型训练
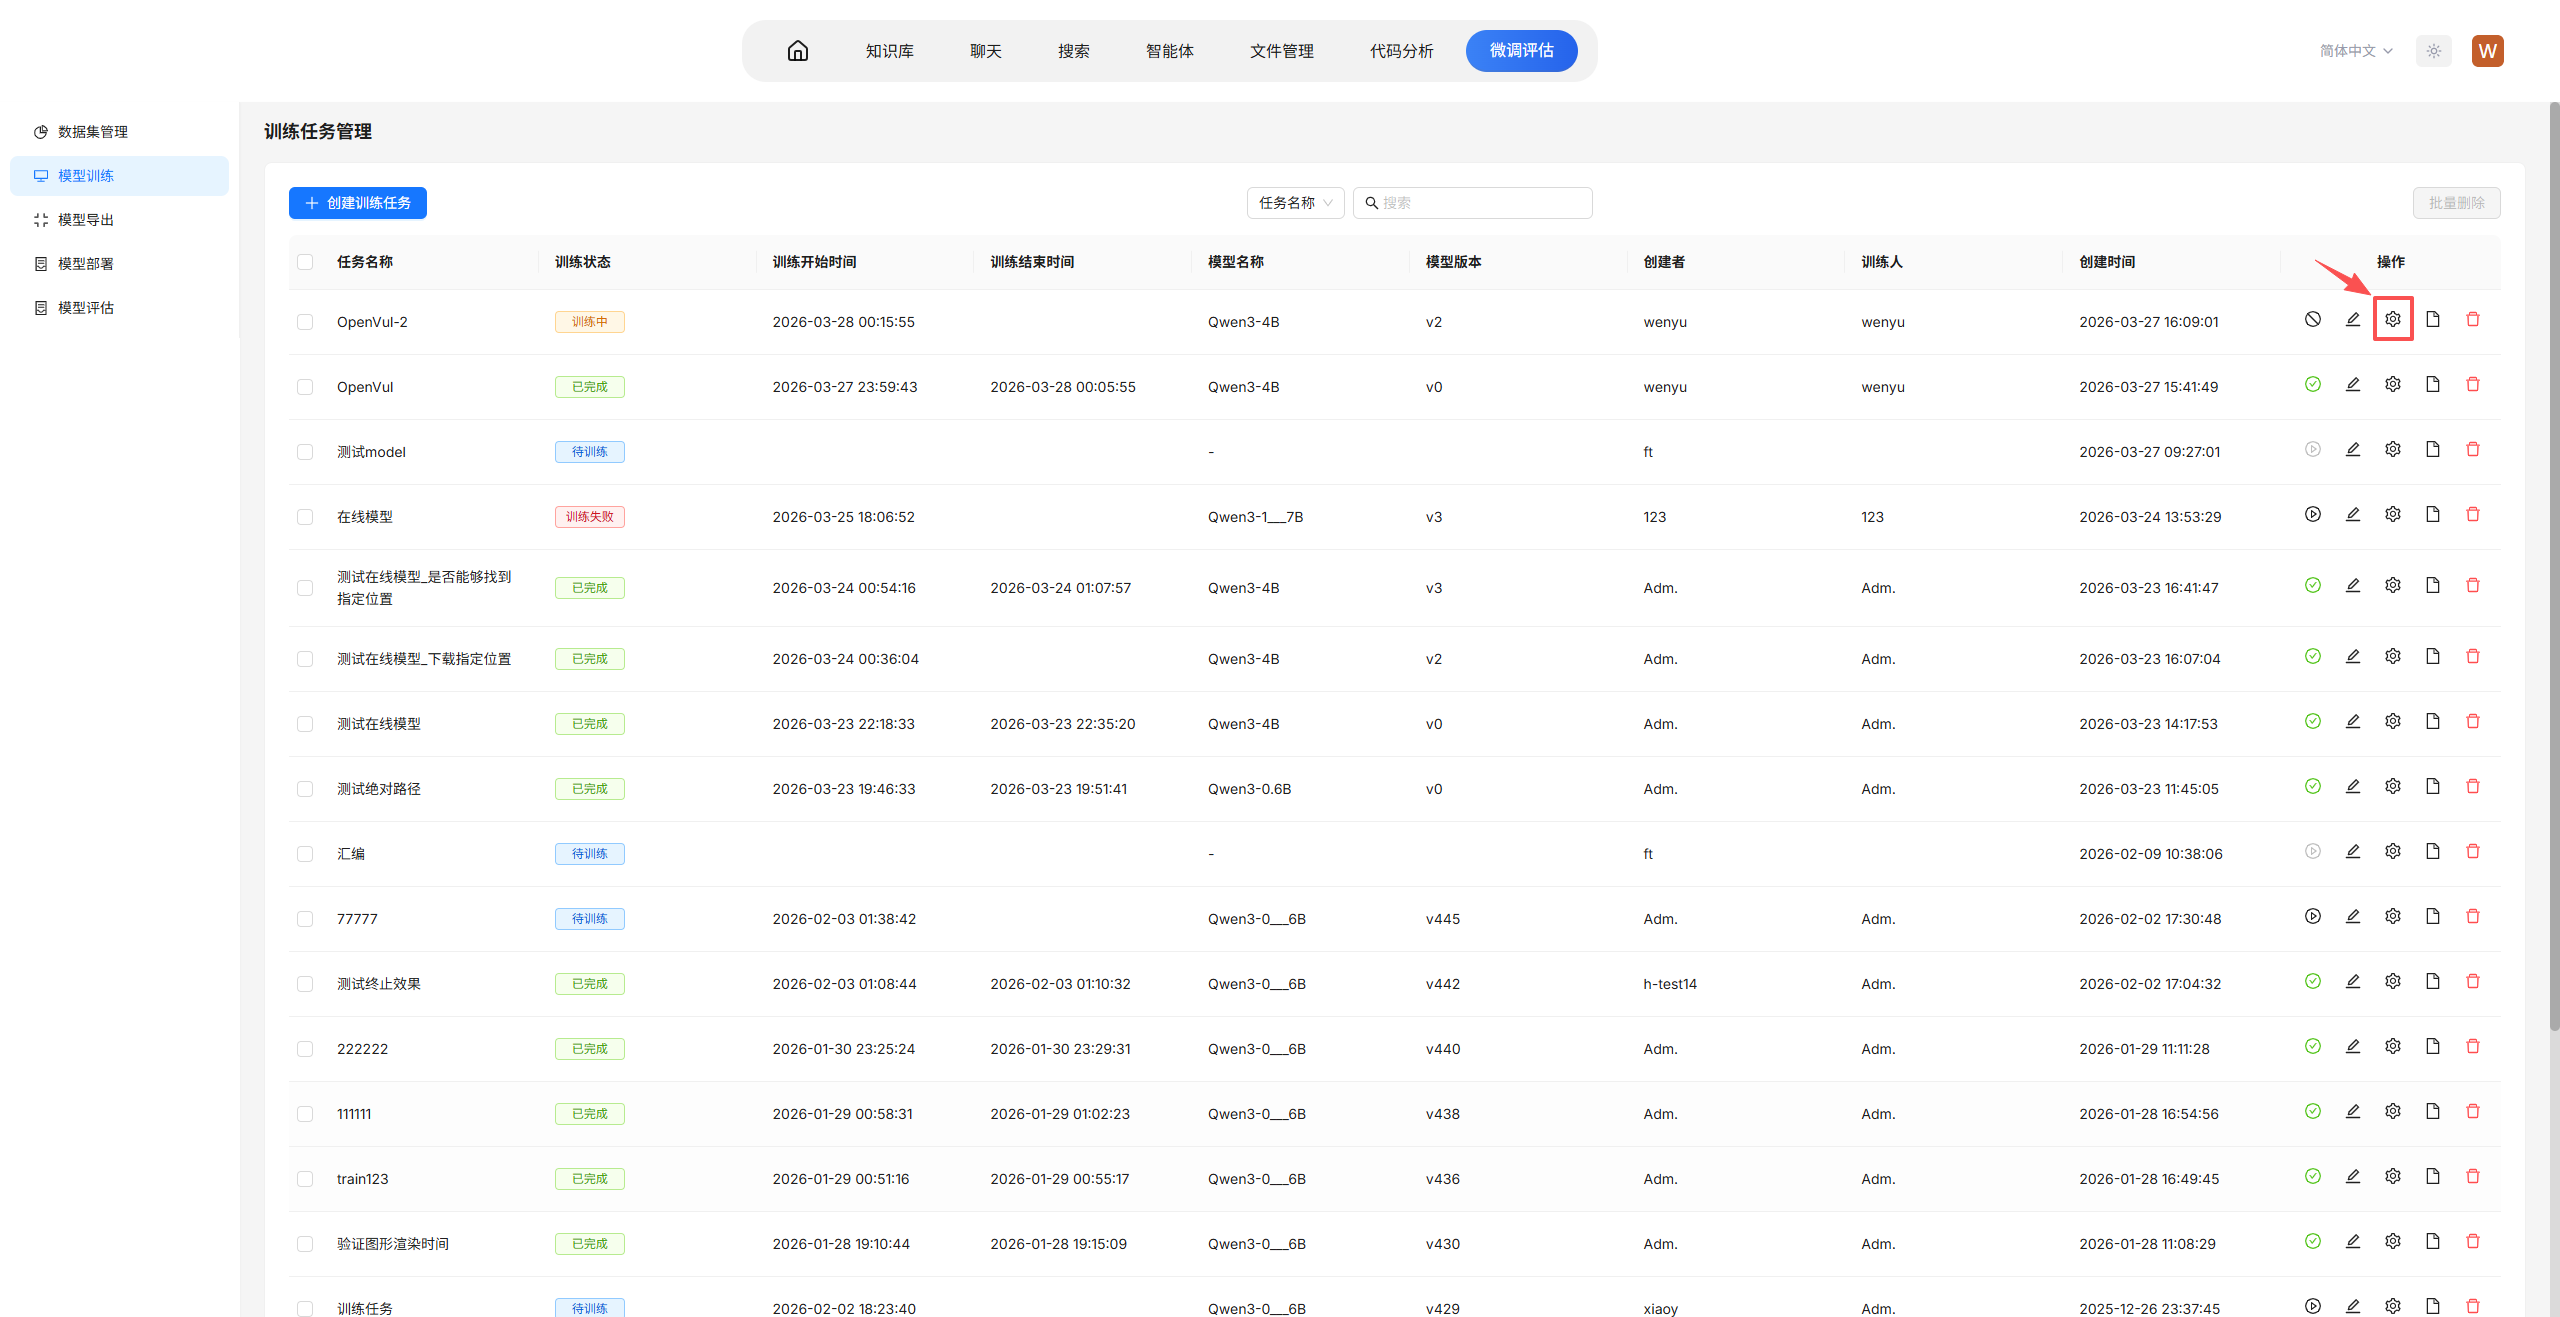
4.1 创建训练任务
在模型训练模块中创建训练任务OpenVul,点击训练配置图标进入配置页面。
4.2 配置训练参数
模型训练参数说明可参考5.1.5节
本案例使用的训练参数配置如下图所示:

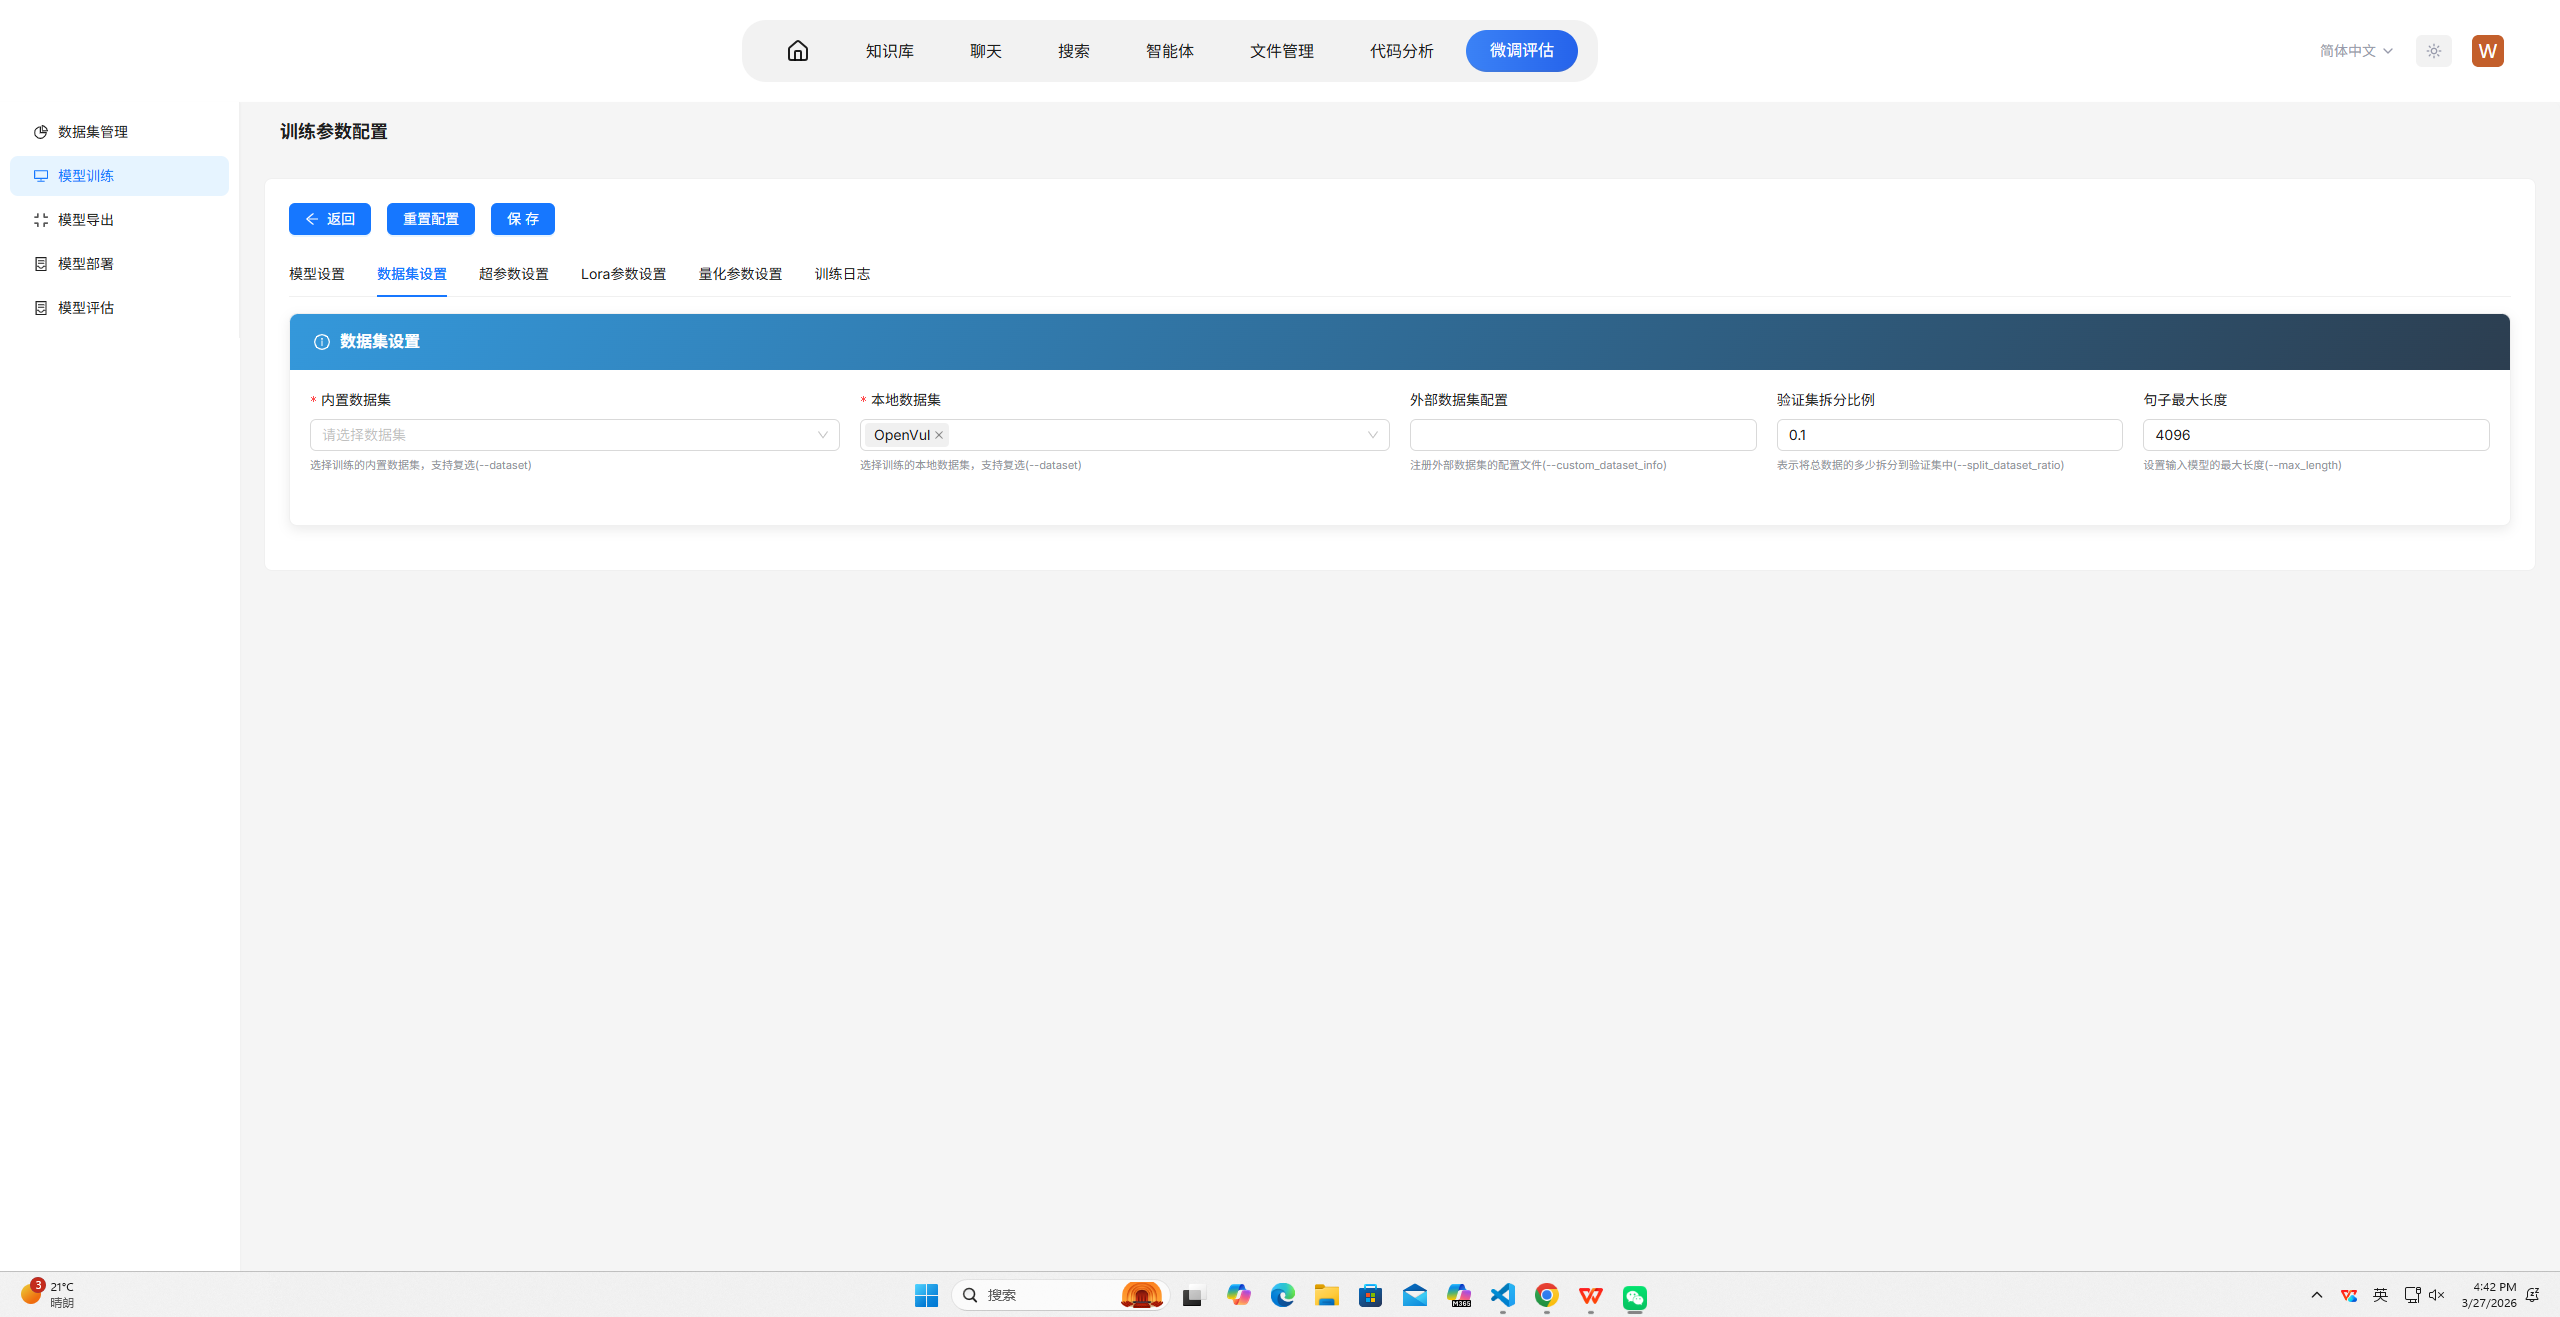
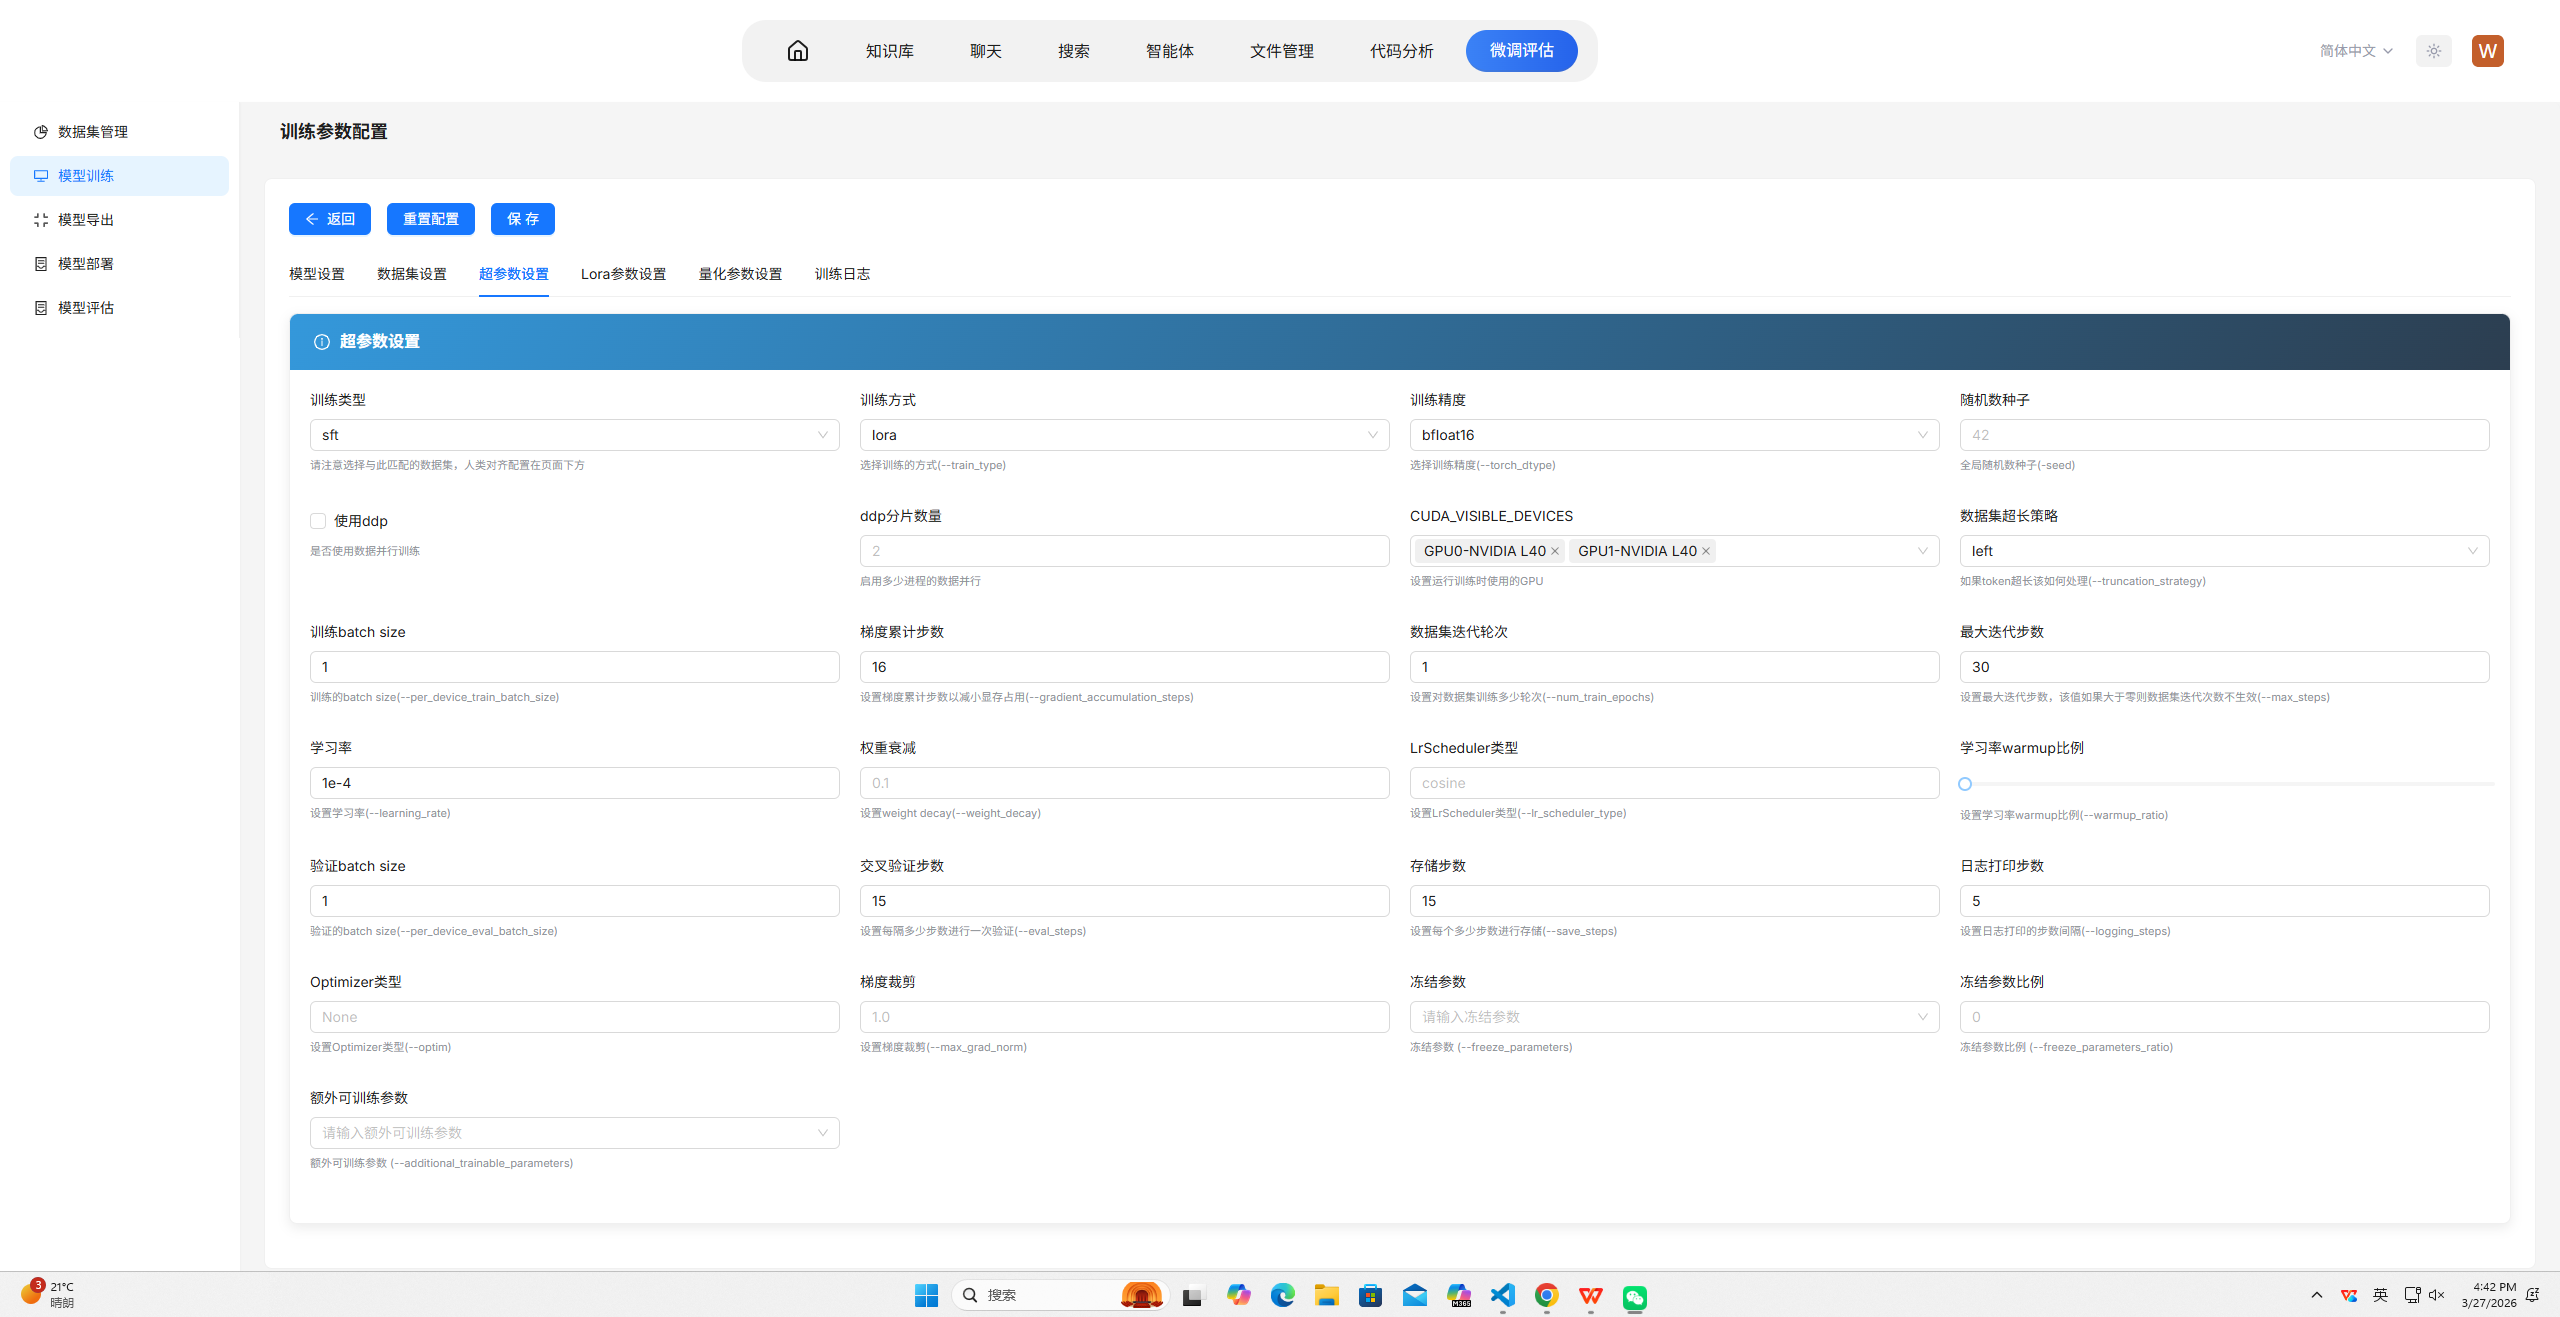
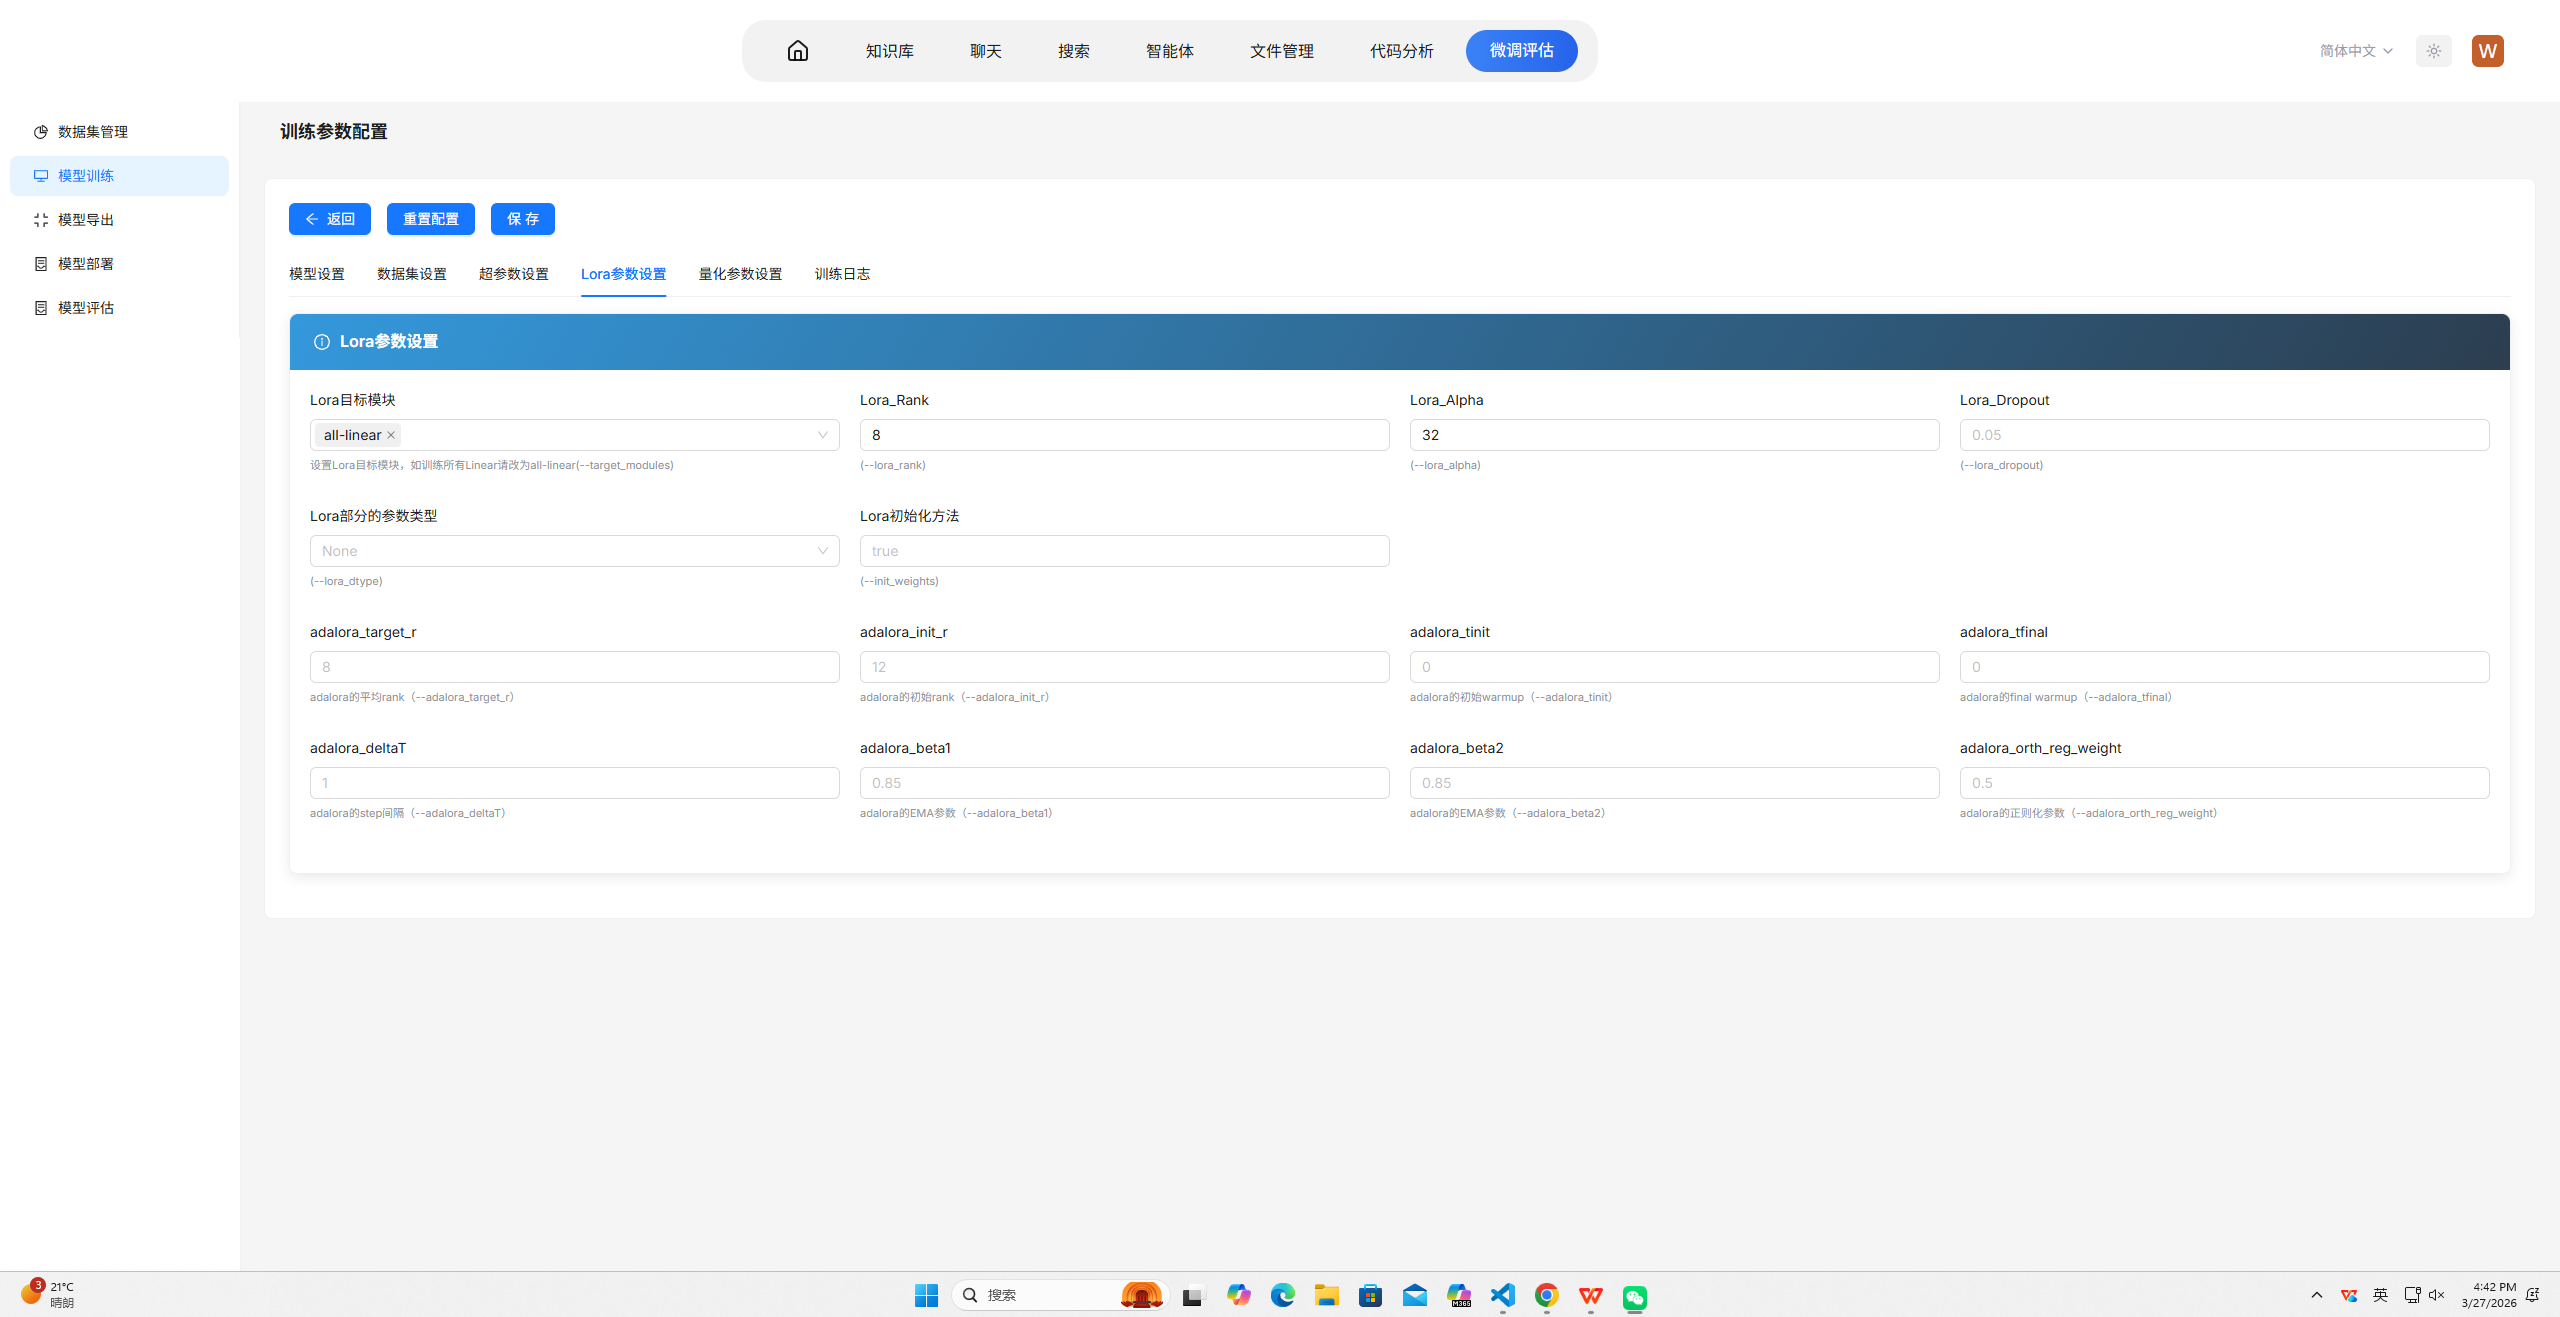
以下训练参数配置旨在快速跑通训练流程进行演示,各项参数均以“快速运行”为首要目标,并未追求模型最佳效果,以下是本样例中参数配置说明:
CUDA_VISIBLE_DEVICES=0,1:指定使用两张GPU进行训练。此处设置为两张主要用于加快训练速度。在普遍训练场景中,该参数应根据实际可用GPU数量设置,一般为0,1,2,3或全部可用卡;对于小规模实验可仅使用单卡,对于大规模训练则建议充分利用所有GPU以提升效率。--train_type lora:采用LoRA参数高效微调。此处选择LoRA是为了仅训练少量新增参数,大幅缩短训练时间,便于快速演示。在普遍训练场景中,LoRA适用于资源受限或需要快速迭代的情况;若追求最佳效果且资源充足,可选择全参数微调(full);此外还有QLoRA等变体可在进一步降低显存的同时保持较好性能。--split_dataset_ratio 0.1:按10%比例划分验证集。此处设置10%是为了演示训练过程中的效果评估,同时保证训练数据足够。在普遍训练场景中,验证集比例通常设为5%-20%,数据量较大时比例可适当降低,数据量较小时可适当提高或采用交叉验证方式。--max_length 4096:设置最大序列长度为4096。此处充分利用模型的上下文窗口,同时演示长文本处理能力。在普遍训练场景中,该参数应根据数据分布和模型能力设置,通常设为2048、4096或8192;若数据中长序列较多且显存充足,可适当增大;若多为短序列,可适当减小以提升训练效率。--torch_dtype bfloat16:使用bf16混合精度训练。此处采用bf16是为了降低显存占用并演示常用的精度优化技术。在普遍训练场景中,bf16适用于支持该精度的硬件(如A100、A40等),可在保持数值稳定性同时提升训练速度;若硬件不支持,可使用fp16;追求极致精度时可使用fp32,但会显著增加显存和训练时间。--truncation_strategy left:采用左侧截断策略。此处选择左侧截断是为了保留序列末尾部分,适合生成类任务保持应答完整性。在普遍训练场景中,截断策略应根据任务特点选择:left适用于生成任务(保留应答),right适用于理解任务(保留上下文),若数据中关键信息分布均匀可采用随机截断或动态截断策略。--per_device_train_batch_size 1:每卡训练批次大小设为1。此处设为最小值是为了降低显存占用,确保在演示环境中稳定运行。在普遍训练场景中,该参数应在显存允许范围内尽可能增大,通常设为4、8或16,以充分利用GPU并行计算能力,加速训练并稳定梯度更新。--gradient_accumulation_steps 16:通过梯度累积实现有效批次大小16。此处设置16是为了在单卡批次较小的情况下保证更新稳定性。在普遍训练场景中,梯度累积步数应与per_device_batch_size配合,使有效批次大小(per_device_batch_size × GPU数量 × gradient_accumulation_steps)达到64-256之间,过大或过小均可能影响收敛效果。--num_train_epochs 1:仅训练1个epoch。此处设置为1是为了配合max_steps确保快速完成。在普遍训练场景中,训练轮数应根据数据规模和任务复杂度确定,通常为3-10个epoch;若数据集较大且模型易过拟合,可减少轮数;若数据量较小或任务较难,可适当增加轮数并结合早停机制。--max_steps 30:设置最大训练步数为30。此处设置为极小值是为了确保训练在短时间内完成,满足演示时长要求。在普遍训练场景中,不应设置max_steps,而是通过epoch数和数据集大小自动计算步数;仅在进行对比实验或调试时需要限制步数。--learning_rate 1e-4:使用1e-4的学习率。此处采用LoRA微调常用的学习率进行演示。在普遍训练场景中,学习率是影响收敛最关键的参数之一:全参数微调通常使用1e-5到5e-5;LoRA微调通常使用1e-4到5e-4;学习率过大易导致不收敛,过小则收敛缓慢,通常需要在小范围网格搜索中确定最佳值。--per_device_eval_batch_size 1:评估批次同样设为1。此处设为最小值是为了保证评估过程稳定运行。在普遍训练场景中,评估批次可适当大于训练批次(如2-8),因为评估过程不保存梯度,显存占用较低,适当增大可加速评估流程。--eval_steps 15:每15步进行一次验证集评估。此处设置较小步数是为了演示训练过程中的实时效果监控。在普遍训练场景中,评估频率应根据总训练步数确定,通常每100-500步评估一次,评估过于频繁会显著增加训练时间,评估过少则无法及时监控过拟合情况。--save_steps 15:每15步保存一次模型检查点。此处设置较小步数是为了展示模型保存机制。在普遍训练场景中,保存频率应根据训练总时长和存储空间确定,通常每500-1000步保存一次,或每个epoch保存一次;保存过于频繁会占用大量存储空间。--logging_steps 5:每5步记录一次训练日志。此处设置较小步数是为了便于演示时查看实时损失变化。在普遍训练场景中,日志记录频率通常设为10-100步,过频繁的日志记录会增加I/O开销但对训练效果无直接影响。--target-modules all-linear:对所有线性层添加LoRA适配器。此处设置为all-linear是为了展示如何灵活配置目标模块。在普遍训练场景中,可根据任务特点选择特定模块:对于代码类任务通常对全部线性层添加适配器效果较好;对于特定领域任务,可仅对注意力层(q_proj、v_proj等)添加适配器以降低参数量。--lora_rank 8:LoRA秩设为8。此处设置较小值是为了进一步减少可训练参数量,加快训练速度。在普遍训练场景中,秩的大小决定LoRA的表达能力:通常设为8、16、32或64,秩越大表达能力越强但参数量增加,需要根据任务复杂度和数据量权衡;简单任务可用较小秩,复杂任务需适当增大。--lora_alpha 32:缩放因子设为32。此处与rank保持合理比例(alpha/rank=4),演示LoRA的标准配置方式。在普遍训练场景中,alpha通常设为rank的2-4倍,控制LoRA适配器对原始权重的缩放程度;alpha/rank比值越大,LoRA的影响越显著,一般保持在2-4之间效果较为稳定。--dataset /path/to/data.jsonl:指定单条JSONL数据文件。此处使用单文件是为了简化数据准备流程。在普遍训练场景中,通常需要指定多个数据文件或数据目录,并可通过参数控制各数据集的采样比例,以平衡不同来源或不同任务的数据分布。
注:
基础模型参数设置:
一.用户可以通过下拉选择系统内置的模型,
二.直接填写modelscope上开源的模型名称id,系统会自动下载模型并保存至本地llm-model目录下,以供训练
三.用户已经下载到本地可以通过绝对路径来指定训练的模型

所有模型的训练版本统一保存在llm-model目录下(与项目llm-source在同一文件夹中)。
要迁移至实际生产环境,建议进行以下调整:
| 参数 | 当前演示设置 | 生产环境建议 |
|---|---|---|
--max_steps | 30 | 移除,改用--num_train_epochs 3-5 |
--per_device_train_batch_size | 1 | 根据显存调整为4-8 |
--lora_rank | 8 | 根据任务复杂度调整为16或32 |
--eval_steps | 15 | 调整为100-500 |
--save_steps | 15 | 调整为500-1000 |
--learning_rate | 1e-5 | 通过小范围搜索确定最佳值 |
通过以上调整,可在快速验证流程的基础上,逐步优化超参数以获得最佳的模型性能。
4.3启动训练与监控
完成配置后启动训练任务,通过训练图表实时监控训练过程。训练结束后,从生成的检查点中选择表现最优版本。
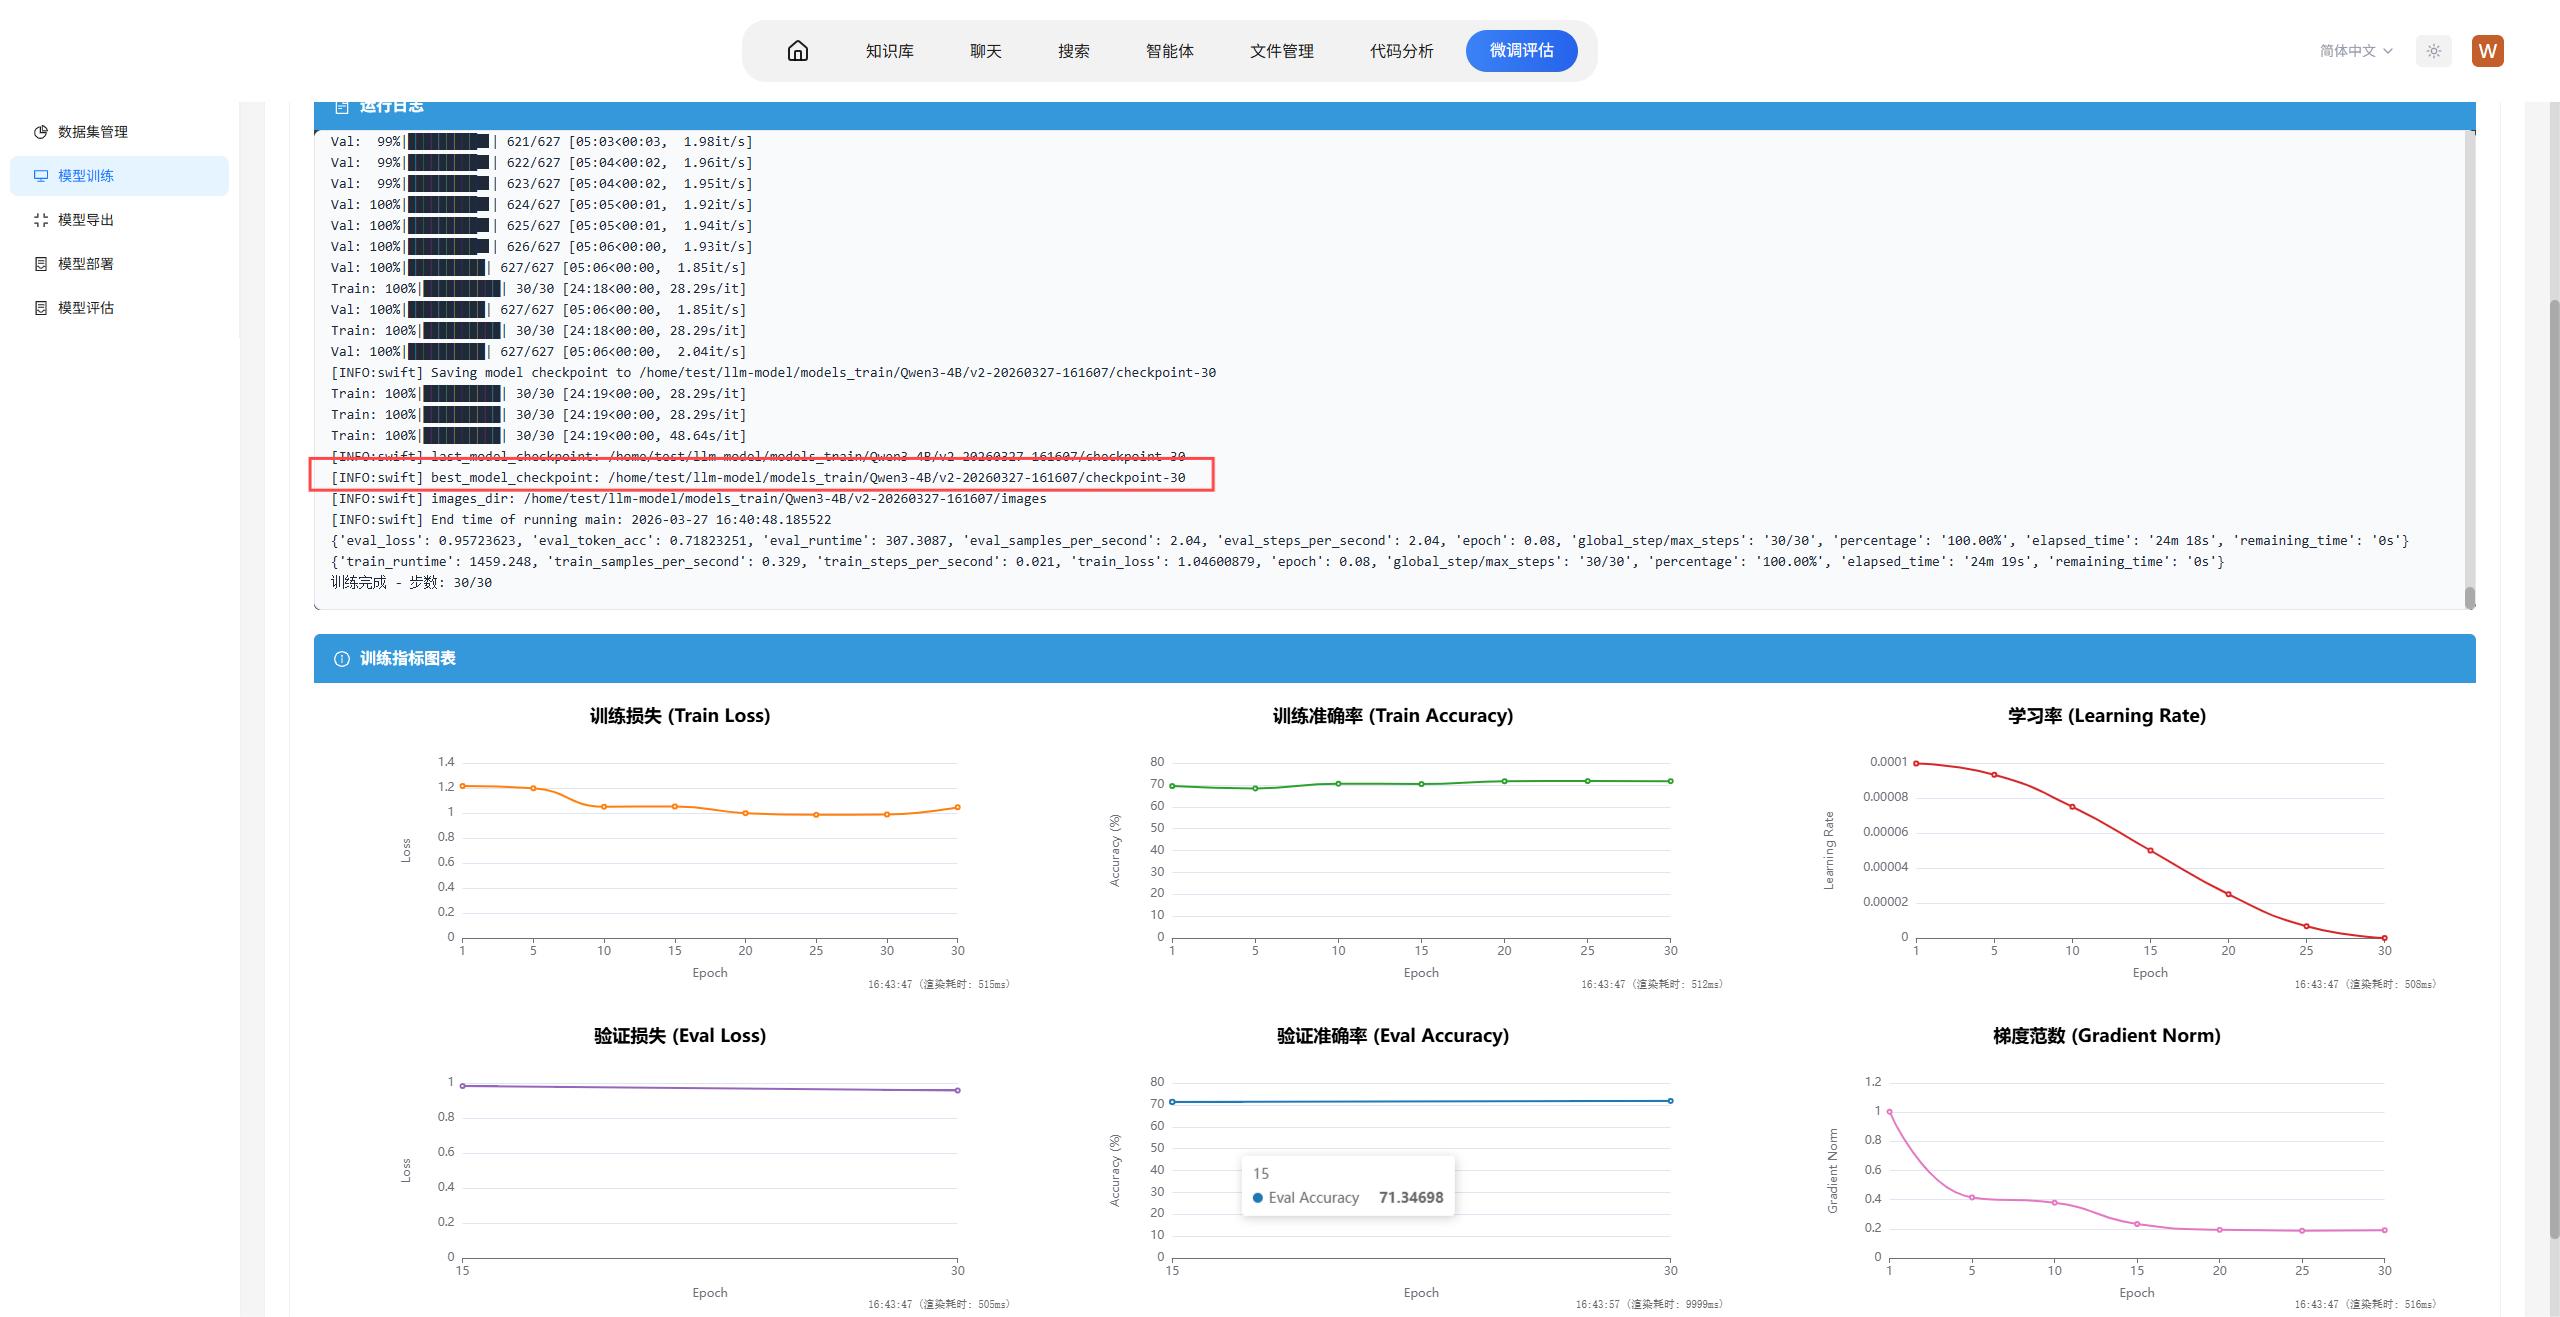
4.4 超参数调优与问题诊断策略
在模型微调过程中,超参数的选择直接影响最终效果。以下结合本次快速训练脚本,介绍通用的超参数调优规则以及针对过拟合和欠拟合的诊断与处理方法。
训练结束后,通过对比训练集损失和验证集损失可以判断模型状态:
欠拟合:训练集损失较高且未充分下降,验证集损失同样处于高位,两者差距不大。典型表现为损失曲线持续下降但未进入平台期,或学习率过低导致收敛过慢。
过拟合:训练集损失持续下降至较低水平,但验证集损失在某个拐点后开始上升,两者差距逐渐拉大。典型表现为验证集困惑度在训练后期出现反弹。
良好拟合:训练集损失稳定下降,验证集损失同步下降并趋于平缓,两者保持较小的差距。
当出现欠拟合时,说明模型表达能力或学习动力不足,可尝试以下调整方向:
提高学习率:当前脚本使用
--learning_rate 1e-4,若欠拟合可尝试增大至2e-4或3e-4,加快收敛速度。增加训练步数:当前设置
--max_steps 30仅用于快速演示,实际训练时应移除该限制,通过--num_train_epochs 3-5增加训练轮数。增大LoRA秩:当前
--lora_rank 8较小,可尝试增大至16或32,提升模型表达能力。调整批次大小:当前
--per_device_train_batch_size 1配合--gradient_accumulation_steps 16实现有效批次16,若欠拟合可尝试减小梯度累积步数(如8)引入更多梯度噪声,或增大有效批次(如32)使梯度更稳定。移除正则化:若使用LoRA的dropout,可尝试降低
--lora_dropout(默认0.05可降至0.01或0),减少对模型表达能力的限制。
当出现过拟合时,说明模型泛化能力不足,可尝试以下调整方向:
降低学习率:当前
--learning_rate 1e-4,若过拟合可尝试降至5e-5或1e-5,使参数更新更加保守。提前停止:根据验证集损失设置早停机制。当前
--eval_steps 15评估频繁,便于及时监控,可在验证损失连续多次未下降时终止训练。增强正则化:增大LoRA的dropout(如
--lora_dropout 0.1),或通过--weight_decay参数增大权重衰减系数。减小LoRA秩:当前
--lora_rank 8已较小,若仍过拟合可进一步降至4,减少可训练参数量。增大有效批次大小:通过增加梯度累积步数(如
--gradient_accumulation_steps 32)或增加GPU数量,使有效批次达到64-128,平滑梯度更新。
超参数的确定通常遵循“由粗到细”的网格搜索原则:
学习率优先:学习率是最敏感的超参数。可在1e-5到5e-4的对数尺度上选取3-5个候选值进行短时训练(如30-50步),观察损失曲线,选取收敛快且稳定的学习率。
批次大小与学习率联动:增大批次大小时,应适当提高学习率作为补偿。经验上批次大小加倍,学习率可相应乘以√2或2的系数。
LoRA参数调优:固定学习率后,在rank=8、16、32三个档位测试,观察验证集效果。rank与alpha通常保持2-4倍关系,当前
--lora_alpha 32与rank=8的比例为4,符合常见配置。正则化参数微调:在较优的学习率和LoRA参数基础上,小范围调整权重衰减(0.001-0.1)和dropout(0.0-0.2),观察验证损失变化。
早停与模型选择:最终训练时建议启用早停机制,保留验证损失最低的检查点作为最终模型,而非最后一个epoch的模型。
5. 模型部署
点击项目的模型部署模块,新建部署任务。分别命名为“OpenVul-tuned”,点击部署配置的图标,进入配置页。
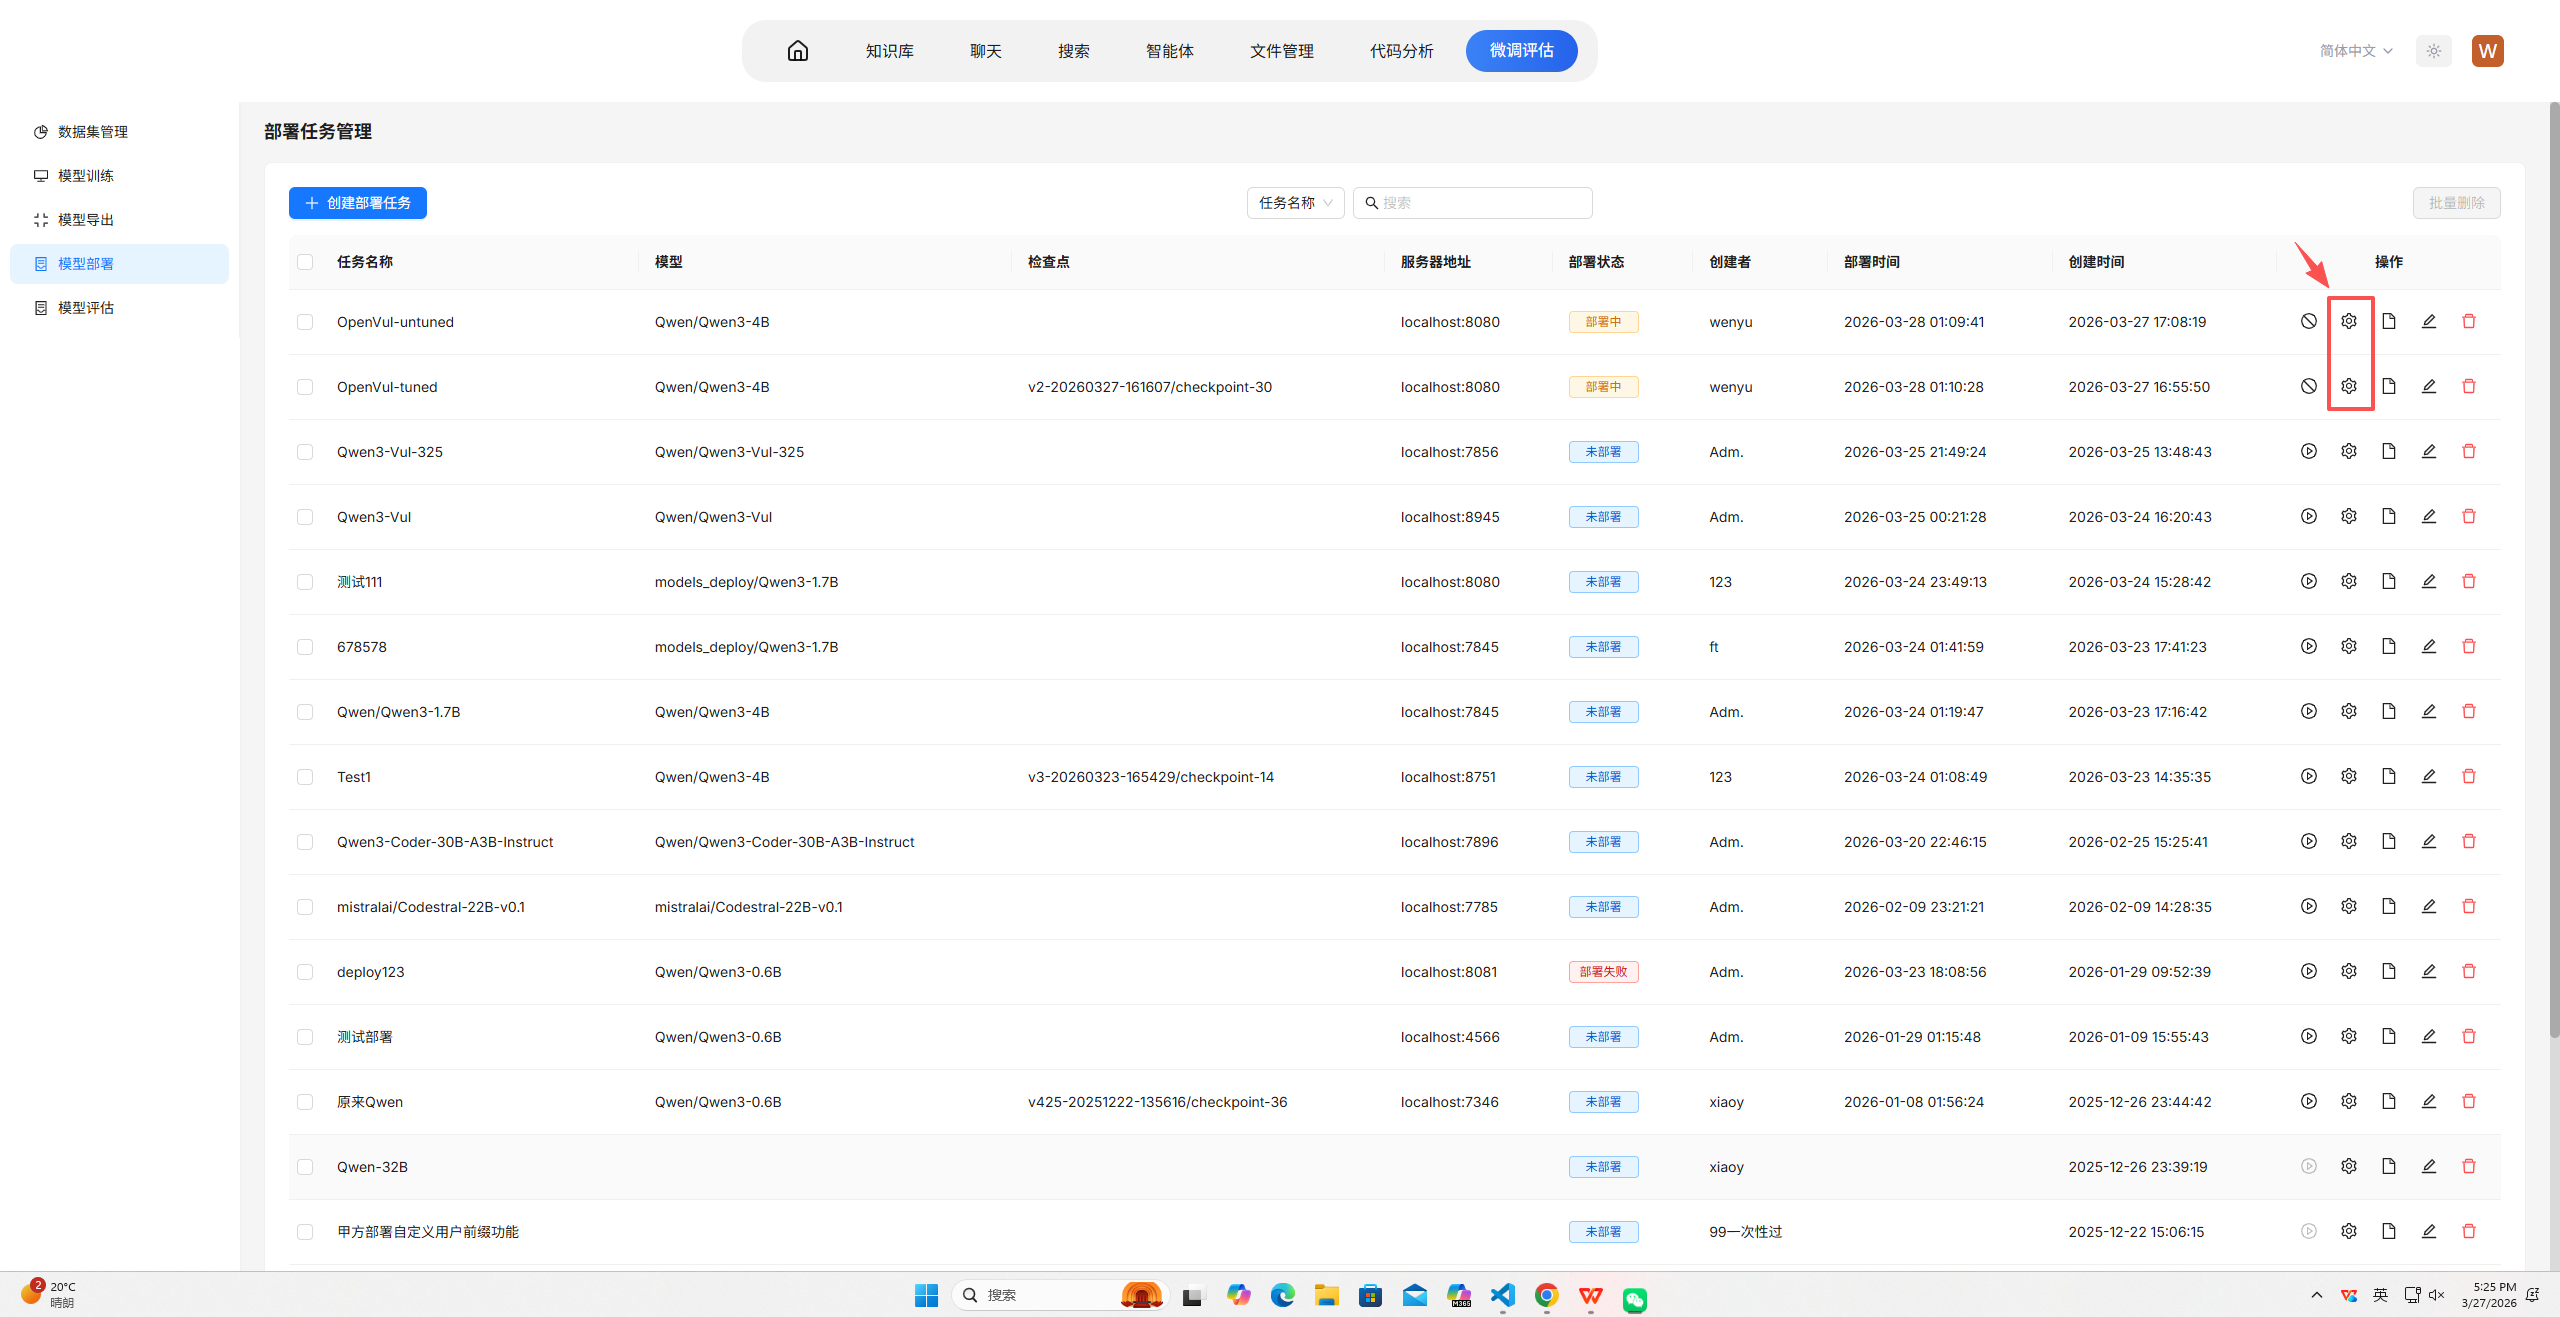
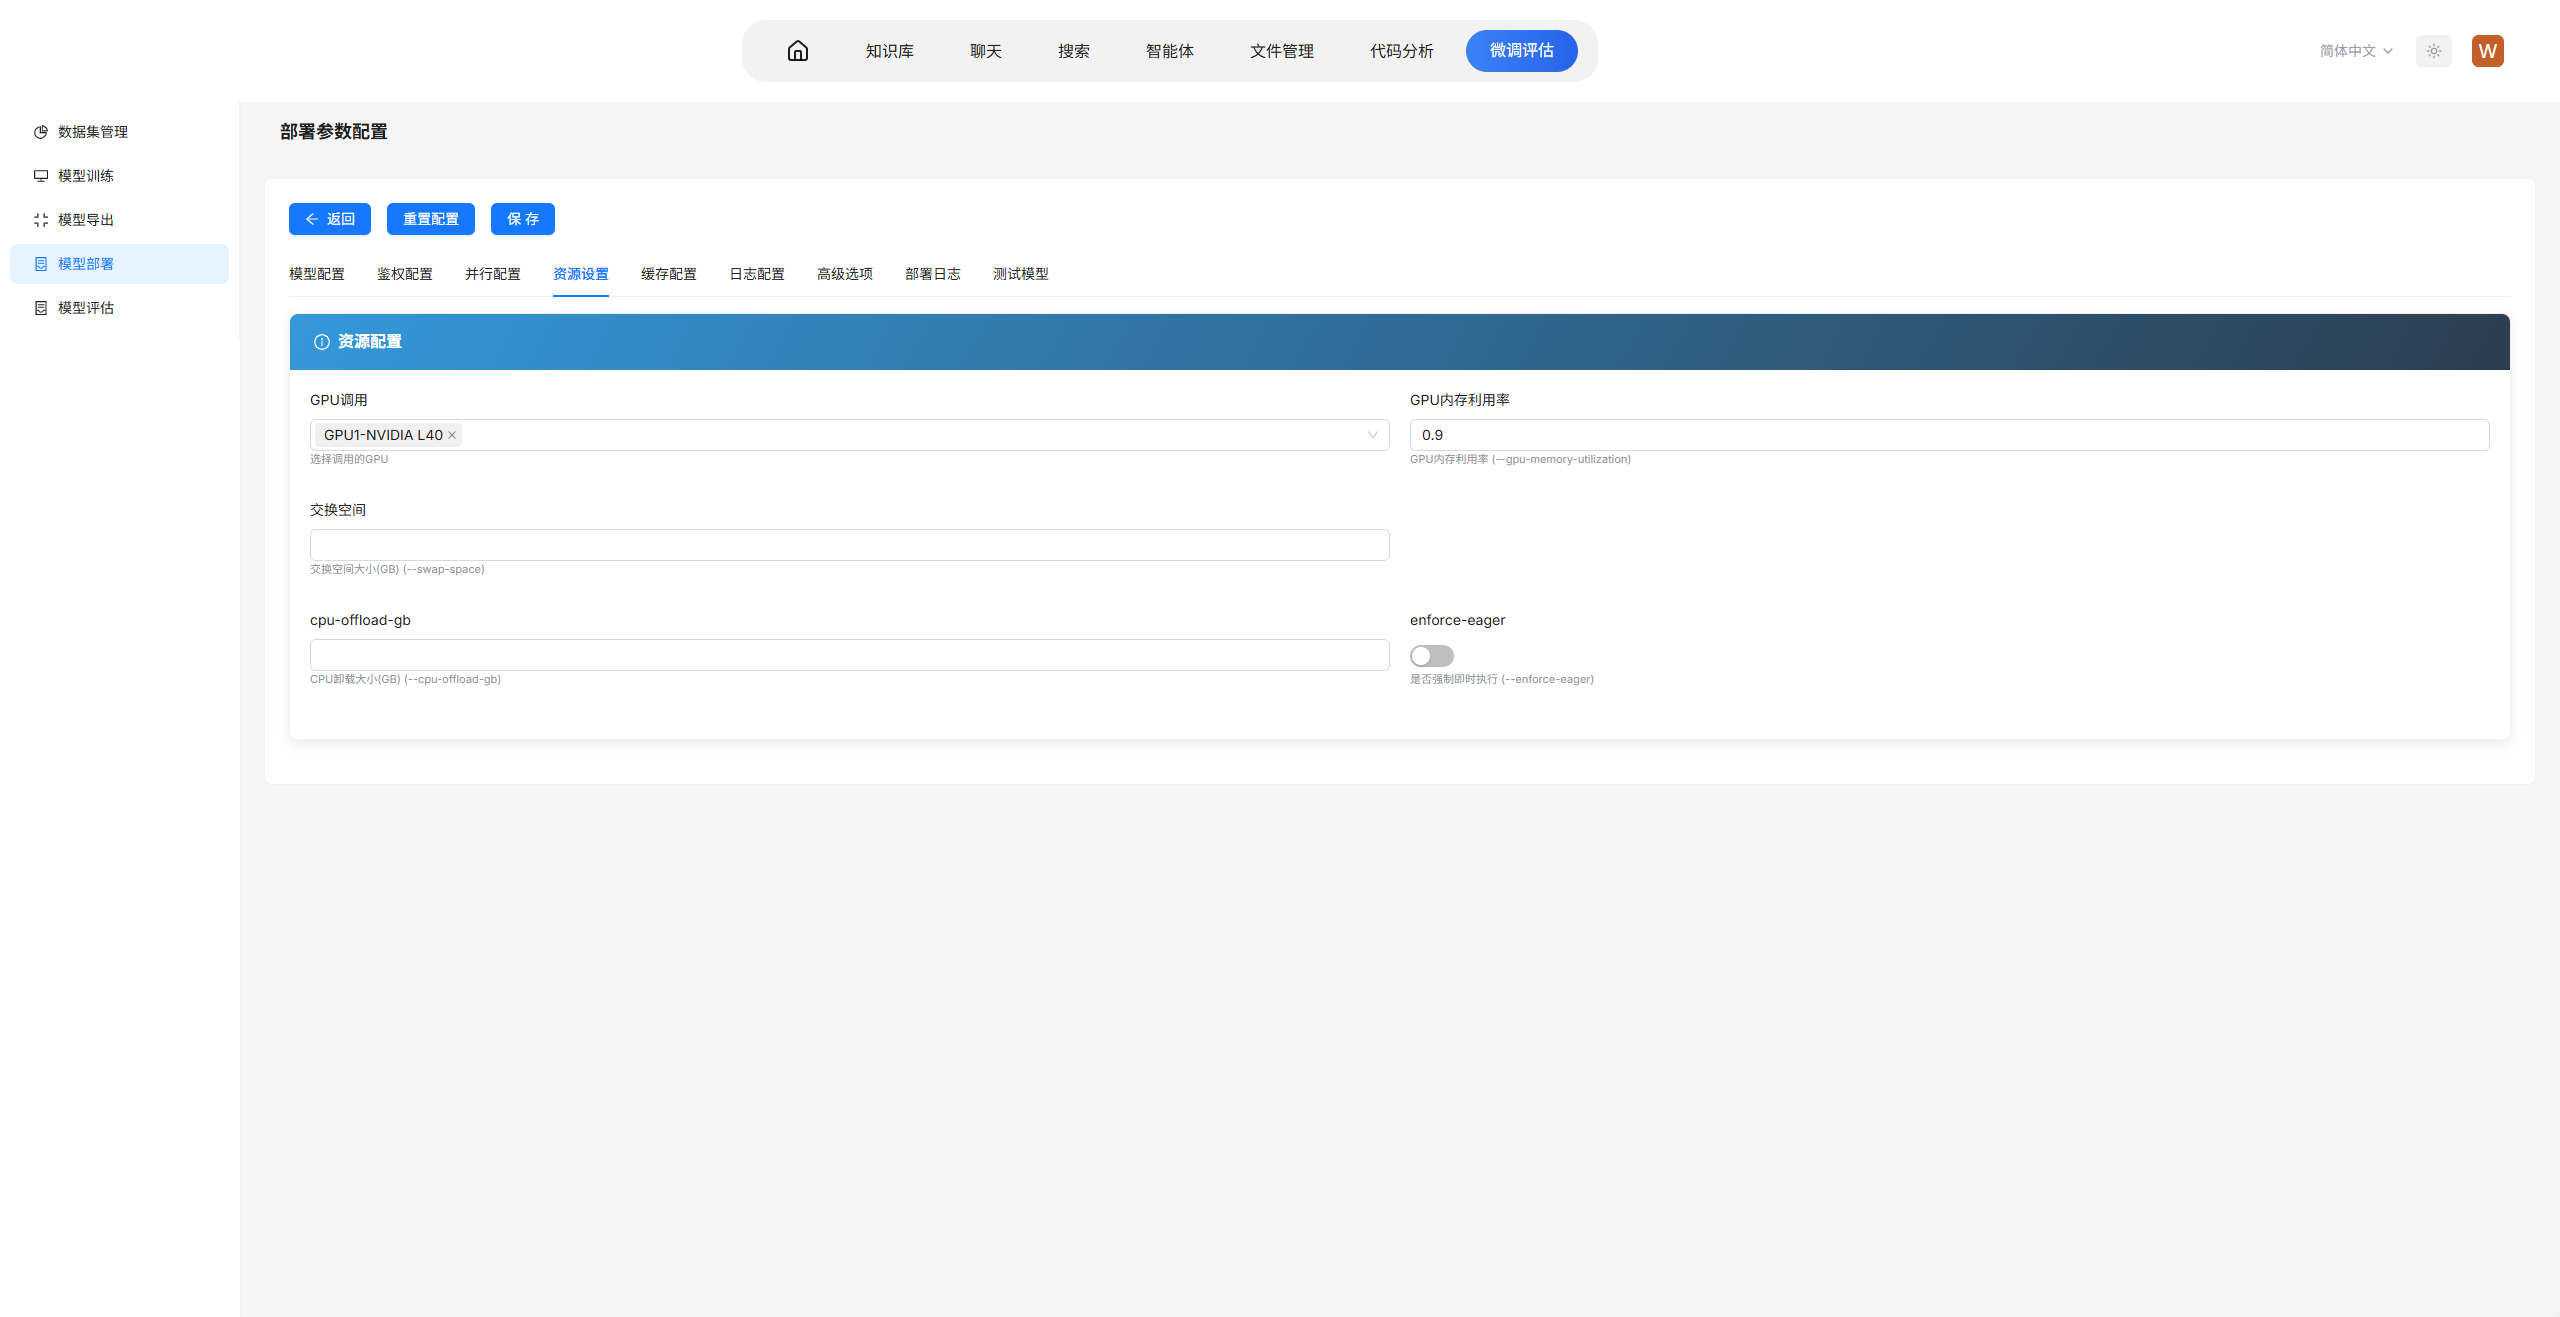
OpenVul-tuned,配置参数设置为使用单卡(CUDA_VISIBLE_DEVICES=1),设置检查点为训练步骤中的最佳检查点,设置最大上下文长度 8192、服务端口 8080、张量并行度为 2。
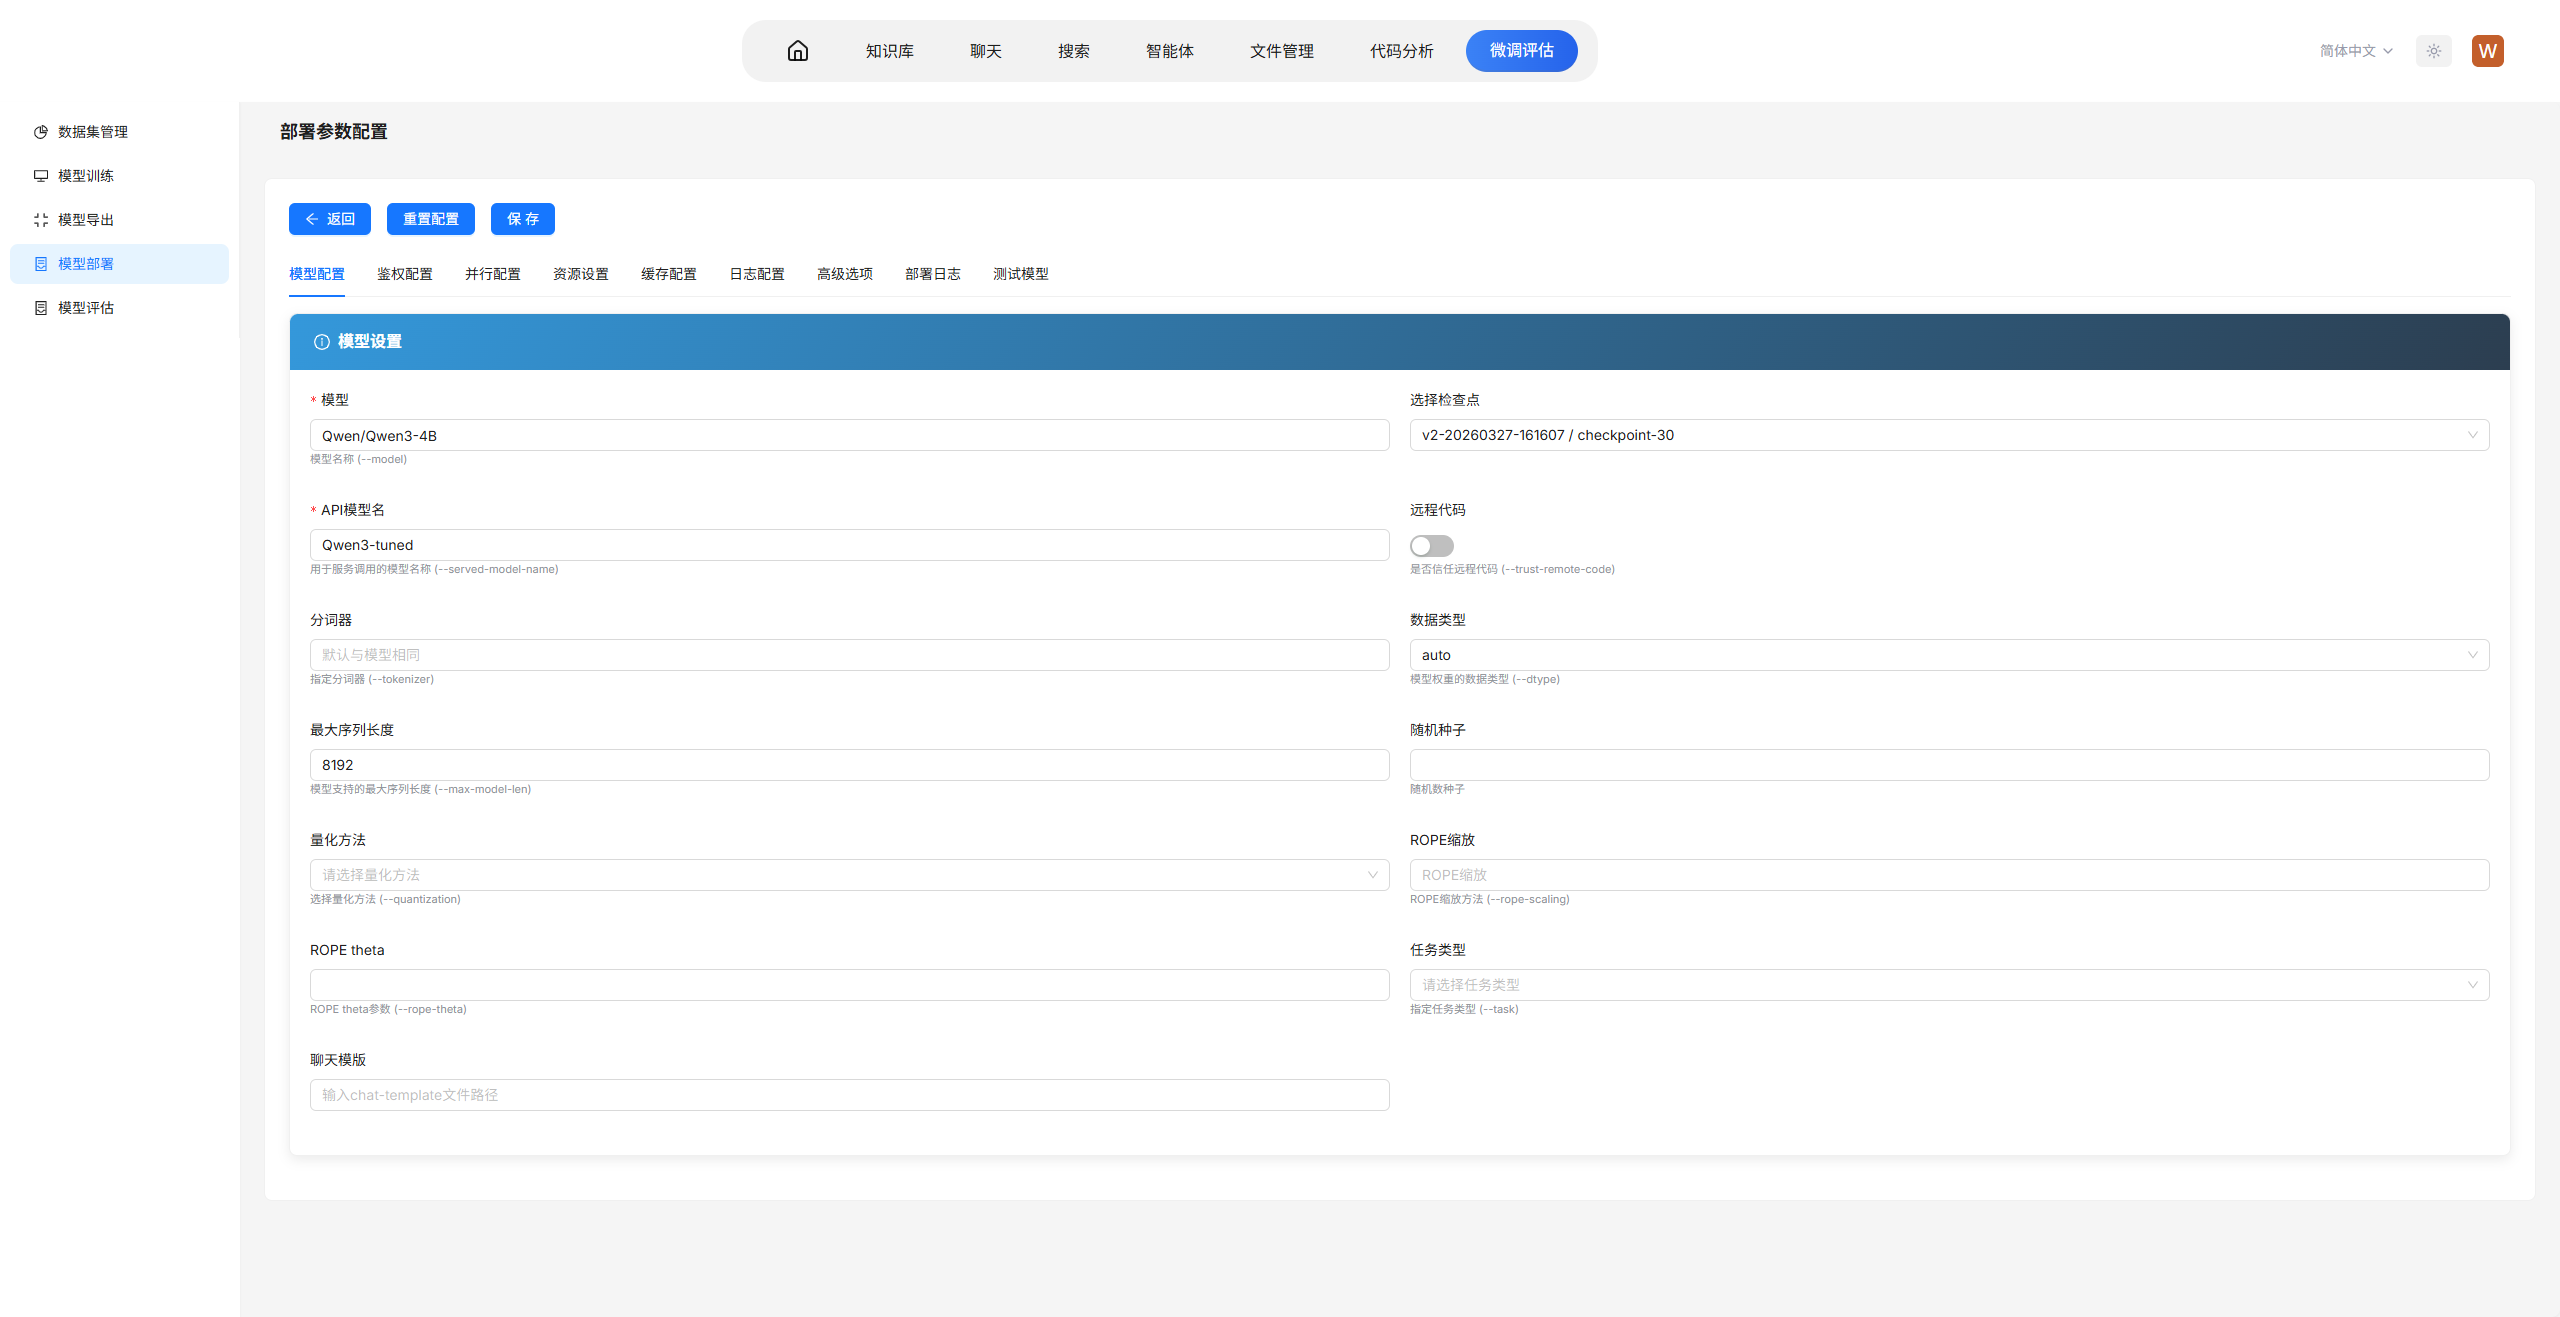
参数说明
--max-model-len 8192:设置模型支持的最大上下文长度,即输入和输出 token 总数上限。此处设置为 8192,充分利用 Qwen3-4B 的上下文窗口能力。该参数决定了模型能够处理的单次请求最大 token 数,设置过小可能导致长文本被截断,设置过大会增加显存占用和推理延迟。在实际部署中,应根据业务场景的平均输入长度和显存容量权衡选择,常见设置为 4096、8192 或 16384。--port 8080:指定服务监听的端口号。此处设置为 8080,是常用的 HTTP 服务端口。在生产环境中,可根据部署架构选择合适的端口,如 8000、8080 或自定义端口;若需对外提供服务,通常需要在防火墙或负载均衡器中开放对应端口。--tensor-parallel-size 2:设置张量并行度,即使用多少张 GPU 共同承载一个模型实例。此处设置为 2,表示将模型切分到 2 张 GPU 上进行并行推理。张量并行适用于单卡显存不足以容纳完整模型的情况,或将模型负载分散到多卡以提升推理吞吐量。对于 Qwen3-4B(约 8GB 显存占用),单张 GPU 即可部署,此处设置为 2 主要用于演示多卡并行能力或预留更多显存以支持更大上下文长度。
在实际部署场景中,本系统还支持以下常用参数:
--dtype half或--dtype bfloat16:指定推理精度,使用半精度可显著降低显存占用并提升推理速度。Qwen3-4B 通常支持 bfloat16,推荐设置以优化性能。--gpu-memory-utilization 0.9:设置 GPU 显存利用率,默认值为 0.9,即使用 90% 的可用显存用于模型加载和 KV Cache。适当提高该值可支持更大的并发请求,但需预留部分显存用于系统开销。--max-num-seqs 256:设置最大并发请求数,即同时处理的序列数量。该参数影响服务吞吐量,设置过大会增加显存压力,设置过小则可能造成请求排队。--swap-space 4:设置 CPU 交换空间大小(GB),当 GPU 显存不足时,可将部分 KV Cache 交换至 CPU 内存,以支持更大的并发或更长的上下文。--served-model-name:设置对外暴露的模型名称,便于客户端通过自定义名称调用。--api-key:设置 API 密钥,为服务添加访问鉴权,防止未授权访问。
注:
模型参数设置:
一.训练时用户通过下拉选择系统内置的模型或者modelscope上开源的模型名称id,可通过下拉选择模型id及对应检测点
二.训练时用户选择本地模型的绝对路径来指定训练的模型,可通过填写训练日志中的最佳绝对路径来指定训练的模型

所有模型的训练版本统一保存在llm-model目录下(与项目llm-source在同一文件夹中)。
待部署完成后,即可与模型进行对话。
✨ 核心功能详解文档对应说明
1. 🚀 一体化训练部署平台
集成数据上传、模型训练(全参数/LoRA)、模型部署,配备可视化配置与实时监控。
- 参数说明: 详见第 5.1.4-5.1.6 节
- 经验参考:
2. 🤖 智能体编排系统
提供人与模型协同交互界面,预置多种功能智能体,支持自定义编排。
- 核心能力: 提示工程、工具调用、知识库集成
- 文档参考: 第 5.1.8-5.1.10 节
- MCP 扩展: 第 2.1.5 节
3. 📊 专项任务微调模型
针对漏洞检测、成因分析、修复建议三大核心任务进行 LoRA 微调优化。
漏洞检测性能对比
在评估数据集 vuln_evaluate_accept 上的表现:
| 模型 | 得分 |
|---|---|
| Qwen2.5-72B-Instruct | 0.2933 |
| Deepseek-V3.2 | 0.3283 |
| Qwen3-max | 0.37 |
| Qwen3-coder-plus | 0.2767 |
| Qwen3-coder-30b-a3b-Instruct | 0.285 |
| XingYun-Vul-72B (本项目) | 0.912 ⭐ |
📖 训练介绍: 第 2.5 节
💻 数据处理脚本:交付移动硬盘 - 软件:\交付 - 软件:框架\llm-source\source\instruction_datasets
💻 模型位置:交付移动硬盘 - 软件:\交付 - 参数\XingYun-Vul-72B
4. 🔍 代码分析功能
用户上传代码文件压缩包后,系统自动分析代码中可能存在的漏洞并生成分析报告。
- 使用指南:第 5.1.2 节
5. 🏷️ 程序标注工具
支持手动标注代码文件中的漏洞,并可导出为漏洞训练数据供模型训练使用。
- 使用指南: 第 5.1.3 节
6. 📦 核心数据集
项目累计构建四大核心数据集,为模型训练提供坚实基础:
| 数据集类型 | 规模 | 说明 |
|---|---|---|
| 自然语言标注数据 | ≥520.7GB | 高质量自然语言标注语料 |
| 无监督代码数据 | ≥2.9TB | 大规模代码语料库 |
| 代码语义标注数据 | ≥800MB | 代码语义理解标注 |
| 漏洞分析样本 | ≥153.1 万条 | 漏洞检测与分析样本 |
数据集位置: 交付移动硬盘 - 数据集
额外数据支持:
| 数据类型 | 规模 | 位置 |
|---|---|---|
| 汇编数据 | 36,000 条 | 交付移动硬盘 - 软件:\补充协议\交付数据 |
| 二进制相关数据 | 1,000 条 | 交付移动硬盘 - 软件:\补充协议\扩充数据 |
📖 处理流程: :第 2.4 节
💾 脚本位置: 各对应数据集文件目录下
7. 🔧 汇编大模型
支持将 C 汇编语言转化为 C 语言代码,并提供 C 代码的自然语言解释。
- 任务名称: XingYun-Decompile(已在系统模型部署中设置)
参考文档:
- 模型位置: 交付移动硬盘 - 软件:\补充协议\反编译模型
8. 💻 VSCode IDE 插件
提供 VSCode 平台原生兼容的 IDE 插件,支持开发者在日常编码过程中无缝调用私有化部署的大模型。
- 核心特性:
- ✅ 对话式交互界面
- ✅ 自然语言提问
- ✅ 实时精准分析与回复
- 使用指南: 第 5.2 节
- 插件位置:
交付移动硬盘 - 软件:\交付 - 软件:框架\IDE 插件
9. 🔌 标准化 API 接口
提供标准 RESTful API 接口,支持开发者在应用程序中集成模型功能。
- 接口文档: 第 5.3 节
文档目录结构
实用文档/
├── 实际操作相关文档/
│   ├── 反编译模型微调实践记录
│   ├── 面向漏洞分析领域的可私有化部署深度学习模型 Web 快速使用手册 V2.0
│   ├── 面向漏洞分析领域的可私有化部署深度学习模型开发运行手册
│   └── 面向漏洞分析领域的可私有化部署深度学习模型新增模块说明
└── README.md
🎯 技术优势
| 优势 | 说明 |
|---|---|
| ✅ 私有化部署 | 保障数据安全,支持本地化部署 |
| ✅ 低门槛 | 可视化界面,无需深厚技术背景 |
| ✅ 高性能 | 漏洞检测准确率显著领先业界模型 |
| ✅ 可扩展 | 支持自定义智能体编排和功能扩展 |
| ✅ 全栈支持 | 从数据准备到模型部署的全流程支持 |
📧 联系我们
最后更新:2026-03-30